Bitbucket Cloud issues in VS Code
Within the Atlassian sidebar, the VS Code extension provides a tree view displaying the Bitbucket pull requests, pipelines, and issues of each repository connected to your current Bitbucket account.
The tree views can be disabled/enabled from Atlassian Settings. You can also configure how often the tree views auto-refresh and the frequency of new pull request notifications. You can also manually refresh the tree views at any time by clicking the refresh icon ![]() on each tree view's title bar.
on each tree view's title bar.
View Bitbucket Cloud issues in VS Code
Select the Atlassian logo on the leftmost sidebar. This opens the Atlassian sidebar which displays any Jira issues and Bitbucket pull requests, pipelines, and issues connected to your current Bitbucket or Jira account. These panels should be displayed by default; if not, click on the title bar of each to open and display any issues, pull requests or pipelines.
Clicking on any issue in the issue tree will bring up the Issue Details screen which can be used to view and edit issues. These functions are covered in the next section: View and Modify Bitbucket Issue details
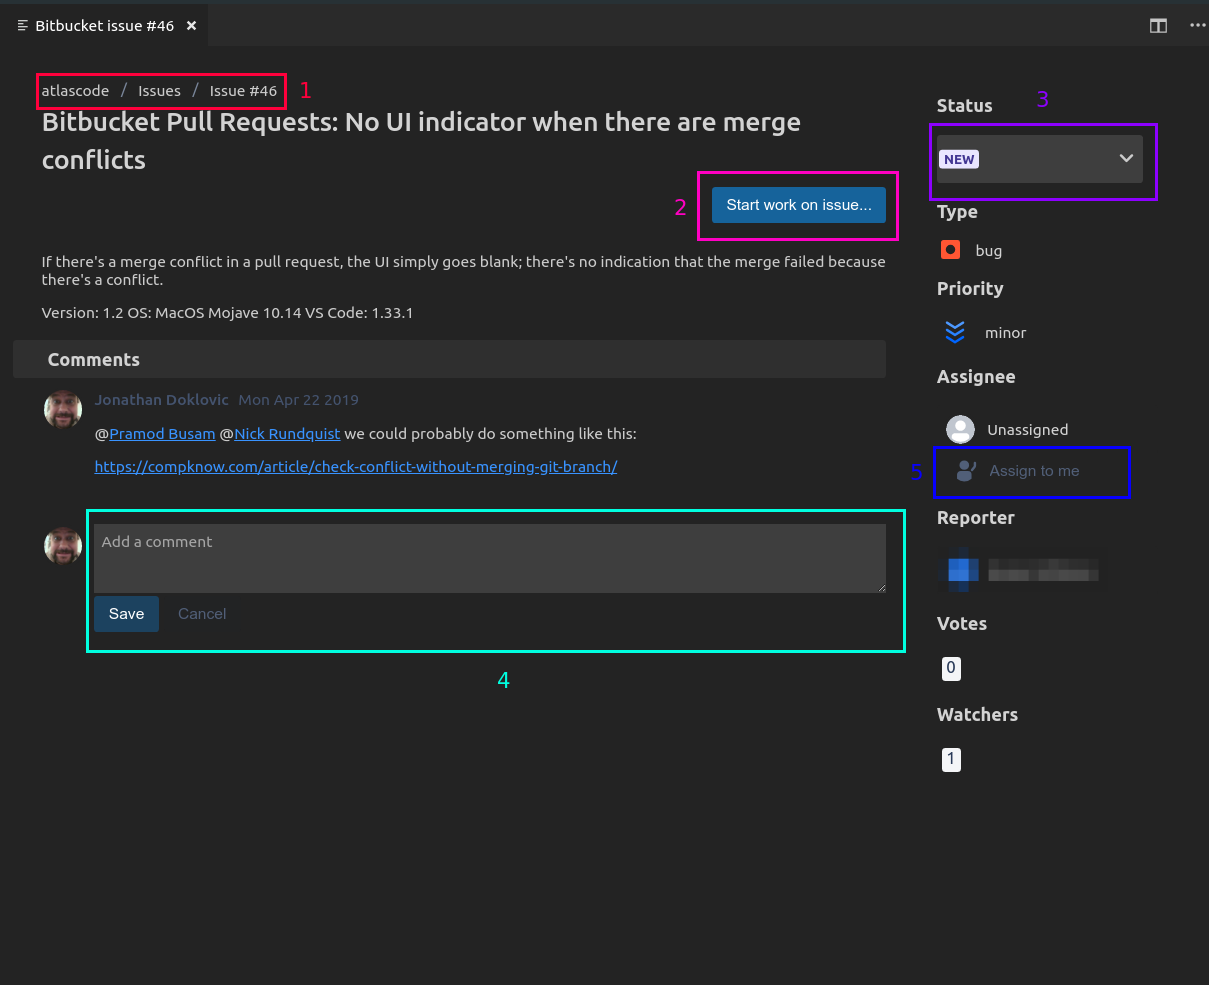
View and modify Bitbucket issue details
To open the issue details screen for a Bitbucket issue, click on the issue in the Bitbucket Issues list.
The issue details screen
The issue details screen provides details about an issue as well as the ability to comment on the issue, change the issue status, assign the issue to yourself, and 'start work on an issue'.
Create Bitbucket Cloud issues from VS Code
- To create a new Bitbucket issue, you can either use the Create Bitbucket Issue option from the command palette or you can use the + button on the Bitbucket Issues tree.
- Fill out the fields as needed and click the Submit button to create the issue.
From the command palette
- Open the command palette by executing the following Atlassian: Open Settings command: Command + Shift + P (on Mac) or Ctrl + Shift + P (on PC) and search for Create Bitbucket issue.
- From the command palette: choose the Atlassian: Create Bitbucket Issue command.
- Fill in or update any fields on the Create issue form.
- Click the Submit button in the lower-right corner.
From the Bitbucket issues tree
- Click on the Atlassian logo on the leftmost navigation bar.
- Click on the BITBUCKET ISSUES heading on the Atlassian status bar.
- Click on the + in the upper-right corner.
- Click on Create Bitbucket Issue.
- Fill in or update any fields on the Create issue form.
- Click the Submit button in the lower-right corner.
Once the issue is created, the Issue Details screen for it will be opened up in VS Code.
Notifications will also appear in VS Code for everyone that has the repository connected to their workspace.
Work with Bitbucket Cloud issues
The Start work on issue feature performs all the steps required in Bitbucket so you can start coding:
Assign the issue to yourself
Create a new branch for the issue, containing the issue key and branch name
Checkout the new branch locally and link it to the remote repository branch
To use the feature:
Open a Bitbucket issue.
Double-click on an issue to open it.
Click on the Start work on issue button.
- Check the Source and Local branches are accurate. You can change them by clicking the drop-down.
- Click Start to assign the issue to yourself and switch to the new local branch.