Getting started with Bitbucket and Jira Cloud
Learn how you can connect the Bitbucket code hosting service with Jira Cloud. Connecting Bitbucket to Jira gives your team the power to see commits, branches, pull requests. You can also create branches and see the status of pull requests all from the development panel in Jira or Jira Agile.

You won't see the builds reference shown in the screenshot above unless you Integrate Jira with Bamboo.
On this page:
Before you begin...
Bitbucket and Jira Cloud are independent services: you will have both a Jira Cloud account and a Bitbucket team each with their own set of users, permissions, and access rules.
Bitbucket teams are not accounts: they must be managed by an administrator (or administrators) who have individual Bitbucket accounts. However, the Bitbucket team can have its own payment plan.
- Every member of the Bitbucket team must have their own individual Bitbucket account. When you invite new team members using their email they are also automatically invited to sign up for Bitbucket and are automatically added to your team when they complete sign up.
You can transfer Bitbucket repository ownership to a team: this can be helpful if you want to create a team based upon existing repositories.
Step 1. Sign up for Bitbucket and create a Bitbucket team
If you don't already have Jira Cloud, set up a trial or a paid instance.
Create a Bitbucket account
If you already have an account, you can skip this section and go to the next. When you create a Bitbucket individual account you must supply the following fields:
Field | About what you are supplying |
|---|---|
| Username | Up to 30 character username. You can use letters, numbers, and underscores in your username. Your username must be unique across the entire Bitbucket site. Bitbucket appends this username to the URL for all the repositories you create. For example, the username |
| Email address | An email address that is unique across the entire Bitbucket site. The system sends you a confirmation email. |
| Password | A combination of up to 128 characters. If you are using a Google account to sign up the system uses that password. You are responsible for ensuring that your account password is sufficiently complex to meet your personal security standards. |
To sign up for a Bitbucket account:
- Open https://bitbucket.org/account/signup/ in your browser.
- Complete the fields in the sign up form.
Click Sign up.
When you are done signing in, Bitbucket places you in the Dashboard of your account. Take a second to look around the user interface. Across the side of each Bitbucket page is a series of options that let you navigate around Bitbucket. On the top bar is a link for Teams. Select Teams > Create team and move to the next section.
Create a team
To better understand how teams work let’s first take a look at how they fit into the Bitbucket environment.
| Teams are comprised of | Which are |
| Users | Who develops the code and manages the team. Each user has an individual Bitbucket account which can be added to (or removed from) any group or team within the Bitbucket universe. |
| Groups | What users can do and where they can go. Groups provide permissions (administrator, read/write, read only) to groups of individual users, and are assigned to repositories for the team. |
| Repositories | Where the code lives. The repository is where you store, access, create, develop, modify, and share the code for a project |
Create a team
The following process and infographic describe how to create a very simple team consisting of you, one member, and one repository. Feel free to follow along in your Bitbucket account, or just read through to get an idea of what goes into creating a team.
Prerequisite: You have an individual Bitbucket account |  |
Create a team |  |
Step 2. Invite team members to your team on Bitbucket
You can add team members to your linked Bitbucket team account. These may be the same users you added to Jira. It is your choice. Users that you add to Bitbucket need not have accounts on the Jira instance.
- Log in to Bitbucket as a user with administrative rights on the team.
- Choose Your avatar > View all teams.
- Choose the team you want to add new members to.
- Choose Settings > User groups.
- Click on the group you want to add the user to.
- Enter the user's username or email address, then click Add:
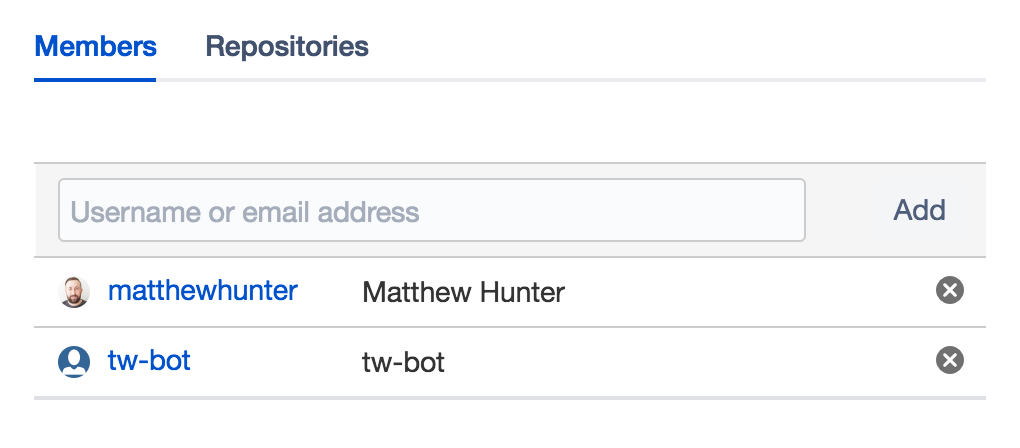
If you entered an email address that corresponds to a Bitbucket account, Bitbucket resolves the account for you. If Bitbucket can't resolve the address, it sends the user an invitation to create a Bitbucket account and join the team.
Step 3. Create repositories in or move repositories to your Bitbucket account
A repository (sometimes called a repo) contains your project code.
If you name a repository with upper case letters, you'll see the name with upper case letters in Bitbucket, but Bitbucket converts the name to all lower case in the repository UR. As a result, you can't create two repositories with names that result in the same URL.
To create a repository
- Click + in the global sidebar and select Repository under Create.
- Select the Workspace where you want to create the repository.
- Select a project from the Project dropdown menu. If a project does not exist, click on Create new project at the bottom of the Project dropdown menu to create a new project in which to work and collaborate with others on your repository.
- Enter a Repository name that will describe your repository and appear in its URL.
- Keep access to your repository set to Private unless you want to make your repository public so that anyone can see it.
- If you already have files that you want to add to your repository, select No from Include a README? Otherwise, go with the default option or select a one of the included README options.
- Select the Version control system. If you don't know the difference, keep Git as the default system.
- Click Create.
After you create a repository
What comes next depends on what you want to do with your repository:
- Starting from scratch with no files? — Clone the repository to your local system to connect Bitbucket repository to a local directory. Learn how
- Working on existing files that aren't under version control? — Add unversioned files to a repository before pushing them to Bitbucket. Learn how
- Already have local files in a Git or Mercurial repository? — Push versioned code to an empty repository, maintaining commit history. Learn how
Take a minute to explore what comes with your new repository.
The Bitbucket service allows you to create an unlimited number of public repositories. The number of private repositories is restricted by your plan.
Tips, Tricks, and Links to More Information
- You can transfer a Bitbucket repository from an individual Bitbucket account to your Jira team account.
- You can import a Git or Mercurial project from your local system into Bitbucket.
- To learn about Bitbucket's few restrictions on repositories, see this page.
- Some users have security and backup concerns about code, see this page for details.
- See the Atlassian blog for information about Centralized vs. Distribute Version Control System (DVCS).
Step 4. Connect the team account in Jira
Make sure you understand how Jira connects to your Bitbucket account
The connector needs permission from your Bitbucket account to access your account data. The connector does this through an OAuth access token.
You create an OAuth access token from the Bitbucket account. You should create the access token on the team that owns the repositories that you want to link. The values that make up the token are:
| key | A string generated by the Bitbucket system. |
| secret | A string generated by the Bitbucket system. |
| authorizing account | The account that authorizes the token. |
After you create a key and secret in Bitbucket, go back to Jira. There, you can enter the account, the OAuth key, and secret data.
Bitbucket does not automatically trust the key and secret it will ask you to authorize the Bitbucket connection.
When you link your Bitbucket account with Jira all the public and private repositories owned by the account. It adds a POST commit hook service to the repository on the Bitbucket system. The POST commit hook is a piece of code that sits on the repository waiting for users to commit changes.
On the Jira Cloud side, the repositories owned by your Bitbucket account appear on the Manage DVCS Accounts page. A team member may create repositories under their individual Bitbucket account, but assign the team as the owner. These repositories also appear in Bitbucket under the list.
Procedure to link an account
It is a two step procedure to link a Bitbucket account to Jira. To work through this procedure, you must have administrative rights on both the Jira Cloud instance and on the Bitbucket account you want to link.
Step 1. Create an OAuth access token for your Bitbucket account
To link a Bitbucket account you create an OAuth access token on your Bitbucket account. If you are linking repositories under a team, you should generate this token under the team account.
Log in to Bitbucket as a user with administrative rights on the account.
- Choose Manage account.
- (Optional) If connecting a team, choose the team from the Account drop-down.
- Select OAuth.
- Click Add consumer.
- Enter
Jira DVCSfor the Name. - Leave the other fields fields blank.
- Press Add consumer.
Keep your browser open to Bitbucket and go onto the next step.
Step 2. Link the account on Jira
To complete the link between your DVCS and Jira:
- Log in to Jira Cloud as a user with administrative rights.
- From the Jira dashboard click the
 (settings) icon.
 - Choose Applications then DVCS accounts (under 'Integrations' in the left-hand panel).
- Click Link a Bitbucket Cloud or GitHubaccount.
- Choose Bitbucket Cloud as your Host value.
Enter a Team or User Account.
For example, if you want to link the account that owns the
https://bitbucket.org/tutorials/markdowndemorepository then you would entertutorialsfor the Team or User Account value. Linking thetutorialsaccount links all of that account's repositories, not only themarkdowndemorepository.- Copy the OAuth Key and OAuth Secret from your Bitbucket account into the dialog.
- Leave the default auto link and smart commits (recommended) as is or change them.

- Click Add.
- Grant access when prompted by the system:

- Upon success, the DVCS accounts page displays with your account.
The account you just connected and all of its repositories appear in the DVCS accounts page. The initial synchronization starts automatically. After that, the system continues to sync your repository automatically on a regular basis.
Automatic synchronization and temporarily disabling a link
After you link an account, Jira automatically starts looking for commits that reference existing issue keys. The summary shows the synchronization results and errors, if any. A synchronization of commit data from the DVCS repository to Jira can take some time. As the synchronization progresses, the commits appear in related issues. You can always enable and disable the linking of repositories with Jira as needed.
How the link appears in Bitbucket
The DVCS Connector does two things:
- It adds an OAuth consumer to the linked account's list of integrated applications. To view the listing in Bitbucket, click your profile image and select Manage Account. Click Integrated applications and you'll see a listing similar to the following:

- The DVCS Connector programmatically adds a POST commit hook service to each of the account's repositories. To view this service, choose Settings, then click Hooks to display the Hooks page. You'll see a listing similar to the following:
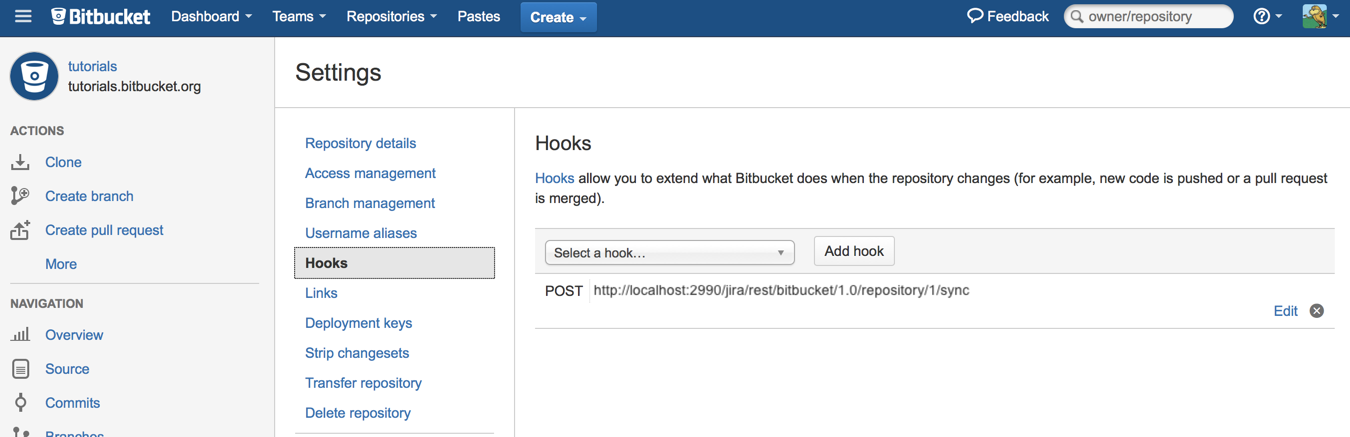
The DVCS Connector uses its link to check for new repositories on the account, then adds this service to those as well. You see the result of all this on the Services page.
What to do next
What you do after getting started depends on your team's own knowledge and needs:
- If your team is unfamiliar with code hosting using Bitbucket or brand new to DVCS, you should work through the Bitbucket 101.
- If your team is comfortable with DVCS and Bitbucket, you might want to learn to Link to a web service in Bitbucket which will give you even more interaction between Jira and Bitbucket.
- The DVCS Connector lets you update and move Jira issues through a workflow, see processing Jira issues with smart commit messages for commands and examples of how to do this.