Securing Bamboo behind nginx using SSL
This page describes how to establish a network topology in which the Nginx server acts as a reverse proxy for Bamboo. Typically, such a configuration would be used when Bamboo is installed in a protected zone 'behind the firewall', and Nginx provides a gateway through which users outside the firewall can access Bamboo.
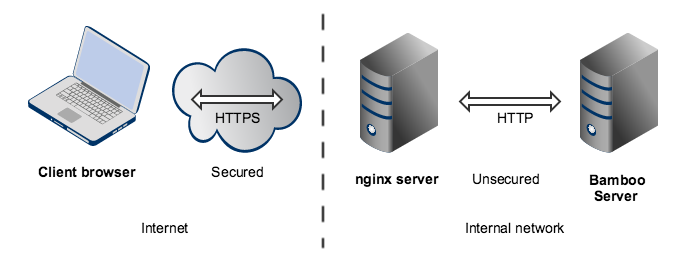
The configuration described on this page results in a scenario where:
- External client connections with Nginx are secured using SSL. Connections between Nginx and Bamboo are unsecured.
- Bamboo and Nginx run on the same machine.
- Bamboo is available at
http://mycompany.com:8085/bamboo.
Please note that:
- We assume that you already have a running instance of Nginx. If not, refer to the Nginx documentation for instructions on downloading and installing Nginx.
- SSL certificates must be installed on the server machine.
- Be aware that Bamboo does not need to run behind a web server since it is capable of serving web requests directly; to secure Bamboo when run in this way see
Any existing links with other applications may need to be reconfigured using the new URL for Bamboo in case of the URL changes.
Securing Bamboo with Tomcat using SSL. Otherwise, if you want to install Bamboo in an environment that incorporates nginx, this document is for you. (You can of course run Bamboo behind nginx without securing client connections to nginx using SSL – we don't describe this option on this page.)
Note that the Atlassian Support Offering does not cover nginx integration. Assistance with nginx may be obtained through the Atlassian community from answers.atlassian.com or from an Atlassian Expert.
Step 1: Configure the Tomcat Connector
Find the normal (non-SSL) Connector directive in Tomcat's
<Bamboo install directory>/conf/server.xml file, and add the scheme, proxyName, proxyPort and secure attributes as shown below. Instead of mycompany.com, set the proxyName attribute to your domain name that the nginx server will be configured to serve. This informs Bamboo of the domain name and port of the requests that reach it via nginx, and is important for the correct operation of the Bamboo functions that construct URLs.
<Connector port="8085"
     protocol="HTTP/1.1"
     connectionTimeout="20000"
     useBodyEncodingForURI="true"
     redirectPort="443"
     compression="on"
     compressableMimeType="text/html,text/xml,text/plain,text/css,application/json,application/javascript,application/x-javascript"
     secure="true"
     scheme="https"
     proxyName="mycompany.com"
     proxyPort="443" />
For more information about configuring the Tomcat Connector, refer to the Apache Tomcat 7.0 HTTP Connector Reference.
Step 2: Set a context path for Bamboo
By default, Bamboo is configured to run with an empty context path; in other words, from the 'root' of the server's name space. In that default configuration, Bamboo would be accessed at:
http://mycompany.com:8085/
For the example configuration on this page, we want Bamboo to be accessed at:
https://mycompany.com:8085/bamboo
In Tomcat's
<Bamboo install directory>/conf/server.xml file, set the context path to /Bamboo:
<Context path="/bamboo" docBase="${catalina.home}/atlassian-bamboo" reloadable="false" useHttpOnly="true">
    ....
</Context>
If you use a context path, it is important that the same path is:
- appended to the context path of Bamboo's base URL (Step 3).
- used when setting up the location for the p
roxy_passdirective (Step 4).
See Changing Bamboo's root context path for more details.
Step 3: Change Bamboo's base URL
After re-starting Bamboo, open a browser window and log into Bamboo using an administrator account. Go to the Bamboo administration area and click Overview. Then click General Configuration (under 'System'), in the left navigation panel and change Base URL to match the proxy URL (the URL that the nginx server will be serving). Click save once you are finished.
For this example, use
http://mycompany.com:8085/bamboo
(Note the context path included with this.)
See Specifying Bamboo's URL for more information. Please note the above changes will require a restart of Bamboo.
Step 4: Configure nginx
Edit
/etc/nginx/nginx.conf
, using the example server configuration below, to configure nginx as a proxy server.
Put the proxy_pass directive in the location block, and specify the protocol, name and port of the proxied server in the parameter (in our case, it is http://localhost:8085):
server {
	listen          443 ssl;
    server_name     mycompany.com;

    ssl_certificate      	<path/to/your/certificate>;
    ssl_certificate_key  	<path/to/your/certificate/key>;
    ssl_session_timeout  	5m;
    ssl_protocols  			TLSv1.2;
    ssl_ciphers  			HIGH:!aNULL:!MD5;
    ssl_prefer_server_ciphers   on;

	# Optional optimisation - please refer to http://nginx.org/en/docs/http/configuring_https_servers.html
	# ssl_session_cache   shared:SSL:10m;
    location /bamboo {
        proxy_pass 			http://localhost:8085/bamboo;
		proxy_set_header 	X-Forwarded-Host $host;
        proxy_set_header 	X-Forwarded-Server $host;
		proxy_set_header    X-Forwarded-For $proxy_add_x_forwarded_for;
		proxy_set_header    X-Real-IP $remote_addr;
		proxy_redirect 		off;
    }
}
Refer to http://nginx.org/en/docs/http/ngx_http_proxy_module.html.
Changes made in the configuration file will not be applied until the command to reload configuration is sent to nginx or it is restarted. To reload the configuration, execute:
nginx -s reloadThis command should be executed under the same user that started nginx.
Resources
You may find the following resources helpful in setting up Bamboo behind nginx:
- http://nginx.org/en/docs/http/configuring_https_servers.html
- http://www.cyberciti.biz/tips/using-nginx-as-reverse-proxy.html
- https://mywushublog.com/2012/08/atlassian-tools-and-nginx/