How to create Slack channels automatically using A4J or REST API
Platform Notice: Data Center Only - This article only applies to Atlassian products on the Data Center platform.
Note that this KB was created for the Data Center version of the product. Data Center KBs for non-Data-Center-specific features may also work for Server versions of the product, however they have not been tested. Support for Server* products ended on February 15th 2024. If you are running a Server product, you can visit the Atlassian Server end of support announcement to review your migration options.
*Except Fisheye and Crucible
Summary
Jira DataCenter for Slack has the feature to create dedicated channels for issues manually. However, to create those channels automatically we need an external call that can be done either from the terminal/script or Automation for Jira.
Solution
After installing Jira DataCenter for Slack, a series of private REST APIS are enabled in Jira, which can be used to retrieve the integration information as well as modify and create channels, the endpoints we will use here are:
GET slack/1.0/connection: return the workspace information
GET/POST slack/1.0/channels: retrieve the workspace channels information or create a new channel
POST slack/dedicatedchannel: set the channel dedicated to an issue, hence all updates in the issue will be posted in the channel.
With that, we can build a solution to automatically create dedicated channels using the REST API endpoints in a script or through Automation for Jira.
To proceed with this solution, the Jira DataCenter for Slack needs to be installed and already configured in the instance and project. For more details, please follow the app documentation.
REST API
If calling the REST API endpoints directly in a script, follow the steps:
Get the workspace information. The teamId will be used later.
1
2
3
4
5
6
7
8
9
10
11
12
curl -k -u dalves:dalves -X GET https://localhost:8443/rest/slack/1.0/connection | python3 -mjson.tool { "workspaces": [ { "teamName": "death start", "teamId": "T05UUAQ1WRY", "appConfigurationUrl": "https://api.slack.com/apps/custom-install/A05UWQ78UF6?edit=true", "botUserId": "U05V70ADHND", "botUserName": "jira_server" } ] }Create the channel using as parameters the channelName (using any value you want) and the teamId (from step 1). The channelId will be used later.
1
2
3
4
5
6
7
8
curl -k -u dalves:dalves -X POST "https://localhost:8443/slack/channels?channelName=issue-kbb-5xx&teamId=T05UUAQ1WRY" | python3 -mjson.tool { "teamId": "T05UUAQ1WRY", "teamName": "death start", "channelId": "C06BKN0DAC9", "channelName": "issue-kbb-5xx", "isPrivate": false }Setup the dedicated channel using the issueKey (the issue you need the channel), channelId (from step 2), and the teamId (from step 1).
1curl -k -u dalves:dalves -X POST --data '{"issueKey":"KBB-12","channelId":"C06BKN0DAC9","teamId":"T05UUAQ1WRY"}' https://localhost:8443/slack/dedicatedchannel
Automation for Jira
The Automation for Jira rule will follow the same logic.
Get the connection information through the same REST API or using the browser (Project Settings > Slack integration and click on the Slack Workspace
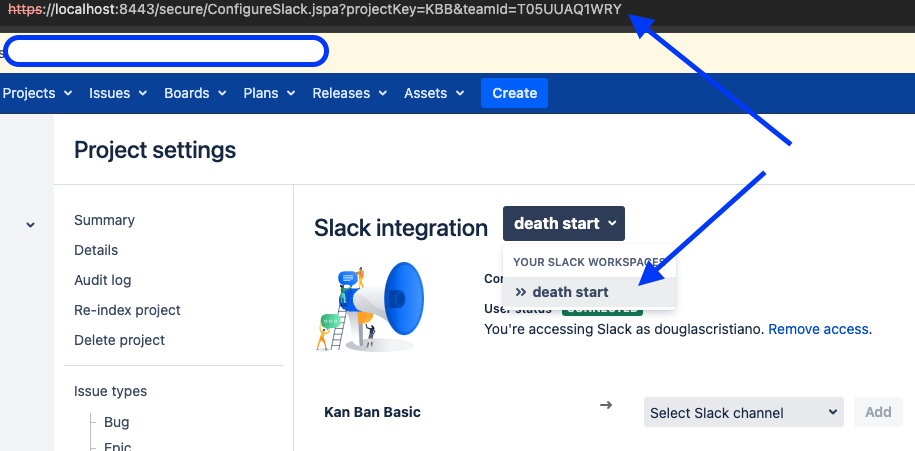
With the teamId noted, create a rule to first create the channel with the rule action "Send Web Request".
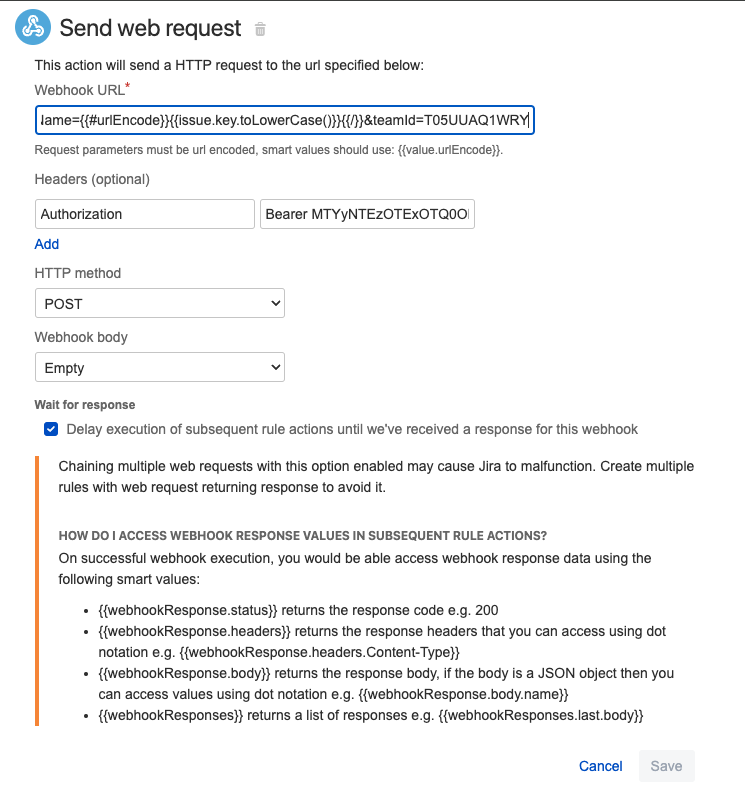
The URL shall be: <jira-url>/slack/channels?channelName={{#urlEncode}}{{issue.key.toLowerCase()}}{{/}}&teamId=T05UUAQ1WRY
Important: the smart value {{issue.key}} needs to be encoded and parsed as lower case, otherwise the rule will fail.
Use the authorization you are used to, in the example I used PAT.
HTTP method: POST
Click to Delay execution. This is essential as the automation needs to retrieve the channelId
Example from UI:
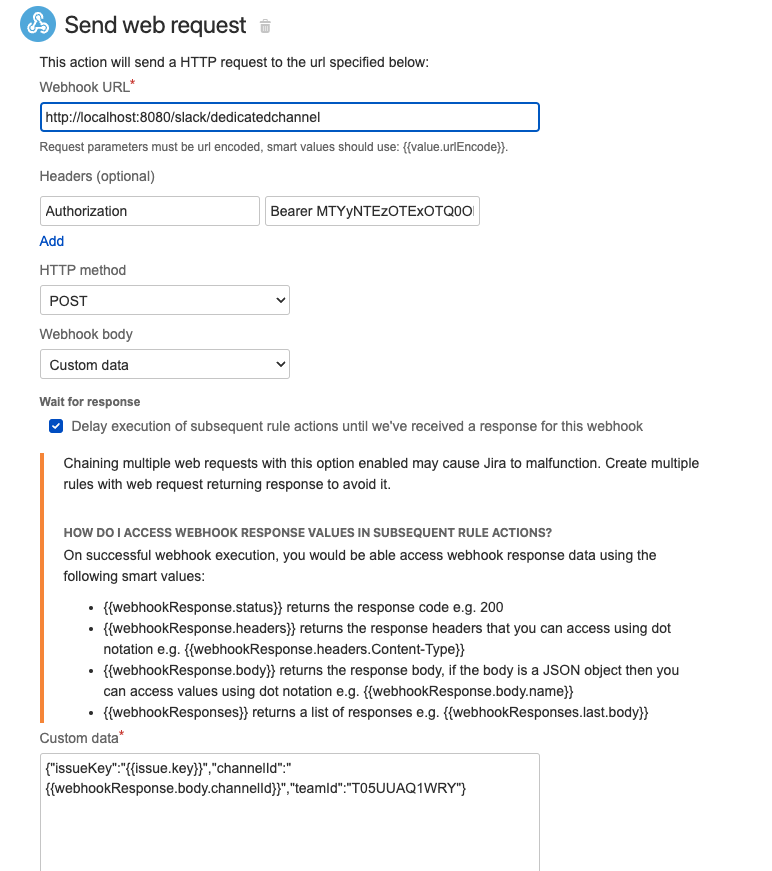
The second step will dedicate the channel using the channelId and teamId. Create the second rule action "Send Web Request" with the data below.
The URL shall be <jira-url>/slack/dedicatedchannel
Use the authorization you are used to, in the example I used PAT.
HTTP method: POST
Webhook body: Custom data with content (note you need to add the teamId with the information collected on step 1)
1{"issueKey":"{{issue.key}}","channelId":"{{webhookResponse.body.channelId}}","teamId":"T05UUAQ1WRY"}Example from UI:
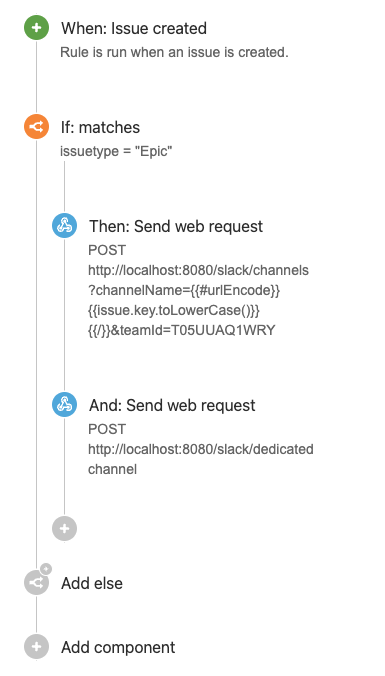
As an example, I created one automation rule to automatically create dedicated channels for all created Epics:
Was this helpful?