HipChat Server or Data Center data Transfer and Backup
If you used the Migration Utility tool to migrate data from your Hipchat Server instance to your Hipchat Data Center instance, you can also use this tool in a few other scenarios:
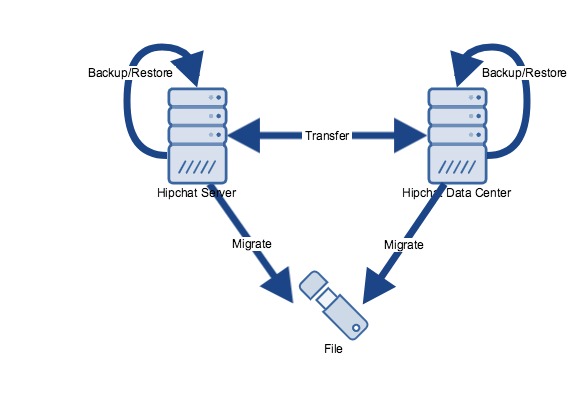
- to transfer data from Hipchat Server to Hipchat Data Center
- to transfer data from Hipchat Data Center to Hipchat Server (also called a 'Downgrade')
- to backup Hipchat Server and restore another Hipchat Server
- to backup Hipchat Data Center and restore another Hipchat Data Center
- to export data from Hipchat Server for migration
- to export data from Hipchat Data Center for migration
Overview
Transferring data from Hipchat Server to Hipchat Data Center
Export data from your Server instance, then import it to your Data Center instance.
Follow the steps in How to migrate from Hipchat Server to Hipchat Data Center.
Transferring data from Hipchat Data Center to Hipchat Server
Export data from your Data Center instance, then import it to your Server instance.
- Follow the 'export' steps in Exporting from Hipchat Server or Data Center for Data Portability.
- Read How to import data into Hipchat Server below.
Backing up Hipchat Server and restoring another Hipchat Server
Export data from your Server instance, then import it to your Server instance.
- Follow the 'export' steps in How to migrate from Hipchat Server to Hipchat Data Center.
- Read How to import data into Hipchat Server below.
Backing up Hipchat Data Center and restoring another Hipchat Data Center
Export data from your Data Center instance, then import it to your Data Center instance.
- Follow the 'export' steps in Exporting from Hipchat Server or Data Center for Data Portability.
- Follow the 'import' steps in How to migrate from Hipchat Server to Hipchat Data Center.
Exporting data from Hipchat Server for migration
Export data from your Server instance and ensure that your data is in the right format.
- Follow the 'import' steps in How to migrate from Hipchat Server to Hipchat Data Center.
- Read Exporting from Hipchat Server or Data Center for Data Portability to learn how to format your data.
Exporting Data from Hipchat Data Center for migration
Export data from your Data Center instance and ensure that your data is in the right format.
Follow the steps in Exporting from Hipchat Server or Data Center for Data Portability.
Importing data into Hipchat Server
You can import data from Hipchat Server version 2.2.3 or later. Imports are not supported in older versions.
- (optional) If you have an older version of Hipchat Server, you need to upgrade it to version 2.2.3 or later.
Connect to the Hipchat Server command-line interface using a terminal or SSH:
ssh -i /path/to/sshkey.pem admin@<hcserver.example.com>Escalate your user permissions to root:
sudo dont-blame-hipchatSwitch to the directory containing the migration utility:
cd /home/admin/Update the permissions for the migration utility, then verify the checksum and the version:
chmod +x /home/admin/hc-migrate
sha512sum hc-migrate
/home/admin/hc-migrate -version
  Hipchat Migration Utility version 3.1.4 (2018-02-01)
Retrieve the password to the source Hipchat Server MariaDB database:
cat /hipchat/config/site.json | jq -r .databases.hipchat.passClear the Redis cache.
This will remove all key:value pairs from the specified Redis environment, regardless of whether or not they are associated with Hipchat. Server has two redis services on board.redis-cli flushdb redis-cli -p 6380 flushdbCopy, edit, and run the example command below to start the import process.
Running the import with the--forcecleanflag deletes all existing user accounts in the database (including the owner account created in the setup wizard) and cleans Elasticsearch./home/admin/hc-migrate --hcs --import "exportFileLocation.tar.gz.aes" --aes_password "passwordToExportFile" \ --db_password "dataBasePassword" \ --forceclean --verbose |& tee <desiredLogFile>Example command
/home/admin/hc-migrate --hcs --import "hcs_export_05-12-2017.tar.gz.aes" --aes_password "asdf9324lkJasdf" \
--db_password "th1$1$@S3cr3t" \
--forceclean --verbose |& tee <desiredLogFile>
Result
DEBUG 2017/11/15 02:41:19 Counted 3 messages in muc-2017.11
DEBUG 2017/11/15 02:41:19 == Extracting and processing rooms/714/history.json
DEBUG 2017/11/15 02:41:19 Counted 3 messages in muc-2017.11
DEBUG 2017/11/15 02:41:19 == Extracting and processing rooms/715/history.json
DEBUG 2017/11/15 02:41:19 Counted 3 messages in muc-2017.11
DEBUG 2017/11/15 02:41:19 total message count 16688
DEBUG 2017/11/15 02:41:19 Done processing the source
DEBUG 2017/11/16 21:38:27  ======== *** Import completed successfully! *** ========
Restart Hipchat Server:
hup- (optional) Request a password reset for each user that will be logging in to Hipchat Server using the internal authentication system at https://example.server.com/forgot_password. If your deployment uses an external user directory like LDAP or SAML, you don't need to perform this step.
- Finish your Hipchat Server setup and start chatting.