Upgrading Jira Data Center from 7.x to 8.13
You'll be upgrading your Jira Data Center manually by using the tar.gz/zip archive.
Already on 8.x? Go to our regular upgrade guide.
Skip to
Before you begin
Step 1: Stop the cluster
Stop Jira on all nodes in the cluster. We also recommend that you configure your load balancer to redirect the traffic away from Jira until the upgrade is complete on all nodes.
Upgrade Jira on the first node
To avoid upgrading each of the nodes separately, you’ll just upgrade one of them, and make it a template. Then, you’ll copy this template to remaining nodes. You can choose any node here.
Step 1. Download Jira
Download one of the Jira applications from our website. Choose the Windows or Linux binary.
If you're upgrading both Jira Software and Jira Service Desk, upgrade Jira Software only. You'll later upgrade Service Desk directly in Jira, without a separate installer.
Step 2. Extract the files
Extract the archive you've downloaded, and start the upgrade.
- Extract (unzip) the files to a directory (this is your new installation directory, and must be different to your existing installation directory).
Point Jira to your existing Jira home directory.
We recommend that you do it by setting the JIRA_HOME environment variable. For more info on how to do this, see Setting Jira home directory.
Step 3. Install the database driver
If you're using an Oracle or MySQL database, download a new JDBC driver. For other databases, you can omit this step. For more info on supported drivers, see Supported platforms.
If the driver is up to date, you can also copy it from your previous version.
- Download one of the following drivers:
- Oracle: JDBC driver 19.3 (ojdbc8)
- MySQL: MySQL Connector/J 5.1 driver.
- Place it in
<installation-directory>/lib.
Step 4: Re-apply any custom changes and increase pool-max-size
While using Jira, you’ve probably added some custom modifications to Jira files. These may include connection details, settings related to memory allocation, or other JVM arguments. Usually, these are the files that contain custom changes:
server.xmlUpgrading from Jira 7.6?
You need to add some extra config properties to your new server.xml file. See this article for more info. Make sure you do not copy the entire old file to the new one in your upgraded Jira.
dbconfig.xmlsetenv.shjira-config.properties- for more, see Important files in Jira.
If you've made changes to the following files:
- <jira-home-directory>/atlassian-jira/ directory
- <jira-home-directory>/conf/server.xml
- <jira-home-directory>/bin/setenv.sh
then we'll automatically copy the changes over during upgrade. However, if the changes have been made to other files, you need to re-apply your custom changes to your respective new Jira files by copying them from your backups.
Tomcat started to use double-quotes as of version 8.5.48 as a result of Expansion of JAVA_OPTS in catalina.sh containing '*' stops startup on linux bug. That's why when you upgrade and set parameters in setenv.sh or setenv.bat, make sure that you:
- Don't remove the double-quotes in the catalina.sh
- Set all your parameters in one line without any new line in setenv.sh or setenv.bat
Otherwise you might experience issues starting up Jira.
Pool-max-size
If you're upgrading from Jira 7.x to Jira 8.x we recommend changing the pool-max-size parameter to 40 in your dbconfig.xml before the upgrade. Leaving the default of 20 can sometimes lead to “ResultSet Closed” errors during re-indexing on 8.x. For information on implementing the change, see Tuning database connections.
Step 5. Disable automatic reindex
Because of the changes to indexes that we've introduced in Jira 8.0, the index from any earlier Jira version will be incompatible after the upgrade. To create a new index, Jira will trigger an automatic reindex right after you start it. To avoid reindexing twice (after startup and after upgrading your apps), you can disable the automatic reindex, and run the second one later, whenever you’re ready.
Edit or create the following file:
<jira-home-directory>/jira-config.propertiesAdd the following line, and save the file:
upgrade.reindex.allowed=false
Post-upgrade steps on the first node
Complete these post-upgrade steps only on the first node (the one you've just upgraded). The remaining nodes will later download the upgraded apps and index from the shared directory.
Step 1. Start Jira
Start your new Jira version, and connect it to the database.
- Go to
<installation-directory>/bin, and run one of the following files:- Windows:
start-jira.bat - Linux:
start-jira.sh
- Windows:
- Open Jira in your browser.
- Follow instructions on the screen to complete the setup.
Post-upgrade landing page
After a successful upgrade, you should see the post-upgrade landing page. It has some useful information about the new version, as shown below.
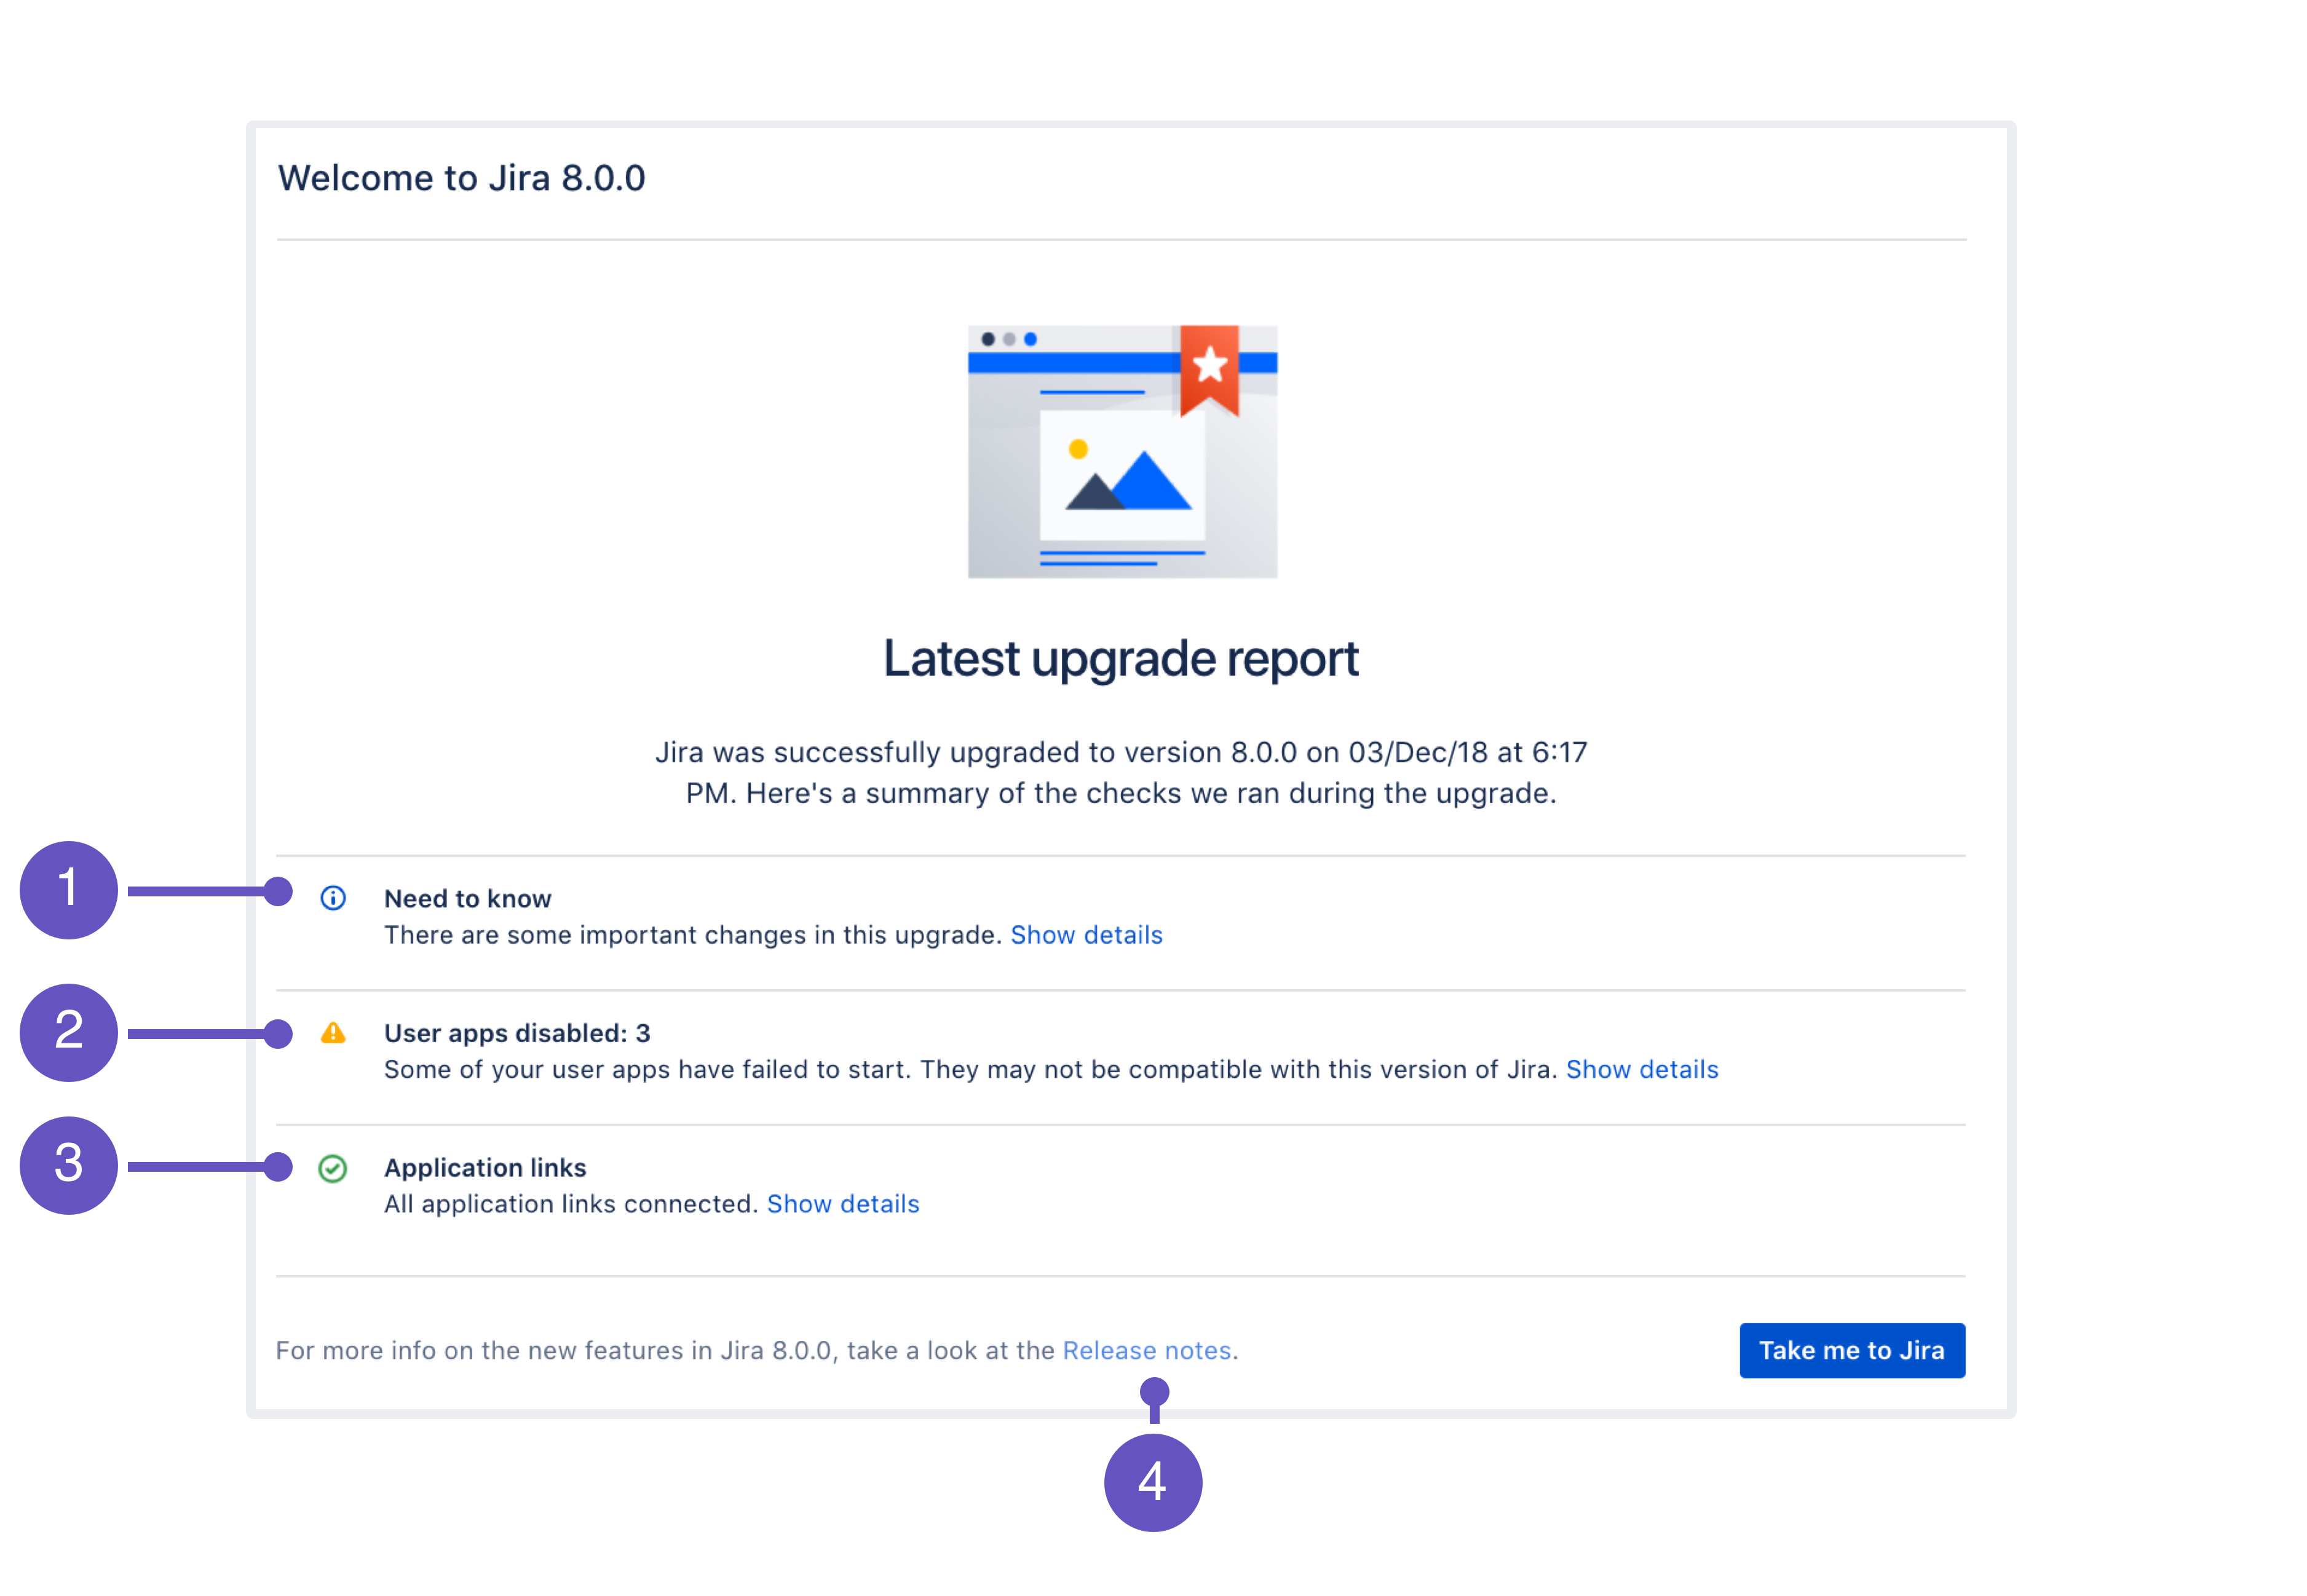
- Need to know: A list of new features that might affect your work as an admin.
- User apps: Status of your apps after the upgrade.
- Application links: Status of your application links.
- Release notes: Link to release notes where you can see more detailed information about the version you've upgraded to.
Step 2. (Optional) Update Jira Service Desk
If you're using Jira Service Desk, you can update it directly in the UI, without downloading a separate installer.
- Go to
 > Applications > Versions and licenses.
 - Update Jira Service Desk. This will automatically update Service Desk to a compatible version.
Step 3. Upgrade / Install compatible apps (add-ons)
Now, it's the time to work with your apps. If you've decided to disable the apps or if you successfully upgraded your Compatible once both are updated apps in your test environment, this is the time to do it in production.
- Go to
 > Manage apps > Manage apps.
 - Upgrade your apps to the supported versions.
- Once the apps are upgraded, you can enable the apps.
If you need more information about the statuses and apps in general, see Preparing for the upgrade.
If you have removed all apps, now you can install the compatible versions of the apps.
Step 4. Rebuild index
Reindex Jira to recreate your index. This step might take some time, depending on how many issues and apps you have.
Go to ![]() > Indexing, and run Full re-index.
> Indexing, and run Full re-index.
Step 5. Copy the upgraded Jira as a template
In this step, you'll copy the new installation directory with all the modifications you did so far. This will give you a template that you'll later copy to other nodes.
Copy the new installation directory to some other location. This will be your template.
Upgrade remaining nodes
By now, you should have the ready Jira template, and upgraded add-ons and index data available in the shared directory. In this step, you'll copy the template to other nodes and start them one by one.
- Copy the template installation directory to the new node.
- If the path to the local home directory is different on this node, update it in the
setenv.bat/setenv.shfile. - Start Jira on this node.
- Rinse & repeat: Repeat these steps on the next node.
Joining the cluster
You can check if the upgraded nodes are joining the cluster by going to ![]() > System > System info, and scrolling down to the Cluster nodes section.
> System > System info, and scrolling down to the Cluster nodes section.