How to replace a long hardcoded IF-ELSE structure with compact/smart approach in Automation
Platform Notice: Cloud - This article applies to Atlassian products on the cloud platform.
Summary
This automation rule addresses the problem when you have to compare a long list of known options using a hardcoded IF-ELSE structure. It also helps to overcome the bottleneck of more than 65 components in automation rules in case your automation rule has grown immensely long which likely to hit the threshold number of components limit.
Environment
Cloud/Server
Solution
Business Case
Let's consider a business scenario where there are large number of product categories and depending on the product category. You need to set different approvers, assign it to a different user or set other fields values. One approach would be to build a long list of if – else structure, but with this approach, you can quickly hit the threshold of number of components in an automation rule. The following approach could save you from this end. It will also make the rule easy to manage or maintain.
Step-1: Build a lookup table of known values.
You can build the basic structure of the look up table in the text editor by making first line and copying it as many times the number of rows are required. Then you can fill up the values between the delimmetres. This one time effort will save you time in future along with many other benefits like better/easy manageability and faster execution time.
- Export users/agents and customers/approvers to manually build a look up table.
- Compile a list of values to be used in the condition.
- Most likely you will be working on a large set of values so I would suggest using an advanced text editor like sublime text that allows multiline cursors to edit vertical selection of lines.
- Your look up table will have all pieces of information required, separated by a delimetre of your choice. It will look like something shown below.
<c1>condition-value-1<c1><c2>60eeec5b62738c00681ca075<c2><c3>qm:be51b48a-97d1-462f-bfc5-abcd2db88046:01dac639-5a2a-4caa-b1ff-304a80a571ea<c3>
<c1>condition-value-2<c1><c2>557058:4a51dc15-094e-4bdc-ba22-88e874f1cf47<c2><c3>qm:be51b48a-97d1-462f-bfc5-abcd2db88046:701428ae-512a-401<c3>
<c1>condition-value-3<c1><c2>557058:febb5479-9025-48a7-ac00-1e6f2c53d979<c2><c3>qm:be51b48a-97d1-462f-bfc5-abcd2db88046:fb754f38-f7f3-40f<c3>
<c1>condition-value-4<c1><c2>63d334e24a3c3294ac052904<c2><c3>qm:be51b48a-97d1-462f-bfc5-abcd2db88046:53a609f0-ec36-4e10-badc-c3bfa507adbc<c3>
<c1>condition-value-4<c1><c2>63d334e24a3c3294ac052904<c2><c3>qm:be51b48a-97d1-462f-bfc5-abcd2db88046:852b2e83-17e7-45b5-adcc-76d99ce79148<c3>
<c1>condition-value-4<c1><c2>63d334e24a3c3294ac052904<c2><c3>qm:be51b48a-97d1-462f-bfc5-abcd2db88046:7a3a0968-114a-4059-a118-713dc7a8243d<c3>
<c1> = condition-value. It could be any feel value to base the condition on.
<c2> = Assignee Atlassian account ID.
<c3> = Approver account ID
Note: in the last three lines of the look up table, <c1> <c2> are same but <c3> is changing. This will cater for the scenario where multiple approvers are to be set.
In this look up table, the delimetres <c1> <c2> <c3> having no significance in the names as they are just used to represent column number one, column number two and column number three of the look up table. You can use any other delimemtre of your choice, but just make sure you use the same delimeter later in the automation rule to parse look up table.
A Real life Example.
Let's say you have a business rule to set the approvers for the request based on the value/cost and the category of the requested item. Let's add to our assumption that on the request form user selects the product category and the product itself. Based on this choice, in the background, a request form is automatically filled in and attached to the request. If there are hundred such combinations of the product/category. Each combination will result in a different form to be attached. For this particular example, the form name will be filled in between <c1>form-name<c1> and <c2>, <c3> will have the account IDs for the approver(s) and assignee for this kind of request.
- Create a single select custom field.
- Next, you need to insert this whole look up table into the select custom field. Use either postman or build a small automation which send web request action to call this REST endpoint.
- Before you can execute the REST command, you need to format the look up table entry in the required format which can be done easily using sublime text, editor.
{"disabled": false, "value": "<c1>condition-value-1<c1><c2>60eeec5b62738c00681ca075<c2><c3>qm:be51b48a-97d1-462f-bfc5-abcd2db88046:01dac639-5a2a-4caa-b1ff-304a80a571ea<c3>"},
{"disabled": false, "value": "<c1>condition-value-2<c1><c2>557058:4a51dc15-094e-4bdc-ba22-88e874f1cf47<c2><c3>qm:be51b48a-97d1-462f-bfc5-abcd2db88046:701428ae-512a-401<c3>"},
{"disabled": false, "value": "<c1>condition-value-3<c1><c2>557058:febb5479-9025-48a7-ac00-1e6f2c53d979<c2><c3>qm:be51b48a-97d1-462f-bfc5-abcd2db88046:fb754f38-f7f3-40f<c3>"},
{"disabled": false, "value": "<c1>condition-value-4<c1><c2>63d334e24a3c3294ac052904<c2><c3>qm:be51b48a-97d1-462f-bfc5-abcd2db88046:53a609f0-ec36-4e10-badc-c3bfa507adbc<c3>"},
{"disabled": false, "value": "<c1>condition-value-4<c1><c2>63d334e24a3c3294ac052904<c2><c3>qm:be51b48a-97d1-462f-bfc5-abcd2db88046:852b2e83-17e7-45b5-adcc-76d99ce79148<c3>"},
{"disabled": false, "value": "<c1>condition-value-4<c1><c2>63d334e24a3c3294ac052904<c2><c3>qm:be51b48a-97d1-462f-bfc5-abcd2db88046:7a3a0968-114a-4059-a118-713dc7a8243d<c3>"}
Step-2: Build Automation Rule
- A suitable trigger for this kind of rule would be Issue created. Just a word of caution, you might need to add Re-fetch Issue Data as the first action in the rule to ensure that all the issue field values are available to the automation rule.
- Use Send Web Request action to this REST endpoint to GET the options list from the single select lookup field.
- Follow the instructions on this document to generate the basic authentication credentials for REST API.
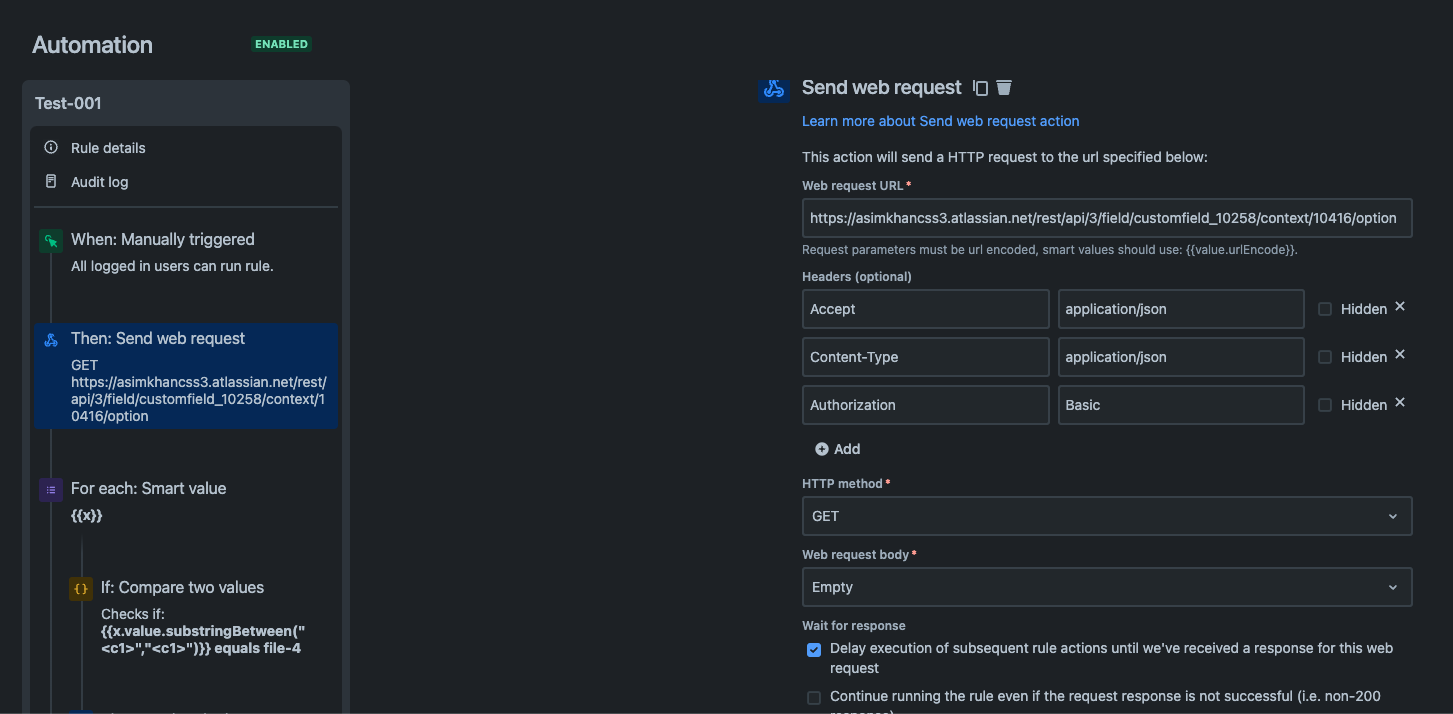
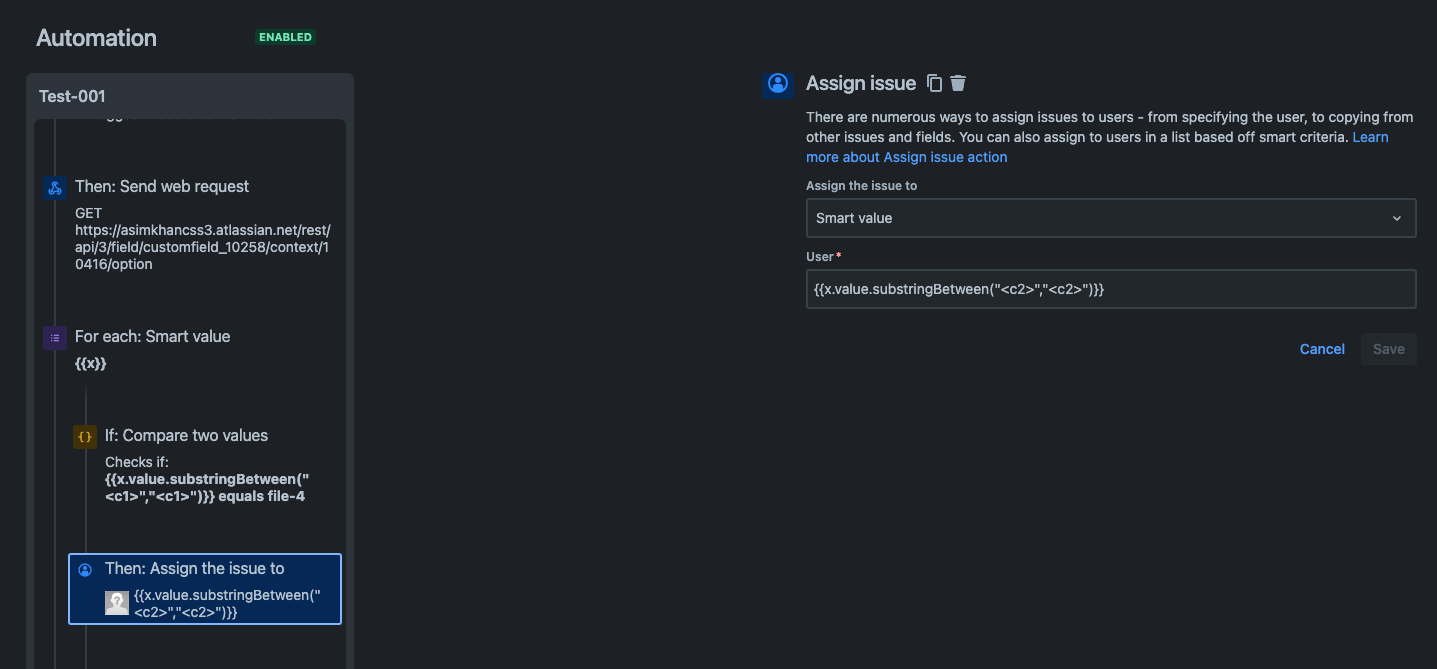
- Use the automation, advanced smart branching to iterate through the JSON response object.

- Use advanced. Compare condition to match desired field value with <c1>.

- Extract the account ID from <c2> to assign the issue to.
* Extract the account ID of the approver to add to the Approvers field.

{
"update": {
   "Approvers": [{"add": {"id":"{{value.substringBetween("<c3>","<c3>")}}"}}]
   }
}
