How to configure Jira Software Data Center for SAML 2.0 SSO with Okta
Platform Notice: Data Center Only - This article only applies to Atlassian products on the Data Center platform.
Note that this KB was created for the Data Center version of the product. Data Center KBs for non-Data-Center-specific features may also work for Server versions of the product, however they have not been tested. Support for Server* products ended on February 15th 2024. If you are running a Server product, you can visit the Atlassian Server end of support announcement to review your migration options.
*Except Fisheye and Crucible
Purpose
Jira Data Center is bundled with the SSO for Atlassian Server and Data Center App – we will refer to it simply as Atlassian SSO App in the remainder of this document.
With this App, Jira administrators can configure SSO using SAML 2.0 or OIDC with your preferred Identity Provider (IdP). Check SAML single sign-on for Atlassian Data Center applications for further details on supported IdPs and more information on the SSO App.
This document highlights the steps to integrate Jira Software Data Center with Okta for SSO using SAML 2.0.
Although it uses Jira Software as a reference, the concept is the same for Jira Service Management – therefore, we will refer to Jira in the remainder of the document.
It might also be used as a reference to integrate Jira Data Center with other IdP solutions.
This document is not intended as a complete reference guide since you may need to change Okta or Jira configuration to your Company needs. Hence, this describes a sample configuration to have it working.
For any Okta-related issue or question, refer to Okta Help Center.
Atlassian products interface with a variety of technologies. Front-end solutions like Web Servers (e.g., Apache HTTP Server), load balancers, single sign-on solutions (SSO), SSL certificates, and LDAP repositories add functionality that is often critical to the functioning of our products.
Atlassian will endeavor to provide documentation for integration with these 3rd party applications but does not provide support for 3rd party applications. We are unable to provide support when a failure in a 3rd party application occurs.
More information can be found in Atlassian Support Offerings.
Solution
Below is a summary of the Steps we will cover in this document:
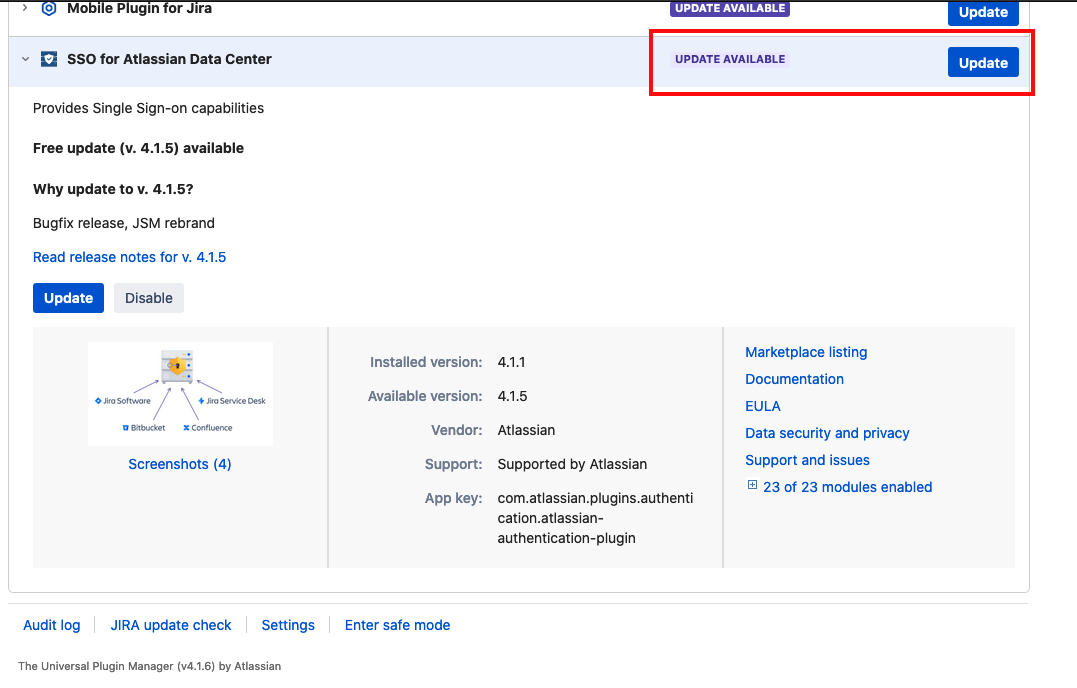
Install or Update the Atlassian SSO App
SSO capabilities are provided in Jira Data Center as a Marketplace App. Although you may have this App bundled with Jira, it's best practice to update it to the latest version supported by your Jira release, ensuring you are protected from security bugs and is also running with the latest improvements.
Refer to the Atlassian SSO App version history for further details on supported Jira versions and release notes.
In this example, we use Jira Software 8.20.6 and Atlassian SSO App 4.2.1. The latest application version available when this document was written is 4.2.11.
Updating apps explains the options to update an App with Universal Plugin Manager (UPM). If UPM is connected to the internet, it will advise you there's an update available and give you the option to update.
Create an Application in Okta
You will need to create a new application in Okta to make it available to users, as Atlassian doesn't provide an Okta Application.
- As an Okta administrator, go to Applications and click Create App Integration.

- On the Create a New Application Integration screen, choose the following and click on SAML 2.0

- Add the information below on the Create SAML Integration page's General Settings and click on Next.
App name: could be any name you would like to be presented to your users; we are using My Company Jira in this example.
Application logo: the logo you would like to be presented to your users; if you want to use any Atlassian logo, please refer to the Atlassian Design System site.

- Add the information below on the Configure SAML screen and click on Next.
- Single sign-on URL:
Add any URL but later, after configuring your Jira, edit to the Jira (will be similar to https://<jira>:8443/plugins/servlet/samlconsumer) - Audience URI (SP Entity ID):
Add any URL but later, when configuring your Jira, edit to the Jira (will be similar to https://<jira>:8443) - Name ID format:
EmailAddress; considering users would authenticate to Jira using their email address.- This must match the username attribute in Jira's user directory, so you may need to change depending on the desired/used configuration.
- Application username:
Email; considering users would authenticate to Jira using their email address. If using a different method, change accordingly.- This must match the username attribute in Jira's user directory, so you may need to change depending on the desired/used configuration.

- This must match the username attribute in Jira's user directory, so you may need to change depending on the desired/used configuration.
- Single sign-on URL:
- On the Feedback screen, choose the options associated with your company and click on Finish.
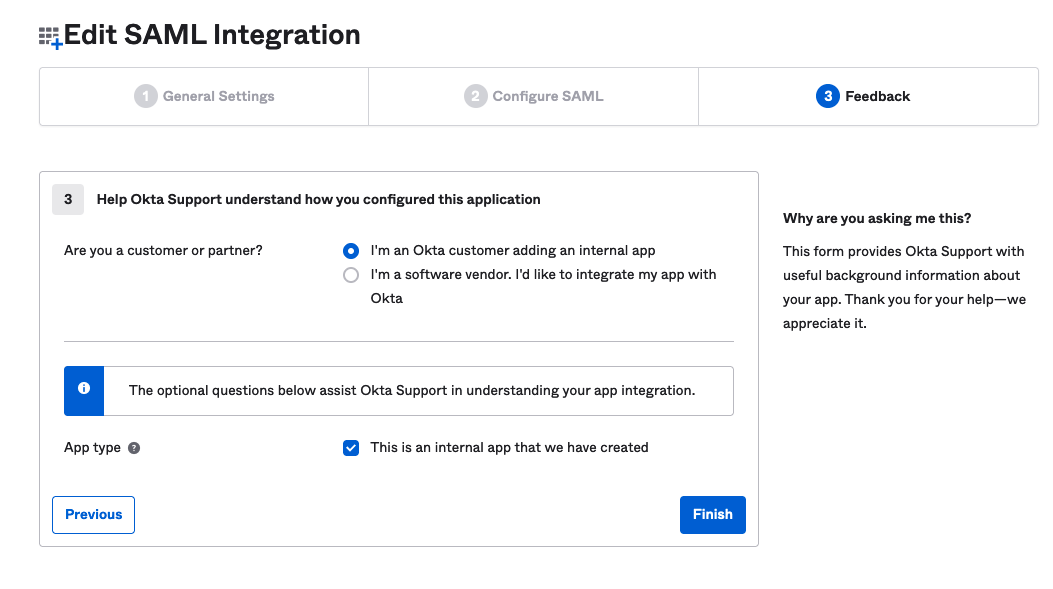
- The application is now created in Okta, and you are sent to the Sign On tab.
- Under the Application Sign-On Settings, click on the View Setup Instructions to open a new window with the information used in the next section.

Now that the Okta integration App is created, keep the How to Configure SAML 2.0 for My Company Jira Application window open and go to the next section to configure SAML SSO on Jira.
We will get back to the Okta administration to finish configuring the App later.

Configure SAML 2.0 on Jira
To configure SAML 2.0 on Jira using the Atlassian SSO App, you need to have Jira running with HTTPS. Refer to Running Jira applications over SSL or HTTPS if this isn't configured yet.
- Login to Jira as an administrator and go to Cog icon > System.
- Click on Authentication methods
- For SSO for Atlassian Server and Data Center App version lower than 4.2, click on SSO 2.0 under the Security section.
- Give the integration a name.
- Choose SAML single sign-on to configure the SAML SSO 2.0 settings on the Authentication method.
- On the Single sign-on issuer attribute, use the value from Identity Provider Issuer from Okta's configuration from the previous section.
- On the Identity provider single sign-on URL attribute, use the value from Identity Provider Single Sign-On URL from Okta's configuration from the previous section.
- On the X.509 Certificate attribute, use the value from X.509 Certificate from Okta's configuration from the previous section.
- On the Username mapping attribute, use
${NameID}.- This value is used based on the configuration made on Okta in the previous step. You may need to change it depending on your configuration.
- Review your configuration to be similar to the sample image below.

- Click on Save configuration and then on Save on the confirmation popup.
Everything is configured on Jira now.
Complete the Okta Application Configuration
Back to the Okta administration page, we still need to complete the configuration based on the information collected from Jira in the previous section.
- On Okta, go to the Jira application and click on the integration created.

- On General Setting, click on Edit on SAML Settings

- Make the changes below on the SAML Settings screen and click on Next.
Single sign-on URL: use the value of the Assertion Consumer Service URL collected from Jira in the previous section.
Audience URI (SP Entity ID): use the value of Audience URL (Entity ID) collected from Jira in the previous section.

- On the Feedback screen, click on Finish without changing anything.
Test the SSO Integration
At this point, Jira is configured for SSO with Okta for authentication. User provisioning is still performed in the regular way you have configured, either from the Internal User Directory or an external LDAP.
Therefore, we consider that users and groups are created in Okta to test this integration. For example, a user "oktauser" was added in Okta and Jira:
- Okta

- Jira

If used, associate the target group in Okta with the Jira application so that Okta can grant users access to it.
- Go to Directory > Groups on Okta administration and click on the target group.
- On the group administration page, click on Applications.
- Click on the Assign applications button next to the Jira application and then click on Done.

By doing this all users add to the specific group will have integration access to Jira.
To test the integration, go to Cog icon > System > Authentication methods > Test sign-in from the created integration

If everything is correctly configured, you will be redirected to Okta login, and you can test with a valid user as the SAML authentication flow.
Additional notes and configuration
Automatic redirect of unauthenticated users to the IdP
Before applying the workaround from this section, make sure the Load Balancer / Reverse Proxy health check is properly configured to send a GET /status.
If the health check is targeting only GET /, then nodes will be reported as unhealthy by the Load Balancer after applying the feature flag.
Refer to Load balancer configuration options for further details on configuring the health check.
When a user accesses the Jira Base URL, the browser is redirected to the system dashboard, which is a public dashboard by default, and the user won't be redirected to the IdP (Okta) to authenticate.
Also, the login form gadget isn't presented (since SAML is configured as the primary authentication method), and the user would be required to click on the Log In icon on the top bar.

There's a feature request to disable any public page in Jira –
JRASERVER-65521
-
Getting issue details...
STATUS
While this feature isn't resolved, the suggested workaround makes the system dashboard private, automatically redirecting unauthenticated users to the IdP.
- Login as an administrator and go to: <Jira Base URL>/secure/SiteDarkFeatures!default.jspa
- In the Enable Dark Feature text field add
public.access.disabled
Even with the above workaround, there will be other pages on which the redirect doesn't occur automatically, such as when accessing the URL for a private dashboard.
This is treated as a feature in JRASERVER-66554 - Getting issue details... STATUS and there's no workaround for it.
Secure administrator session (websudo)
Jira has secure administrator session enabled by default, meaning that they are required to re-authenticate when accessing an administration page as below.
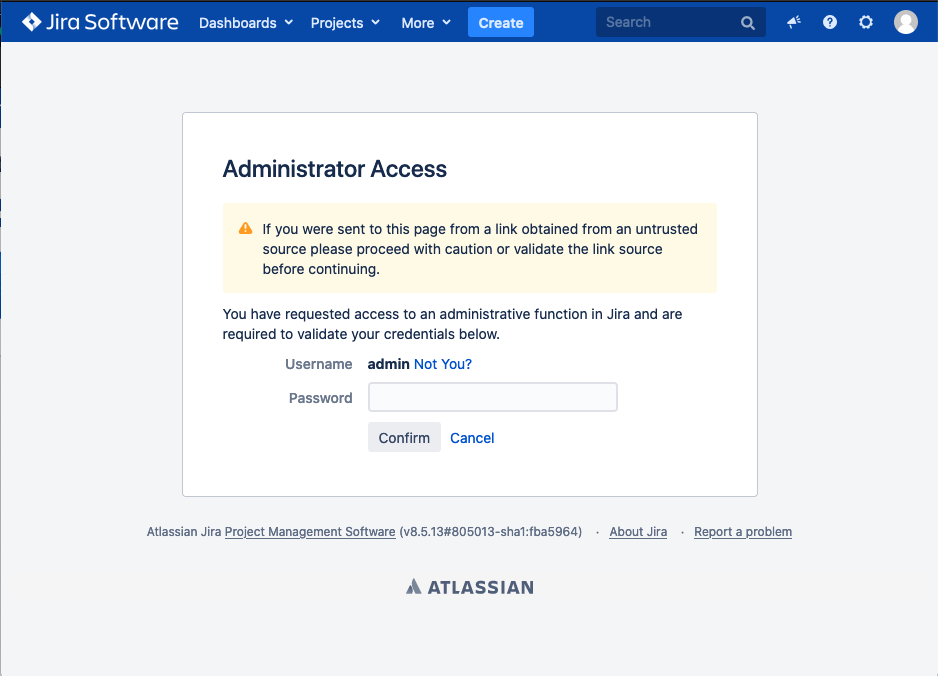
This authentication challenge isn't sent to the IdP; therefore, it will use the configured user directories.
There's a feature request to change it to use the IdP –
JRASERVER-69311
-
Getting issue details...
STATUS
.
While this isn't fixed, you may choose to disable it as described in Configuring secure administrator sessions.
Still having problems?
Contact Atlassian Support. We'll be happy to advise you. Please include as much detail as possible, where applicable:
- Logs from the affected application (if applicable)
- Screenshots of the error message (if they're not covered in logs)
- Information about the steps you've taken previously