This page describes how to add a new application link. The process for adding an application link is different depending on whether the application you are linking to supports Unified Application Links (i.e. has UAL installed). If you are linking to a non-UAL application, you will need to do additional configuration in the non-UAL application. This is because UAL in your UAL-enable application will not be able to access your non-UAL application to automatically configure authentication for you.
Please read the appropriate set of instructions below:
Adding an Application Link to an Application That Supports UAL
Before you begin:
To link to an application that supports UAL:
- Log in as an administrator and navigate to the administration page. Click 'Application Links' in the administration menu. The 'Configure Application Links' page will be displayed, listing all of the application links that have currently been set up for your application.
- Click 'Add Application Link'. The 'Link to another server' dialogue will be displayed.
- Enter the server URL of the application that you want to link to, in the 'Server URL' field. Click the 'Next' button. The 'Link to Reference Application' dialogue will be displayed.
- Fill out the fields, as follows:
- Tick the 'Create a link back to this server' checkbox, if you want to create a "two-way" link (i.e. also create a link from the remote server back to your application). If you want to do this, you will need to enter the 'Username' and 'Password'of an administrator for the remote server (if you are not logged into the remote server already):
 Please note, these credentials are only used to authenticate you to the remote server, so that UAL can make the changes required for the new link. The credentials are not saved.
- 'Accessible URL of this application for the reciprocal link' — This is the URL that is used for features like link rendering. You may have used a server URL that is not accessible to other users in the previous 'Link to another server' dialogue, e.g. an internal IP address. If so, you can change the accessible URL to an address in a domain that is available to other users.
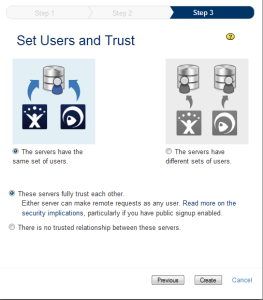
- Click the 'Next' button. The 'Set Users and Trust' dialogue will be displayed.
- Fill out the fields to configure authentication for your application link, as follows:
For more information about configuring authentication, see Configuring Authentication for an Application Link.
- Select either 'The servers have the same set of users' or 'The servers have different sets of users' depending on how you manage users between the two applications.
- Tick the 'These servers fully trust each other', if you know that the code in both applications will behave itself at all times and are sure each application will maintain the security of its private key.
- Click the 'Create' button to create the application link. The 'Configure Application Links' page will be displayed, listing all of the application links that have currently been set up for your application including the one you just added.
Screenshots above: Adding an application link to an application that supports UAL (click to view full-sized images)
Adding an Application Link to an Application That Does Not Support UAL
Before you begin:
To link to an application that does not support UAL:
- Log in as an administrator and navigate to the administration page. Click 'Application Links' in the administration menu. The 'Configure Application Links' page will be displayed, listing all of the application links that have currently been set up for your application.
- Click 'Add Application Link'. Step 1 of the 'Link to another server' dialogue will be displayed.
- Enter the server URL of the application that you want to link to, in the 'Server URL' field. Click the 'Next' button. Step 2 of the 'Link to another server' dialogue will be displayed.
- Fill out the fields, as follows:
- 'Application Name' — Enter the name by which this remote application will be referred to, in your application.
- 'Application Type' — Select the type of application that you are linking to: Bamboo, FishEye/Crucible, JIRA, Confluence, Subversion.
- 'Application URL' — This is the URL that is used for features like link rendering. This will be set to the server URL you entered in the previous step and will not be editable.
- Click the 'Create' button to create the application link. The 'Configure Application Links' page will be displayed, listing all of the application links that have currently been set up for your application including the one you just added.
- Configure the desired authentication (trusted apps, OAuth, basic http, none) for your new application link using UAL. See Configuring Authentication for an Application Link.
- In your application that does not support UAL, configure the same type of authentication that you configured for your application link's outgoing authentication (in the previous step). For example, if you configured outgoing trusted apps authentication in your UAL-enabled application, you also need log into your non-UAL application and manually configure trusted apps (see the relevant administrator's documentation for the application).

|

|
|
Step 1
|
Step 2
|
Screenshots above: Adding an application link to an application that supports UAL (click to view full-sized images)
Notes


 Except where otherwise noted, content in this space is licensed under a Creative Commons Attribution 2.5 Australia License.