How to make Epic Link required on Jira Software issue create screen
Platform notice: Server and Data Center only. This article only applies to Atlassian products on the Server and Data Center platforms.
Support for Server* products ended on February 15th 2024. If you are running a Server product, you can visit the Atlassian Server end of support announcement to review your migration options.
*Except Fisheye and Crucible
The solution described in this KB article requires the Field Required Validator, which is a function that is not available in Jira out-of-the-box.
This validator is only available by installing a paid third-party add-on, including but not limited to:
Such solution falls outside of Atlassian Support scope. If you face any issue while using the validator coming from any of these add-ons, we recommend reaching out to the respective add-on support team.
Purpose
This guide helps to configure the Epic Link as a required field on the Create Issue screen in Jira, without having to unlock the custom field and tamper with default configuration for the field.
Please keep it mind that, as mentioned in the warning panel, this solution cannot be implemented using Jira out-of-the-box, and that installing a paid 3rd party add-on is required.
Solution
This alternative way to make the Epic Link field required when creating an issue in Jira requires modifying the relevant project/issue type workflow, and configuring a 'fields required' validator to the Create Issue transition, coming from a 3rd party add-on.
Here are the steps to implement the solution:
- Log into Jira as a Jira Administrator
- Take a look at the workflow scheme associated to the Jira Software project for which you need to make the Epic Link required at issue creation, so that we can identify the workflow that we will need to copy and edit:
- Go to the page ⚙ > Issues > Workflow Schemes

- Search for the Jira Software project, and check the mapping between workflows and issue type. In any newly Jira Software project that is created, there should be only 1 workflow, which is associated to any issue type. Take note of this workflow. In the example from the screenshot below, we can see that all issue types are associated to the workflow "Software Simplified Workflow for Project SCRUM4".

- Go to the page ⚙ > Issues > Workflow Schemes
 To ensure that the solution we will implement does not prevent your Jira users from creating new Epics and new Sub-Tasks (the Epic Link field cannot be set for issues with the Epic or the Sub-task Type), we need to make sure that the Epic and Sub-Task issue types are associated to their own workflow that we will keep untouched. To do that:
- Go to the page ⚙ > Issues > Workflows
- Scroll down to the workflow that you identified earlier, click on the Copy button next to it and make sure to use add a descriptive name and description for this workflow, to make it clear that this workflow will be only used by the Epic Issue type


- Once the workflow was copied, go back to the page ⚙ > Issues > Workflow Schemes, scroll down again to the workflow scheme used by the Software project, and this time click on the Edit button:

- Click on Add Workflow > Add Existing

- Look for the workflow that was copied earlier and which was dedicated to the Epic Issue Type, and click on Next

- Assign this workflow to the Epic type and click on Finish

- After that, verify that the Epic type has now its own dedicated workflow (that we will leave untouched), while all the other issue types are associated to the same workflow (that we will edit in the steps below). Once you verified that the workflow to issue type mapping looks correct, click on Publish to make these changes live:

- Repeat the exact same steps with the Sub-Task issue type. Alternatively, you can associate the same workflow used by the Epic issue type with the Sub-Task issue type.
- It is now time to edit the workflow associated to all the issue types (except the Epic type), to make the Epic Link field required:
- Go back to the page ⚙ > Issues > Workflows, and click on the Edit button next to the workflow which is associated to all the issue types except the Epic type:

- Switch to the Diagram mode, click on the Create transition, and then click on the Validators link:

- Click on the Add Validator button, and from the list of Validators that shows up, select the 'Fields Required' validator, and then choose the Epic Link field as the required field.
- Please note that, depending on the 3rd party add-on that you installed, the name of the validator and the way to configure it will differ:
- If you are using JSU Automation Suite for Jira Workflows, you can use Fields Required (JSU)
- If you are using Jira Misc Workflow Extensions (JMWE), you can use Fields Required Validator (JMWE app)
- If you are using ScriptRunner for Jira, you can use Field(s) required validator [ScriptRunner]

Save and publish your workflow
- Go back to the page ⚙ > Issues > Workflows, and click on the Edit button next to the workflow which is associated to all the issue types except the Epic type:
- Once this solution is implemented, you will see that:
- Next time you try to create a new issue in the Software project (other than an Epic type), the Epic Link field will be required:

- Next time you try to create an Epic in that same project, the Epic Link field will not be required, which is the expected behavior since Epic Links cannot be added to Epics:
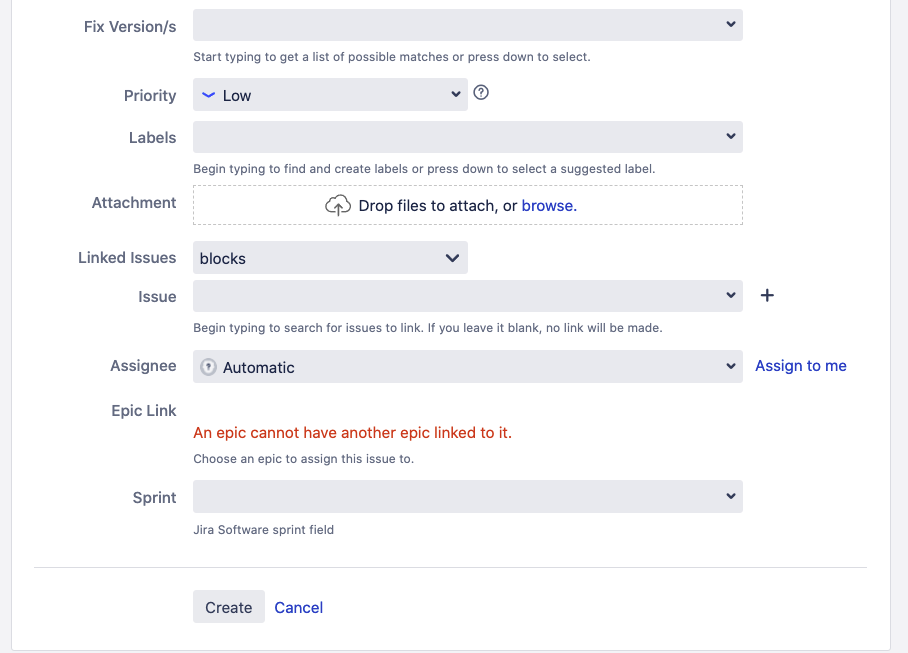
- Next time you try to create a new issue in the Software project (other than an Epic type), the Epic Link field will be required:
Notes
One limitation of this method is that the Epic Link field might not necessarily be highlighted as a required field (usually with a small red asterisk) on the screen like other required fields, as this behavior will depend on the validator provided by the 3rd party add-on used for this solution. However a clear message stating that the Epic Link is required will be shown if the customer tries to create the issue without requiring it.
This would impact all issue types that share the same workflow, including Sub-tasks and Epics. As explained in the Step 3 you need copy the workflow and assign the Sub-task and Epic issue types to the copied workflow, so the changes in the original workflow would not impact Sub-tasks and Epics.
This would only affect Create Issue screen, so technically a user may be able to clear the Epic Link value from the Edit or other screens. You can control this by restricting the Edit Issues permission, and restricting what screens the Epic Link appears in.
- This solution requires third party plugins such as, but is not limited to: