Jira automation
Introduction
There are three scenarios people typically want to use ProForm and Automation for Jira together:
Copy ProForma forms between Issues or Requests
Trigger an Automation rule based on a change to a field or form.
Access the contents of a ProForma form.
Additionally, you can combine Automation with forms to perform advanced functions such as:
Dumping data from multiple ProForma fields into one Jira field
Linking form fields to Jira cascading fields
Linking a form field to the Jira Labels field
Linking a form field to the Due Date field
Calculating fields
Copy Forms between Issues or Requests
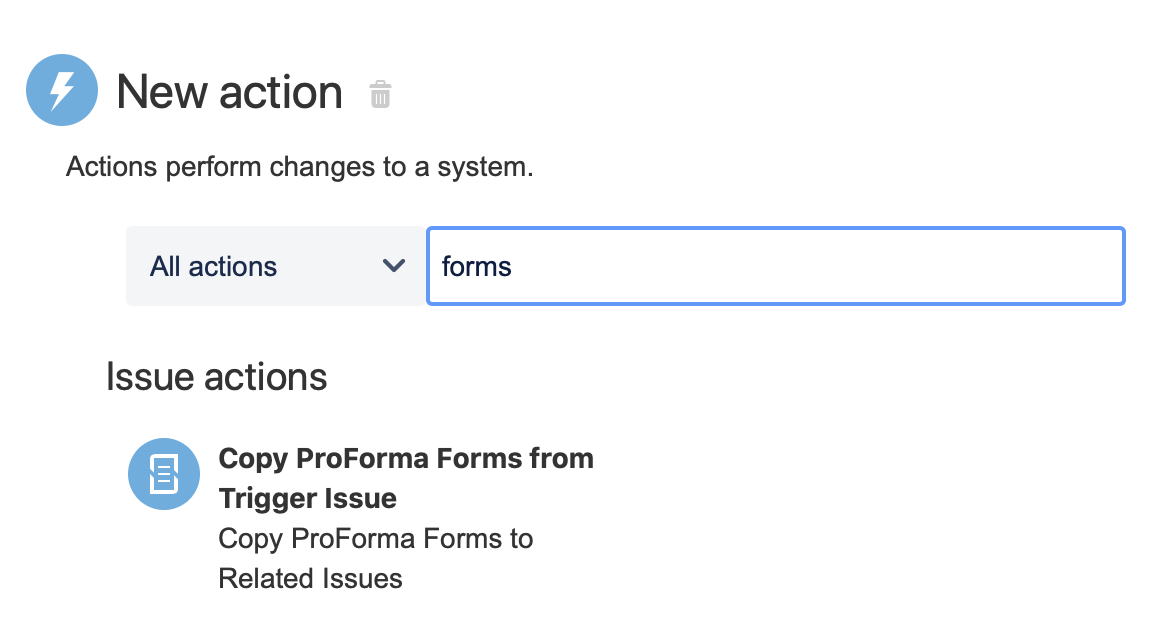
ProForma adds an action to Automation for Jira which allows for forms to be copied between issues and requests.
Known limitations
Currently, when Automation for Jira copies forms to another issue, it will copy all of the forms that are on the source issue. It is not possible to select individual forms to be copied. If you only want some forms to be copied, you need to trigger the automation at a point in the workflow before the other forms have been added to the issue.
Example: Copy from parent issue to subtasks

Example: Copy from subtask to parent issue

Example: Copy a form to a new issue
Warning: Copying between projects
The target project(s) should contain the same custom fields as the source project. If the two projects do not have the same fields:
For a form that is copied in an OPEN state, the contents of the form fields which are linked to fields that do not exist in the target project will be cleared.
For a form is copied in a SUBMITTED or LOCKED state, the form will retain its contents even if the target project does not have corresponding fields.

Trigger an Automation Rule
Prerequisite: Linked fields
To use a value in a ProForma form to trigger an Automation for Jira rule, you must link the form field to a Jira field. The linked Jira field will then trigger the Automation Rule.
Order of Operations: Issue Create
Because ProForma updates the issue and linked fields milliseconds after the issue is created, the Issue Create Trigger is unreliable and the following script rules elements should be used.
In the example below, a form field linked to the Jira Summary field triggers the rule for issues created within the last minute.


Access the contents of ProForma Forms WARNING
Not Supported
Accessing form data directly using Automation for Jira is not officially supported and there are currently some significant limitations.
Please note that the contents of linked fields are not stored within the form entity property unless the form is in a SUBMITTED or LOCKED state.
We are currently working on providing a better solution to accessing form data.
Automation for Jira can access the raw ProForma form data (standard forms only) stored in the entity properties of Jira issues and use that data in automation rules. For issues with ProForma forms attached, this means that form field data and form state can be read by Automation for Jira directly.
The structure to access data, where AAA is the question ID number (not the Question Key defined in the form builder) is:
Text/Email/URL/Number Fields:
{{issue.properties."proforma.forms.i1".state.answers.AAA.text}}Date Fields:
{{issue.properties."proforma.forms.i1".state.answers.AAA.date}}Time Fields:
{{issue.properties."proforma.forms.i1".state.answers.AAA.time}}Name of a user:
{{issue.properties."proforma.forms.i1".state.answers.AAA.users.get(0).name}}Choice Fields:
{{issue.properties."proforma.forms.i1".state.answers.AAA.choices.get(0)}}Note this will only return the ID associated with the choice rather than the text.
Retrieving the text of the selected choice value poses a challenge for Automation for Jira. It is stored in the following format
issue.properties."proforma.forms.i1".questions.choices
To find the question ID, go to the Preview tab of the standard form builder and enter values in the desired fields so they are populated. Then go to the Issue JSON tab and scroll down to the state array at the bottom.
Example:

Dump Form Data from Multiple Fields into One Jira Field
Use Linked fields
Accessing form data directly using Automation for Jira is not officially supported and there are currently some significant limitations. Therefore, this example assumes that the desired ProForma fields are linked to Jira fields.
In the example below, two ProForma fields have been linked to Jira fields:
The ProForma “Item to be repaired” field is linked to the Jira Summary field.
The ProForma “Maintenance location” field is linked to a custom Jira field.
When the value for the linked Maintenance location field is updated, automation will populate the description field with both the item to be repaired and the location.

Link Form Fields to a Cascading Field
ProForma does not currently support linking to Jira cascading fields. However, you can work around this limitation by using conditional logic and automation rules.
Create the Needed Fields
Create one defacto custom field to hold the parent value of the cascading field (eg Country).
Create a defacto custom field for each option in the parent choice list. This field will hold the selected child value (eg Australian State, Canadian Province, etc.).
Build the Form
Start by creating a choice question on your form that represents the parent part of the cascading field. Link the field to the defacto custom field created to hold the parent value.
Create a conditional section for each parent option.
Create a choice question with the appropriate child options in each conditional section. Link this field to the corresponding defacto custom field created to hold the child value.

Build the Automation Rules
Now create automation rules to copy the values from your defacto fields into the cascading field as pictured below.
You'll need to create two rules for each option in the parent list: one rule to copy the values from the defacto custom fields to the cascading field, and one rule to copy the values from the cascading field to the defacto custom fields.

Link a Form Field to the Jira Label Field

Create a “defacto” custom choice field that has the same options as your Labels field. This field does not need to be included on any screens.
Link a field on your ProForma form to that custom field.
Use Jira automation to copy the value from your custom field into your Labels field.
You'll need to create two automation rules to ensure that both the form field and the Jira field are kept up to date:
Update Label field (sets the value of the labels field to match the value of the defacto custom field)
Update defacto field (sets the value of the defacto custom field to match the value of the Labels custom field)
Link a Form Field to the Due Date Field
Currently, you cannot link a form field to the Jira Due Date field. However, you can work around this limitation by using Automation for Jira and a custom date field.


Create a Calculating Form
ProForma does not currently support calculating fields. However, you can work around this by using linked Jira fields and automation.
Create the Needed Fields
Create a custom field (number) for each item that will be used in the calculation, as well as for each field that will hold the result of a calculation.
Set the default value for each field to 0.
Build the Form
Build the form, linking the fields to the corresponding custom fields.
For fields that will hold calculated values, you can use the description property to to tell the user that they do not to fill out the field. (ProForma does not currently have read-only fields.)
On the form Settings tab, set the Advanced Settings to Leave form open. This will allow the form to display updated (calculated) data from the linked fields.

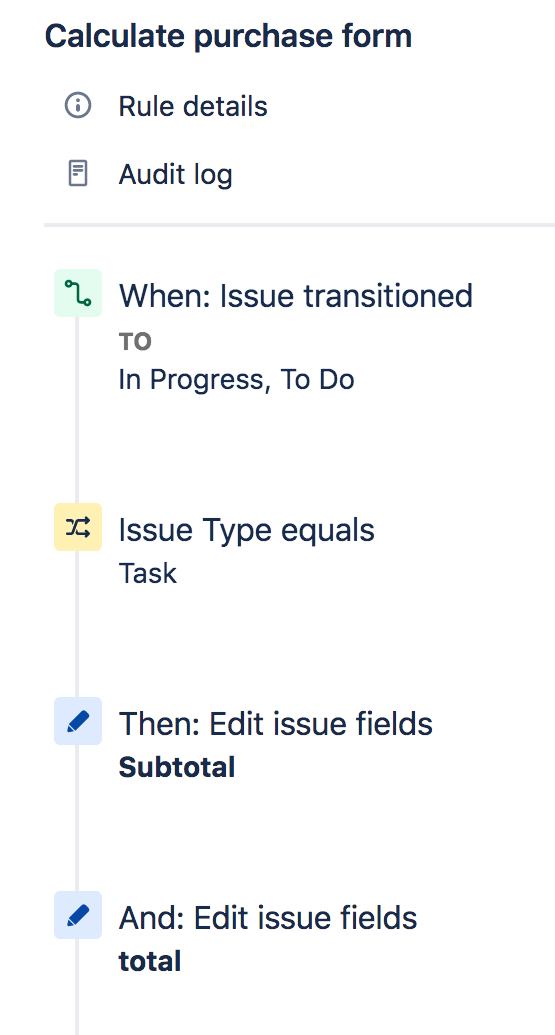
Create a looping transition
If your form will include nested calculations (for instance if you want to calculate a subtotal that is then used in a calculation of the grand total), then you will need a status change to trigger each calculation. A looping transition allows you to trigger the form to recalculate.

Build the Automation Rule
Use the Edit issue fields action to perform the calculation. You will need to reference the custom field ID in the rule: {{#=}}{{issue.customfield_10223}}+{{issue.csutomfield_10224}}+{{issue.customfield_10225}}{{/}}