Configuring Microsoft Entra ID
You can configure Microsoft Entra ID as a directory in Crowd. All changes to your users, groups, and memberships will be synced between Microsoft Entra ID and Crowd periodically, or whenever you request it. You'll be able to view information about your users directly in Crowd by using the User browser and Group browser.
Before you begin
Before you configure your Microsoft Entra ID, you should know about the following restrictions:
- In Microsoft Entra ID, you can have multiple groups with the same name (displayName) but this isn't supported in Crowd and results in a failing synchronization. Make sure you change your Microsoft Entra ID group names to unique ones.
- Crowd doesn't support multi-factor authentication. You'll need to disable it for your users in Microsoft Entra ID, or they won't be able to log in to Crowd or any integrated applications.
- If you need to make any changes to your users, make them directly in Microsoft Entra ID. You can't edit your Microsoft Entra ID users in Crowd.
Configuring Microsoft Entra ID
To configure Microsoft Entra ID, you’ll need to create two applications in your Microsoft Azure portal, and then use them to add Microsoft Entra ID to Crowd.
1. In Microsoft Entra ID web application:
1. Create a web application to allow Crowd to communicate with Microsoft Entra ID:
- Log in to your Microsoft Azure portal.
- Go to Microsoft Entra ID, then select App registrations.
- Create a new application registration with the following details:
- Application type: Web (Option is available under Redirect URI sub-section)
Sign-on URL: <Crowd's base URL>
Where can I find my Crowd's base URL?In Crowd, go to Administration , then select General, and check the value of
 Base URL.
After the application is created, note down the Application (client) ID assigned to it. You will need it later on to configure the integration in Crowd.
2. Configure permissions for the web application to allow Crowd to read data from Microsoft Entra ID:
- In your web application, select API permissions.
- In the
API permissionssection, select Add a permission. - Under Microsoft APIs select Microsoft Graph, and select Application permissions for the type of permissions required for this application
- Add the following permission from:
- Directory.Read.All
- Select Add permissions and then, under Grant consent section, select Grant admin consent.
- Select Yes and confirm.
3. Create a key for the web application. Crowd will use this key to authenticate to Microsoft Entra ID:
- Select your web application.
- In the Certificates & secrets section, select New client secret.
Choose a description and an expiry date for your key, then save it.
Keep in mind that when the key expires and you don't replace it, Crowd won't be able to communicate with Microsoft Entra ID.Copy and store the key value.
You won't be able to view it after navigating away from the key settings.
2. In Microsoft Entra ID native application:
4. Create a native application that will be used by Crowd to validate user credentials:
- Go to App registrations, and create a new application registration with the following details:
- Type: Native (Option is available under Redirect URI sub-section)
- Redirect URL: <Crowd's base URL>
Note down the Application ID assigned to it. You will need it later on to configure the integration in Crowd.
5. Configure permissions for the native application to allow Crowd to validate user credentials:
- Click your native application.
- Click API Permissions
- Under Grant consent section, click Grant admin consent button.
- Click Yes and confirm.
6. Configure manifest for the native application to allow Crowd to validate user credentials:
- Click your native application.
- Click Manifest
- In the manifest editor, set the
allowPublicClientproperty to true - In the bar above the manifest editor, click Save
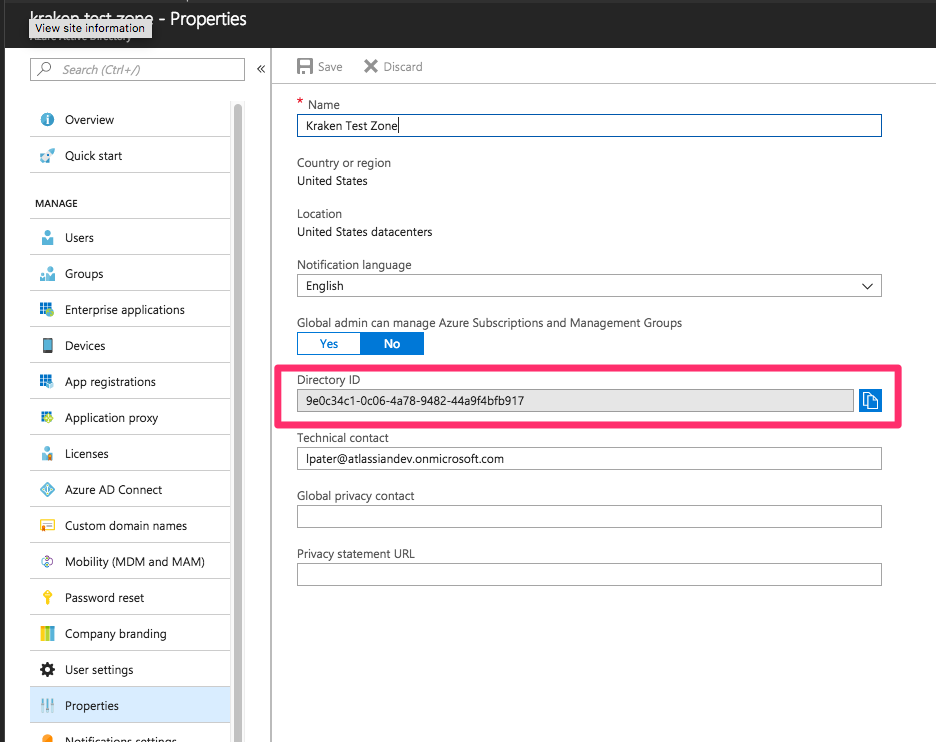
7. Get the Tenant ID to configure the integration in Crowd:
- Go to the main Microsoft Entra ID blade.
- Click Properties.
Note down the Directory ID - this is the Tenant ID you will need later on to configure the integration in Crowd.
3. Steps in Crowd
You've added your Microsoft Entra ID to Crowd. You should now see a brief summary of your directory and details about the synchronization.
In some cases, the synchronization might be failing at first because the new permission wasn't yet propagated in Microsoft Entra ID. Just wait a few minutes, the problem will fix itself.
Crowd will automatically pull data from Microsoft Entra ID. If that doesn't happen, you can select Synchronize now. Once the synchronization is complete, you can check your users and groups from Microsoft Entra ID by going to Users/Groups in the top navigation bar.
Field mapping
The following tables show how fields in Microsoft Entra ID are mapped to those in Crowd. We're comparing Microsoft Entra ID's API fields with Crowd's UI fields.
Users
| Microsoft Entra ID | Crowd |
|---|---|
| userPrincipalName | Username |
| displayName | Display name |
| givenName | First name |
| familyName | Last name |
| accountEnabled | Active |
| id | External ID |
| E-mail address |
Groups
| Microsoft Entra ID field | Crowd field |
|---|---|
| displayName | Name |
| description | Description |
| id | External ID |