Configuring Jira Service Management approvals

Jira Service Management allows you to add an approval step to a status in a workflow, which allows you to specify if an approval is needed for issue types that are using this workflow. Thanks to that, you can make sure the request is reviewed and approved by the right people before it can progress to the next step.

How it works

Here’s a sample flow that will show you how approvals are added to your workflow, configured, and then displayed on requests:


1. Adding the approval to your workflow.

First you’ll select a workflow step to which you want to add an approval, add it, and move to the configuration screen. You can add approvals to multiple workflow steps.

2. Configuring your approval.

Next, you’ll work out the details of your approval – choose the right custom field that will point to your approvers, and specify the Approve and Decline transitions, just so your request moves to the right status when it’s approved or declined.

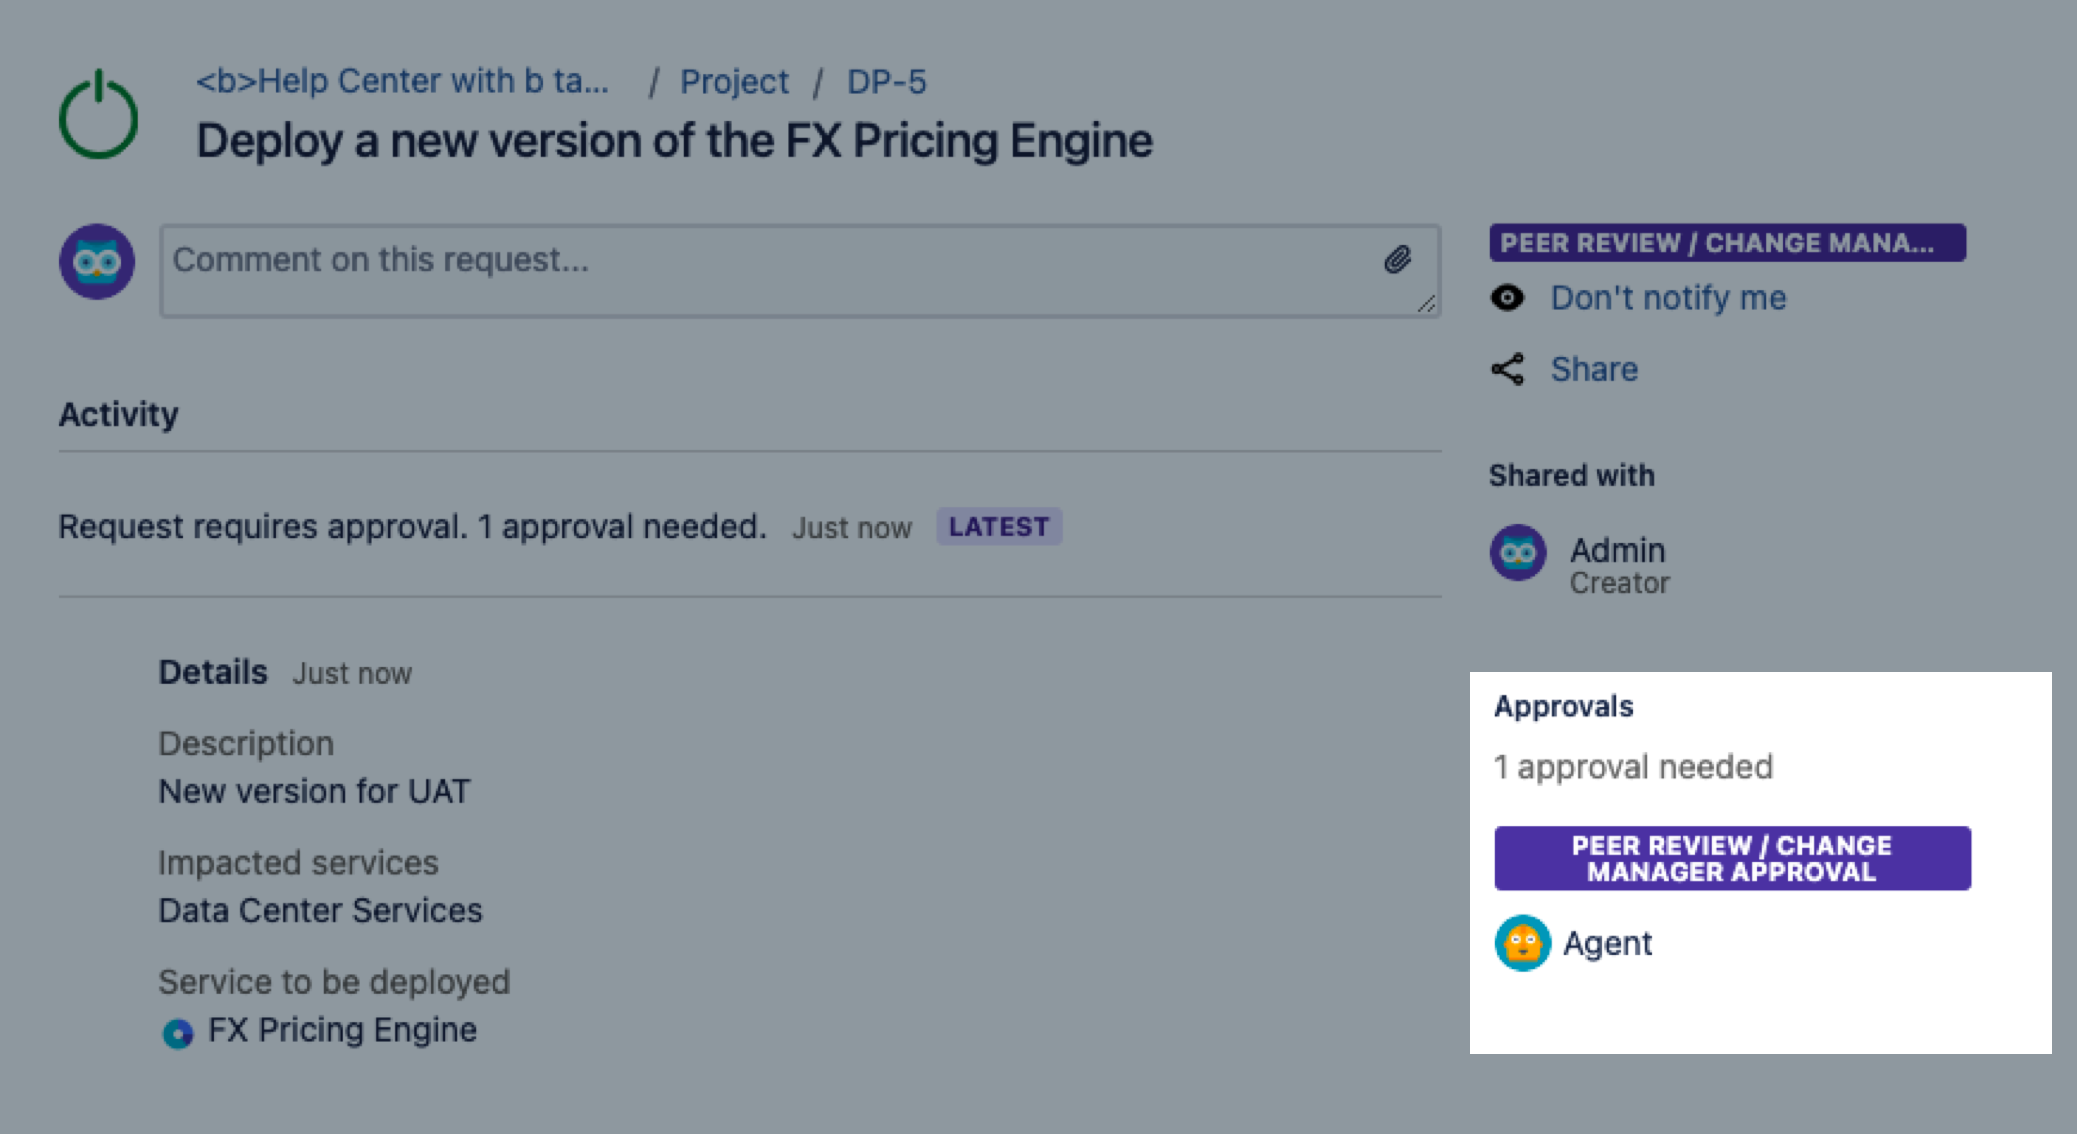
3. Approving the request.

When a request reaches the approval step, the nominated approvers will be added to your request. They will also receive an email notification.


Additional information

Here’s some additional information to help you better understand how approvals work under the hood:

Are approvals available for all workflows and projects?

The option to add an approval step is only available if the workflow is associated with at least one Jira Service Management project. If you add an approval step to the workflow, and that workflow is also used by a non-Jira Service Management project, the issues in the non-Jira Service Management projects can still be worked on in the usual way, but the approval step will not be enforced for those issues.

Are approvals always required?

This depends on the number of transitions going out of the approval step on your workflow:

  • If the approval step has only two existing transitions, the request can’t be transitioned by anyone until the approver has either approved or declined the request. An approval is always related to two transitions - one for Approved, and one for Declined. Agents will be able to add, edit, or remove approvers, but they won’t be able to transition the request using any of these transitions.

  • If there are more transitions, the request can be transitioned via any of the ones that aren’t used in your approval, without requiring an approval. The whole point of configuring approvals is to not have additional transitions that can omit them, but in some cases you might want to add, for example, Emergency override to move the request forward if the usual approvers aren’t available.

How do I enforce approvals?

As mentioned in the previous question, an approval step that has only two transitions makes sure that an approver must make a decision before the request can be progressed. If you want to achieve that, set the approval step on a workflow status that only has two outgoing transitions, one to Decline and one to Approve.

Can there be multiple approvers?

Yes, you can configure single or multiple approvers, and even require how many of them need to approve your request before it’s considered approved. For example, you may want a manager to initially approve a request and then two members of your finance team to make the final approval on the request. You can also have two approval steps on your workflow, each with different approvers.

As for customers and raising requests in the customer portal, you can also decide whether customers can select approvers or if you want them to be selected from a predefined list.

Can I add a transition screen for the approver to fill in?

In Jira, many transitions use transition screens that let you modify requests when they move via these transitions, for example by adding a resolution, comment or some extra description.

Transitions that are used in your approvals omit these screens, which is important when your Approve or Decline transitions are going to a final status, like ‘Done’. In such a case, you can use post-functions to automatically add modifications that you’d usually add by using a transition screen. In the case of a final status, it’s a good idea to add a post function that sets the resolution of the request so it’s considered closed by Jira Service Management.

Types of approvals

When you configure approvals, you select custom fields that in turn point to users who will be nominated as approvers. You can configure two types of custom fields, each will be used for a different type of approvers:

TypeDescription
User picker field

This type uses any Jira user picker custom field (single or multiple) to add approvers from users that are configured to display in this field.

When to use this field

  • When you want to add approvers from your Jira users or groups. It can be any user or group – who is added as approvers will depend on how you configure the custom field.

Required configuration

  • User picker custom field including some users or groups

Insight object field (Data Center)

This type uses an Insight object custom field to add approvers that are related to your assets from Insight, for example – their owners or groups responsible for their maintenance.

When to use this field

  • It would typically be used when you’re raising a request and include one of your assets in it. People with relations to this asset will be added as approvers.

Required configuration

  • Insight object field mapped to assets in Insight. Supported types are:

    • Insight Object/s

    • Insight Object (single) (deprecated)

    • Insight Object (multiple) (deprecated)

  • Object types and objects (assets) in Insight configured to have a User or Group attribute that includes some users or groups

tip/resting Created with Sketch.

If you’re looking to use this type, it’s best to follow our detailed guide: Adding approvers from Insight to requests in Jira.

Adding and configuring your approvals

To add and configure approval steps on your workflow:

Step 1. Create and configure custom fields that will point to your approvers

Approvals are based on custom fields that point to users. You need to create and configure these custom fields in your instance, and also add them to the Create and Edit screens associated with the workflow. You can use the same field for more than one approval step, but it might get confusing for the approvers, so consider creating separate fields.

The steps will differ based on which type of approvals you’re looking to configure.

Creating a user picker custom field

  1. Create a user picker custom field. See Adding custom fields.

  2. Associate it with the Create and Edit screens.

Creating an Insight object field

tip/resting Created with Sketch.

This custom field relies on Insight and additional configuration. If you’re new to Insight, it’s best to follow our detailed tutorial instead. See Adding approvers from Insight to requests in Jira.

  1. Add a User or Group attribute to your object types in Insight. See Adding attributes to object types. If you’re choosing a group, try to keep it small as bigger groups can affect performance.

  2. Add one of the supported Insight custom fields and map it to your Insight objects (assets). See Adding Insight custom fields to screens in Jira.

  3. Associate it with the Create and Edit screens. See Adding custom fields.

Step 2. Add the approval step to your workflow

Before you begin

Jira Service Management request types are mapped to Jira issue types, and the issue types are in turn mapped to a workflow. When you add the approval step to a workflow, it will be applied to all issue types mapped to that workflow, and hence all request types mapped to those issue types. It's important to make sure your approval step is valid for all issue types. If you want to add an approval step for just one request type, you should create a separate workflow and issue type that you can map to the request type individually.

For more information on how to do this, read up on creating issue typesassociating issue types with projects, and working with workflows.

Steps

To add an approval step:

  1. Choose Administration  > Projects, and select the relevant project.

  2. In the Project settings menu, select Workflows. All workflows associated with your project will display.

  3. Select Edit in the Actions column of the workflow you want to modify.

  4. Select the status you wish to add the approval step to. The status dialog will display.

  5. Check the Add approval check box in the status dialog. The Add approval dialog will display.

  6. Choose which custom fields to use, how many approvers are required, and which transitions to use for approval and decline.

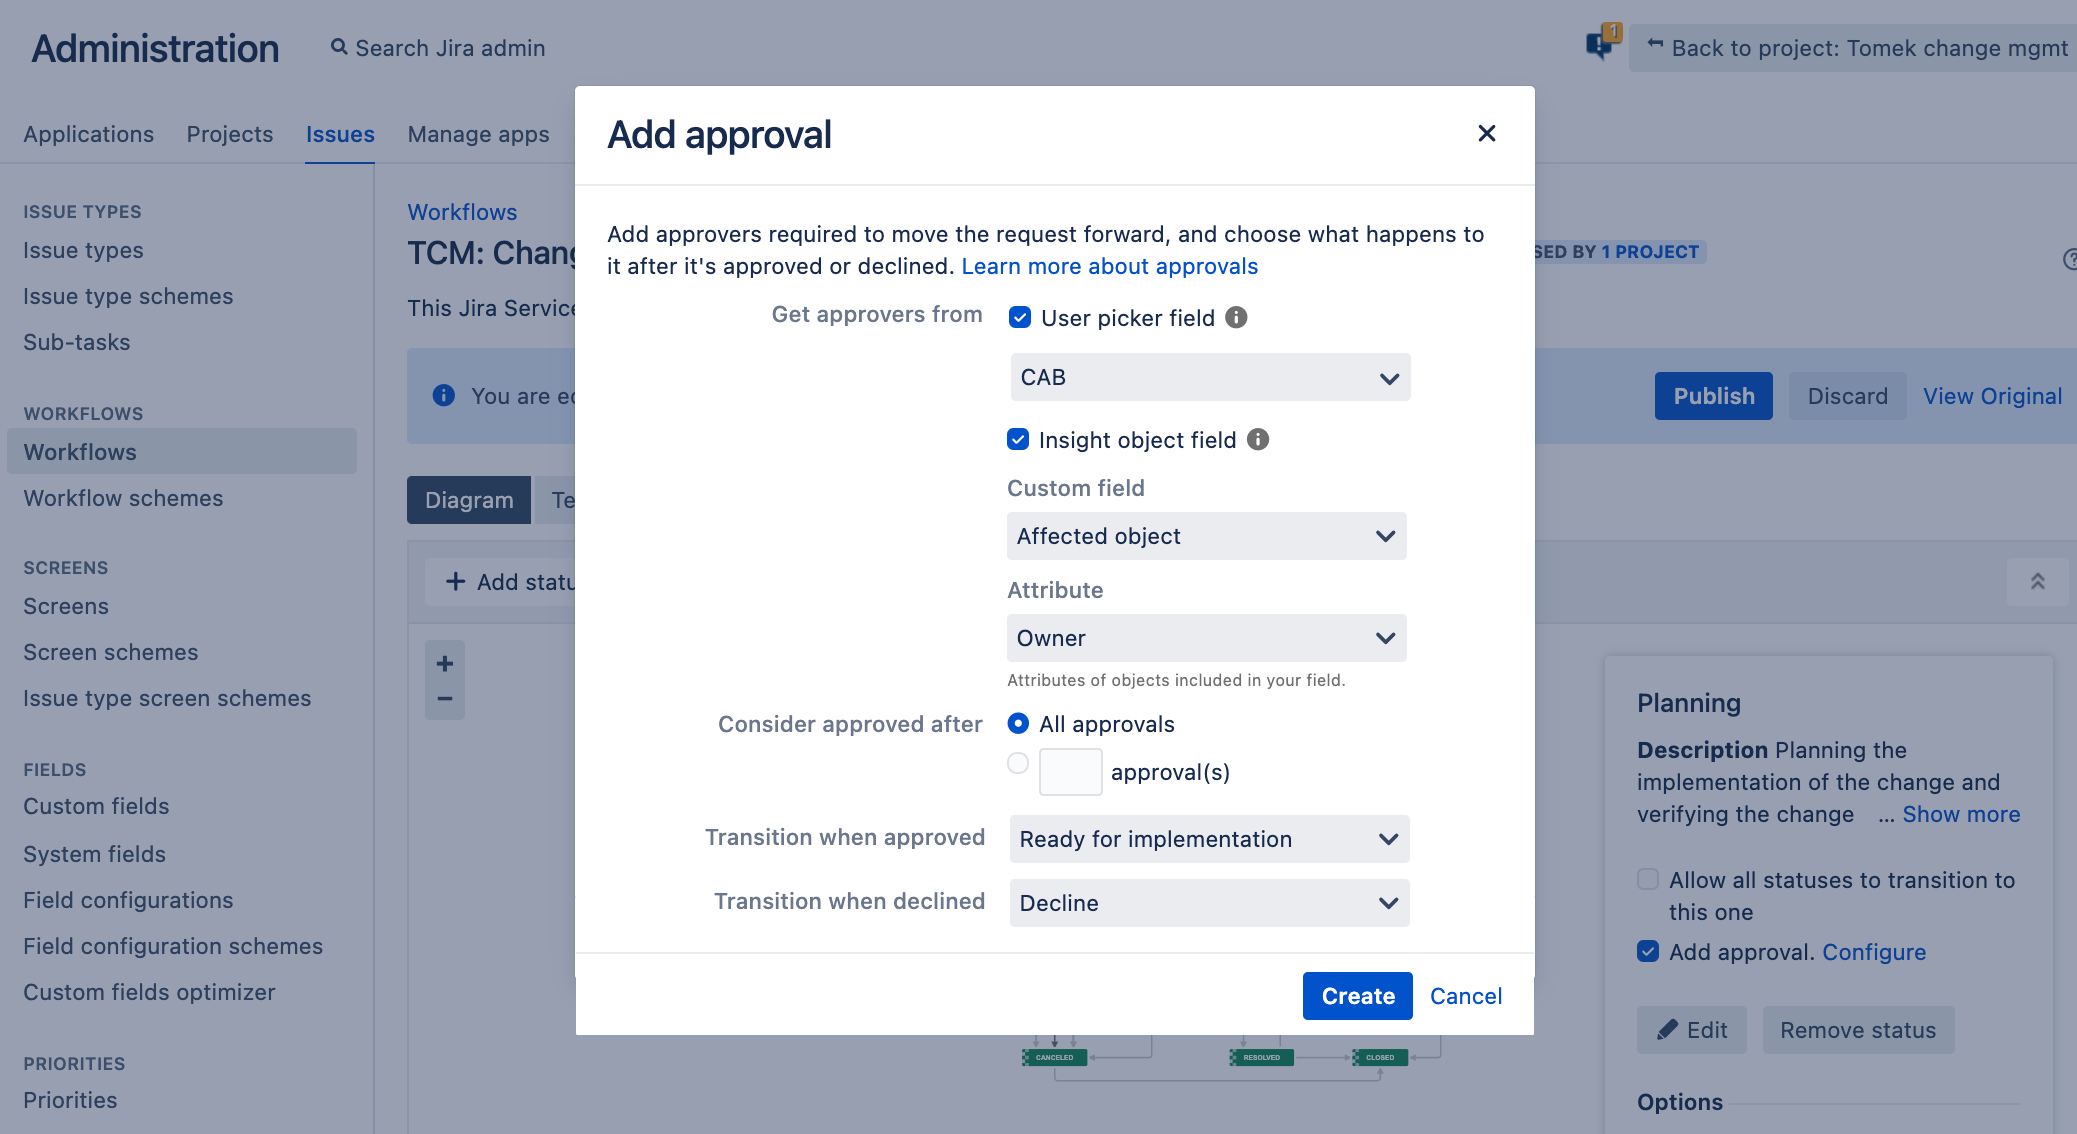
  7. Click Create to add your approval step.

Don't forget to click Publish to make your workflow available! You should also check that if the transitions you're using for the approval step lead to a status in the Done category, they should have a post function to set the resolution of the request so that it shows as closed.

Step 3. Choose how approvers are selected (Jira user picker fields)

The following scenarios apply only to Jira user picker fields. In the case of Insight object fields, approvers are always added automatically from the attribute that you select while configuring the approval.

Let customers select approvers manually

This is useful if you don’t know who the approver may be, but the customer does – for example, it’s their manager. In this scenario, you need to make sure the custom field is available on the customer portal so customers can see and use it.

To add the custom field to the customer portal and show it:

  1. In your project, go to Project settings > Request types.

  2. Select Edit fields next to the request type you want to add the field to.

  3. Click + Add field, select your field, and click Apply.

  4. Select the display name, field help, and choose whether the field is required.

  5. Click Update to save your changes.

  6. The field is added as Shown. You can change the order of the fields by dragging and dropping.

Automatically add approvers from a predefined list

This is useful if the customer doesn’t know who the approver may be, or if you know there is a set list of approvers for the request. The customer won’t need to enter any approvers – they will be automatically added after the request reaches your approval step. In this scenario, you need to enable the custom field on the customer portal, but keep it hidden.

To add the custom field to the customer portal and hide it:

  1. In your project, go to Project settings > Request types.

  2. Select Edit fields next to the request type you want to add the field to.

  3. Click + Add field, select your field, and click Apply.

  4. Select the display name, field help, and choose whether the field is required.

  5. Click Update to save your changes.

  6. Click Hide next to the field you added. At this point, you will need to populate the list of approvers.

Let agents select approvers manually

This is useful if the customer doesn’t know the approver and the approver depends on the information in your request, so they can’t be assigned automatically. In this case, the agent will need to review the request and manually add an approver.

In this scenario, you don’t have to do anything as agents can select approvers by default. Agents will be able to see the custom field and edit it in the People section of the request. Note that there is also an Approval section that lists all approvers, however you can't make any edits here.

If the field isn't showing, you may need to get a Jira administrator to check the field is still available on your project screens.

Last modified on Aug 6, 2021

Was this helpful?

Yes
No
Provide feedback about this article
Powered by Confluence and Scroll Viewport.