Creating issues using the CSV importer
Preparing your CSV file
The CSV importer assumes that your CSV file is based off a default Microsoft Excel-styled CSV file:
- Fields are separated by commas
- Any content that must be treated literally, such as commas, new lines/ (e.g."carriage returns"), or angle brackets, are enclosed in quotes
For Microsoft Excel and OpenOffice, you don’t need to place cell values in quotation marks. These applications do this automatically.
CSV file requirements
In addition to being "well-formed", your CSV file should meet the following requirements:
- The file must have a header row. The CSV Importer uses the header row to determine how to map data from the CSV file's second row and beyond to Jira fields.
- The header row must contain the Summary column for the issue’s summary.
- The header row shouldn’t contain any punctuation, except for commas separating columns or fields. Otherwise, the import may work incorrectly.
- Commas as column or field separators can’t be omitted throughout the file.
Encapsulating Jira data structure in your CSV file
To import issues correctly, you should know how to encapsulate different data in your CSV file. In this way, Jira will be able to process them and create or update issues correctly.
Here, you’ll find tips on and examples of building a CSV file with multiple-line fields, special characters, multiselect fields, and many more.
Learn more about the specifics of issue fields in Tips for importing CSV data into issue fields.
Capturing data that spans multiple lines
Use double quotation marks (") in your CSV file to capture data that spans multiple lines. For example, during the import, Jira will treat the following as a valid CSV file with a single record:
Summary, Description, Status
"Login fails", "This is on
a new line", Open
Treating special characters literally
Put the text with special characters in double quotation marks ("") to treat these characters literally. Once imported to Jira, these special characters will be stored as part of Jira's field value. Examples of special characters include carriage returns/enter characters, commas, etc.
If the text contains words or phrases in quotation marks and you want Jira to treat these quotation marks literally, put these words or phrases in another pair of quotation marks.
- Your CSV file may contain a value like:
"Clicking the ""Add"" button results in a page not found error". Pay attention that the name of the button is put in two pairs of quotation marks. - After the import, Jira will store this value as:
Clicking the "Add" button results in a page not found error. The name of the button is stored in one pair of quotation marks, as it should be.
Aggregating multiple values into single issue fields
You can import multiple values into an issue field that accepts multiple values. For example, Fix (for) Version, Affects Version, Component, Labels. To do this, your CSV file must specify the same column name for each value you wish to aggregate into the mapped issue field. The number of column names must match the maximum number of values to be aggregated into the mapped field.
For example:
IssueType, Summary, FixVersion, FixVersion, FixVersion, Component, Component
bug, "First issue", v1, , , Component1,
bug, "Second issue", v2, , , Component1, Component2
bug, "Third issue", v1, v2, v3, Component1,
In this example, the Component field of the second issue and the Fix Version field of the third issue will generate multiple values in appropriate issue fields after the import.
Be aware that only a limited number of issue fields support multiple values. The CSV importer will not allow you to import aggregated data into issue fields that only support a single value.
Importing issues into multiple projects
You can import issues from your CSV file into different projects through a CSV file import. To do this:
- The CSV file must have two additional columns with the exact names of Project Name and Project Key. These are the mandatory values required for the correct import of issues from the CSV file to specific Jira projects.
Ensure that every issue represented in your CSV file contains the appropriate name and key in these columns for the projects to which they will be imported.
If you aren’t a Jira administrator, you won’t be able to map the fields Project Name and Project Key to Jira’s fields. You’ll need to select different fields for mapping. Learn more about this in Tips for importing CSV data into issue fields.
For example:
IssueType, Summary, Project Name, Project Key
bug, "First issue", Sample, SAMP
bug, "Second issue", Sample, SAMP
task, "Third issue", Example, EXAM
In this example, the first and second issues will be imported into the "Sample" project (with project key "SAMP") and the third issue will be imported into the "Example" project (with project key "EXAM") , assuming you match the "Project Name" and "Project Key" fields in your CSV file to the Project name and Project key issue fields respectively during the CSV file import wizard.
Importing work log entries
Your CSV file can contain work log entries. You need to use seconds to track the time spent. For example:
Summary,Worklog
Only time spent (one hour),3600
With a date and an author,2012-02-10 12:30:10;wseliga;120
With an additional comment,Testing took me 3 days;2012-02-10 12:30:10;wseliga;259200
If you aren’t a Jira administrator, you won’t be able to map the Worklog field to Jira’s field. You’ll need to select different fields for mapping. Learn more about this in Tips for importing CSV data into issue fields.
Importing to multi select custom fields
Your CSV file can contain multiple entries for the one multi select custom field. Here’s an example showing how to populate the multi select custom field with multiple values:
Summary,Multi Select,Multi Select,Multi Select
Sample issue,Value 1,Value 2,Value 3
Importing cascading choice custom fields
You can import values to a custom field with cascading choice by using the following syntax:
Summary, My Cascading Custom Field
Example Summary, Parent Value -> Child Value
The -> separator allows you to import the hierarchy.
Currently Jira does not support importing multi-level cascading select fields via CSV ( JRA-34202 - Getting issue details... STATUS ).
Running the CSV file import wizard
If your Jira installation has existing data, you should back it up before proceeding with the following steps.
To import a CSV file with your Jira issues:
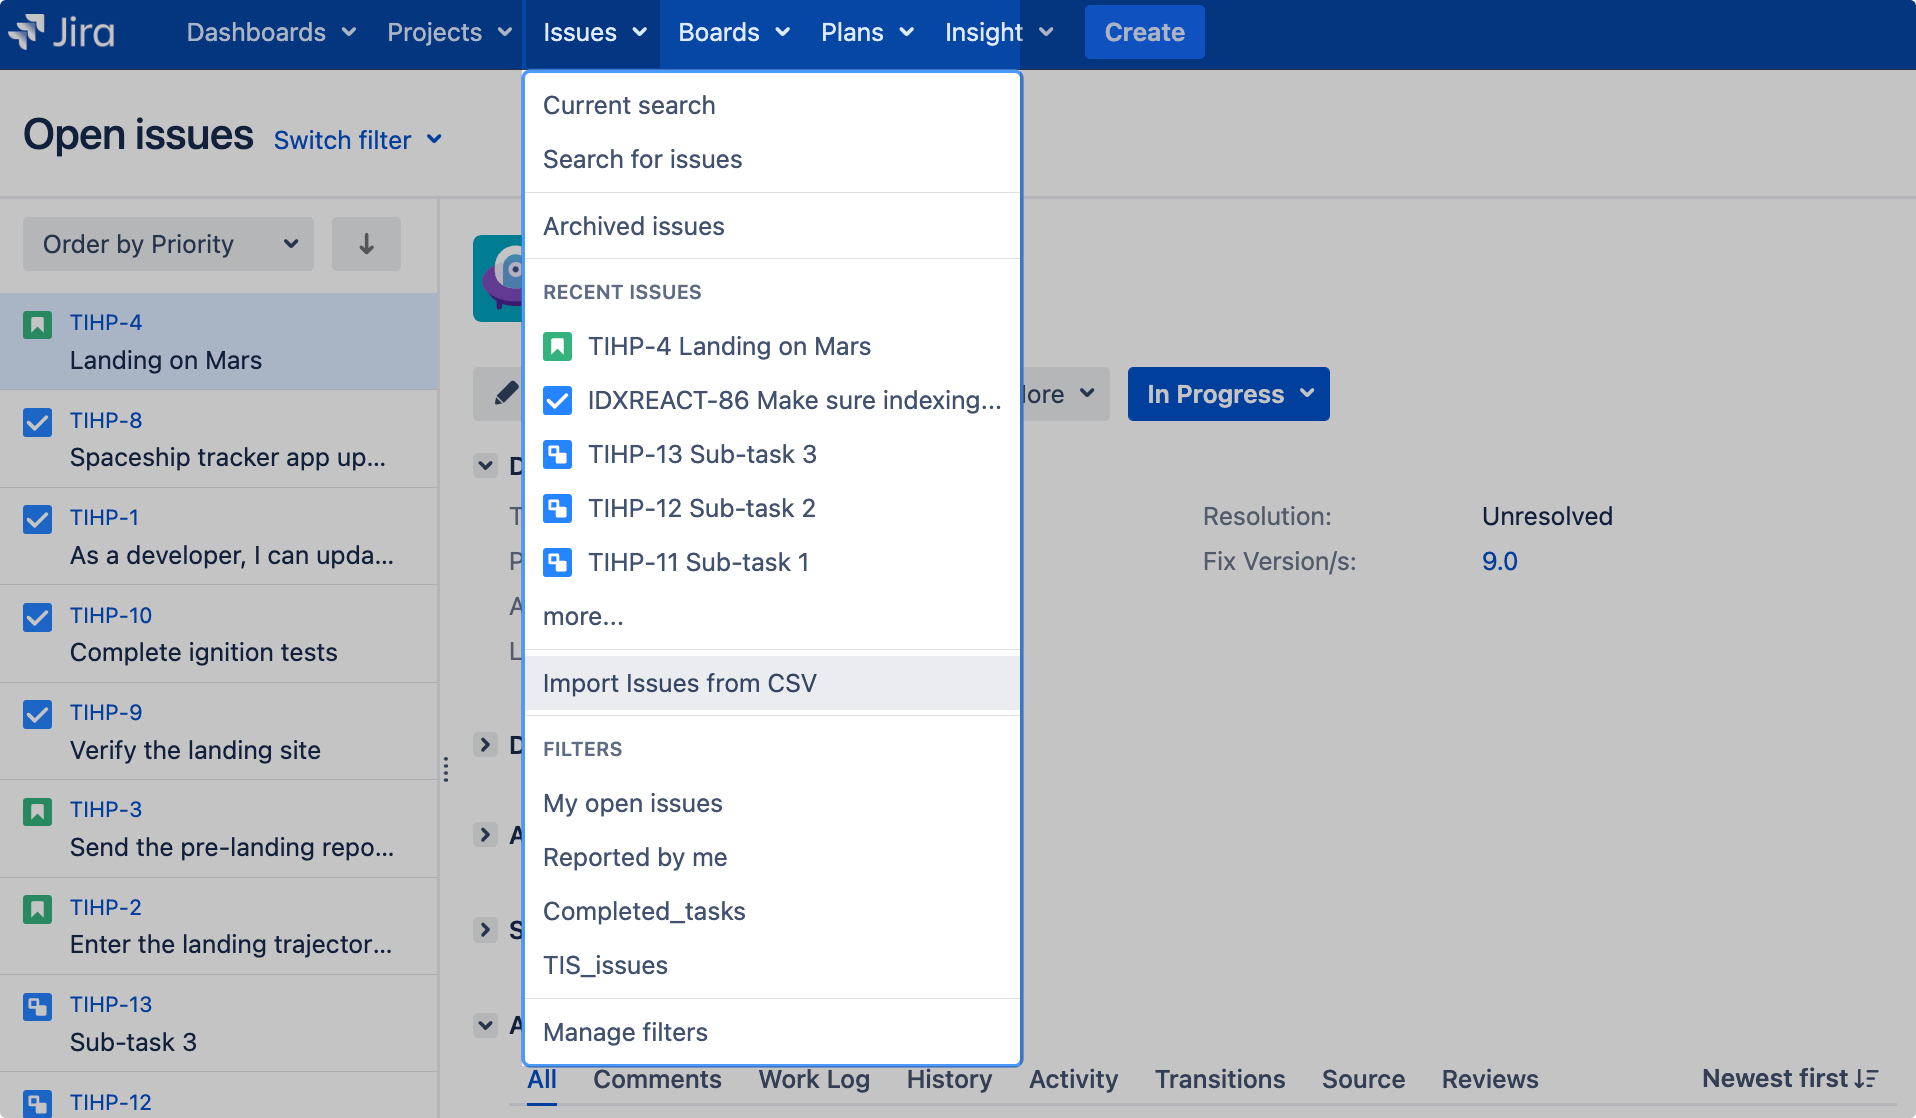
Select Issues > Import Issues from CSV to open the Bulk Create Setup page. If you do not have the option Import issues from CSV, your Jira admin must update the Jira Importers plugin to version 6.2.3 or above.
On the Bulk Create Setup page, select your CSV Source File.
Leave the Use an existing configuration file checkbox cleared if you do not have a configuration file or if you want to create a new configuration file. Configuration files specify a mapping between column names in your CSV file's header row and fields in Jira.
If you select Use an existing configuration file checkbox, you will be asked to upload an Existing Configuration File. If you don't select this option, Jira will automatically create a configuration file that you can use for further imports.
- Select Next to proceed to the Settings step of the CSV file import wizard.
On the Settings page, populate the required fields and select Next.

On the Map fields page, map the fields from your CSV file to issue fields in the selected project. If you also want to map values of these fields, select the Map field value checkbox. After you finish, select Next.
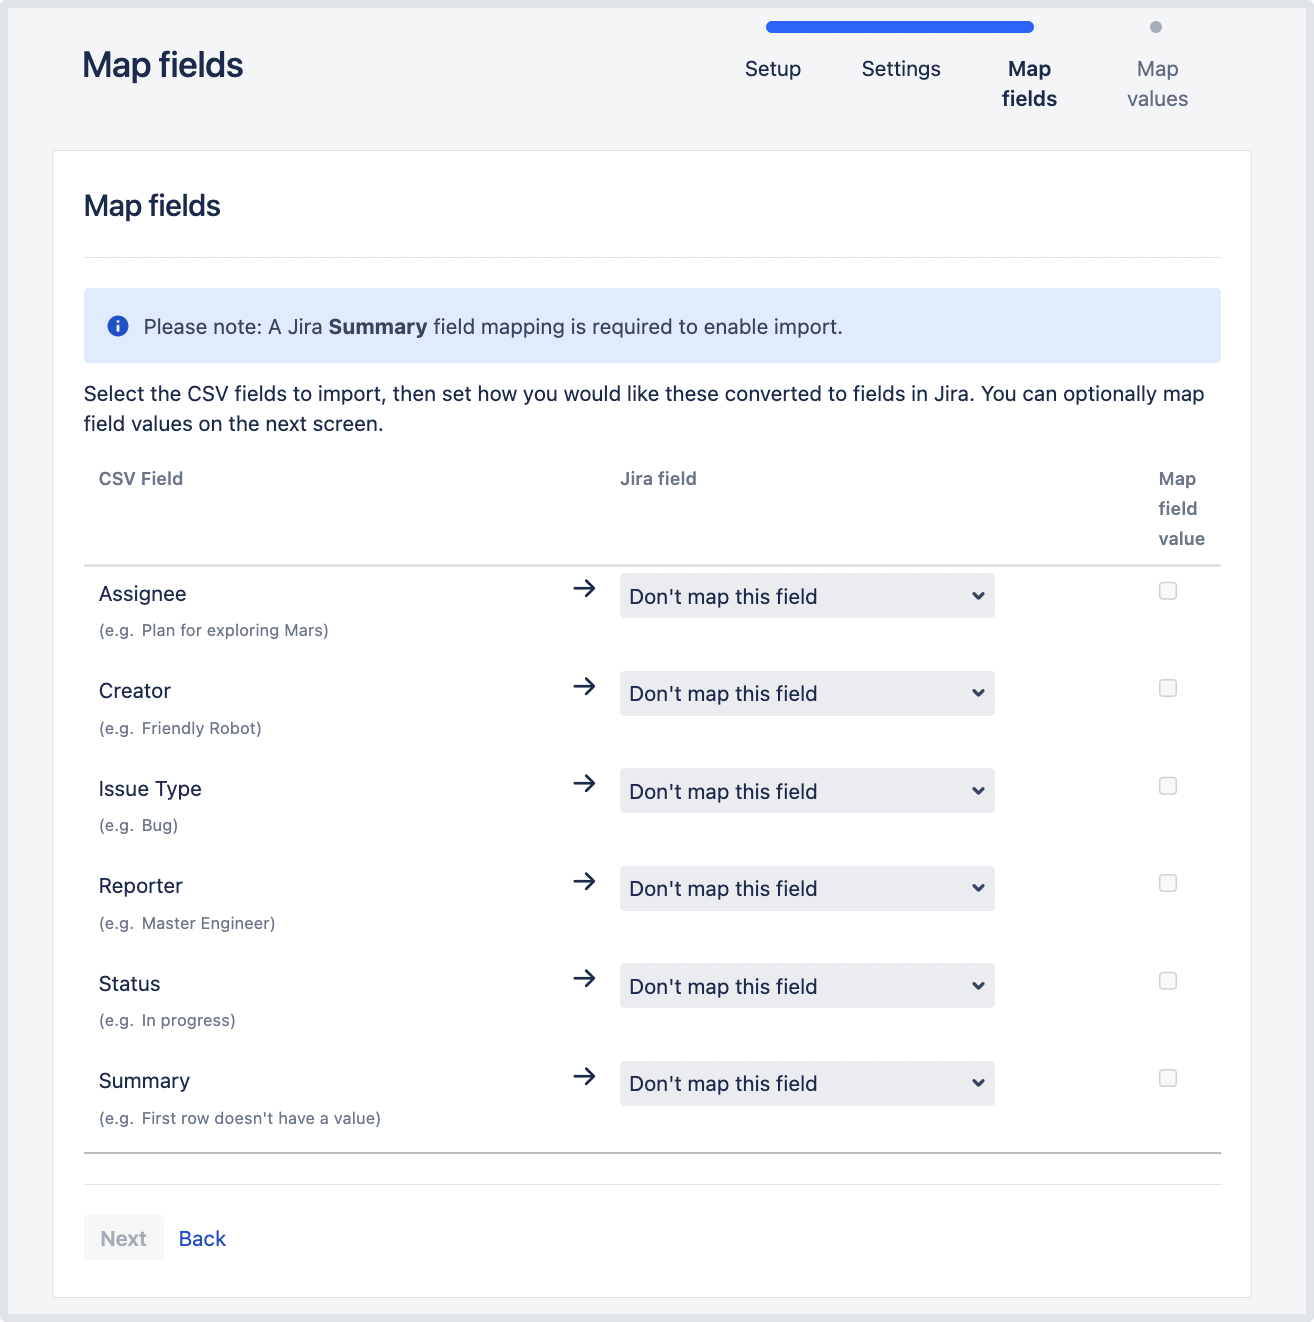
Make sure you map the Summary field. It’s mandatory for creating or updating an issue.
The Don’t map this field option means that you choose not to map a field from the CSV file to any issue field in the project. As a result, after the import, you won’t see the unmapped fields in issues.
Use this option if:
- You can’t find the right issue field for mapping. Learn more about this case in Missing fields for mapping when importing issues through CSV in Jira.
- You don’t have a Jira administrator’s permission to map a field. Learn more about such fields in Tips for importing CSV data into issue fields.
On the Map values page, you can check and reset the target values of the issue fields for which you’ve selected the Map field value checkbox on the previous page. If you haven’t selected the checkbox, proceed to the next step.
Example
Your issue types may have a CSV field value of Feature Request, which you may want to map to the issue type field value Feature.- On this page, you’ll see all values of all fields for which you’ve selected the Map field value checkbox on the Map fields page.
- If you want a field to be empty after the import, select Import as blank in Target value in Jira.
- If you haven’t chosen to map values for username-based fields like Reporter and Assignee, usernames from the file will be automatically mapped to existing usernames (lowercase) in Jira.
- If you import descriptions with line breaks, don’t select the Map field value checkbox for the Description field. Otherwise, Jira may remove line breaks during the import.
Regardless of whether or not you select the Map field value checkbox, Jira will automatically create usernames based on the data in your CSV file if they have not already been defined in Jira.
You may want to check your configuration for errors or warnings before running the import. To do it, select Validate. If your file contains warnings or errors, we recommend fixing them and uploading the file again. To learn more, download the detailed log of the validation.
If you need to import another CSV file with the same (or similar) settings to what you used through this procedure, select the save the configuration link to download a CSV configuration file, which you can use at the first step of the CSV file import wizard. For example, you may want to use the same field or value mappings for the next imports.
- When you’re sure about the correctness of data in your CSV file, select Begin Import. The importer will display updates as the import progresses, then a success message when the import is complete.
After the import is completed, you can check the created or updated issues in Jira. Also, you can download the detailed log of the import or save the configuration for future use. - Congratulations! You have successfully imported your CSV data into Jira! If you have any questions or encounter any problems, contact Atlassian support.
Tips for importing CSV data into issue fields
Here are some helpful tips on importing data from your CSV file into specific issue fields:
Issue field | Import notes |
|---|---|
Project | CSV data is imported on a per-project basis. You can either specify an existing projects as the target, or the importer will automatically create new projects during the import. |
Summary | This is the only required field. |
Component(s) | Import issues with multiple components by entering each component in a separate column. |
Affects Version(s) | Import issues with multiple Affects Versions by entering each version in a separate column. |
Fix Version(s) | Import issues with multiple Fix Versions by entering each version in a separate column. |
Due Date | Make sure to use the date format specified on the second step of the CSV import wizard: |
Issue Type | If not specified in your CSV file, imported issues will be givem the default (i.e. first) Issue Type as specified in your Jira system. For more information, see Defining issue type field values. You can also create new values on the fly during the import process. |
Labels | Import issues with multiple labels by entering each label in a separate column or by putting all labels in one column, deliminated by a space. |
Priority | If not specified in your CSV file, imported issues will be given the default (i.e. first) Priority as specified in your Jira system. For more information, see Defining priority field values. You can also create new values on the fly during the import process. |
Original Estimate | Set this value as a total number of seconds. |
Remaining Estimate | Set this value as a total number of seconds. |
Users | Choose to automatically create Jira users for any values of the Assignee or Reporter field. |
Other fields | If you wish to import any other fields, you can choose to map them to one or multiple Jira custom fields. If your custom fields don't exist yet in Jira, the importer can automatically create them for you. If your custom field is a date field, please use the date format specified n the second step of the CSV import wizard: |
If you aren’t a Jira administrator, you won’t be able to map the following fields in the CSV file to their equivalents in Jira:
- Attachments
- Comment Body
- Date Created
- Date Modified
- Date Resolved
- Project Key
- Project Name
- Project Type
- Resolution
- Status
- Worklog
To complete the field mapping, select either any other available field or the Don’t map this field option.
Known issues