Work in a Jira Cloud project on an iPhone
This page contains:
Common terms used in agile projects
- Scrum: Scrum is an iteration-based approach to reaching goals as a team. Work is completed in sprints. It's generally a good fit for teams developing products and releasing new versions on a regular basis. To dive deeper, check out What is scrum? or explore our scrum tutorial for Jira Software Cloud for web (not mobile).
- Kanban: Kanban works best as a continuous flow of work for (as an example) service-oriented teams. This constraint-based approach helps prevent teams from being overloaded. Check out our kanban tutorial for Jira Software Cloud for web (not mobile).
- Sprints: Sprints are fixed periods of time (often two weeks) during which a team completes issues. Sprints are usually planned in advance, in the backlog. (Sprints are part of scrum, an agile methodology.)
Board basics
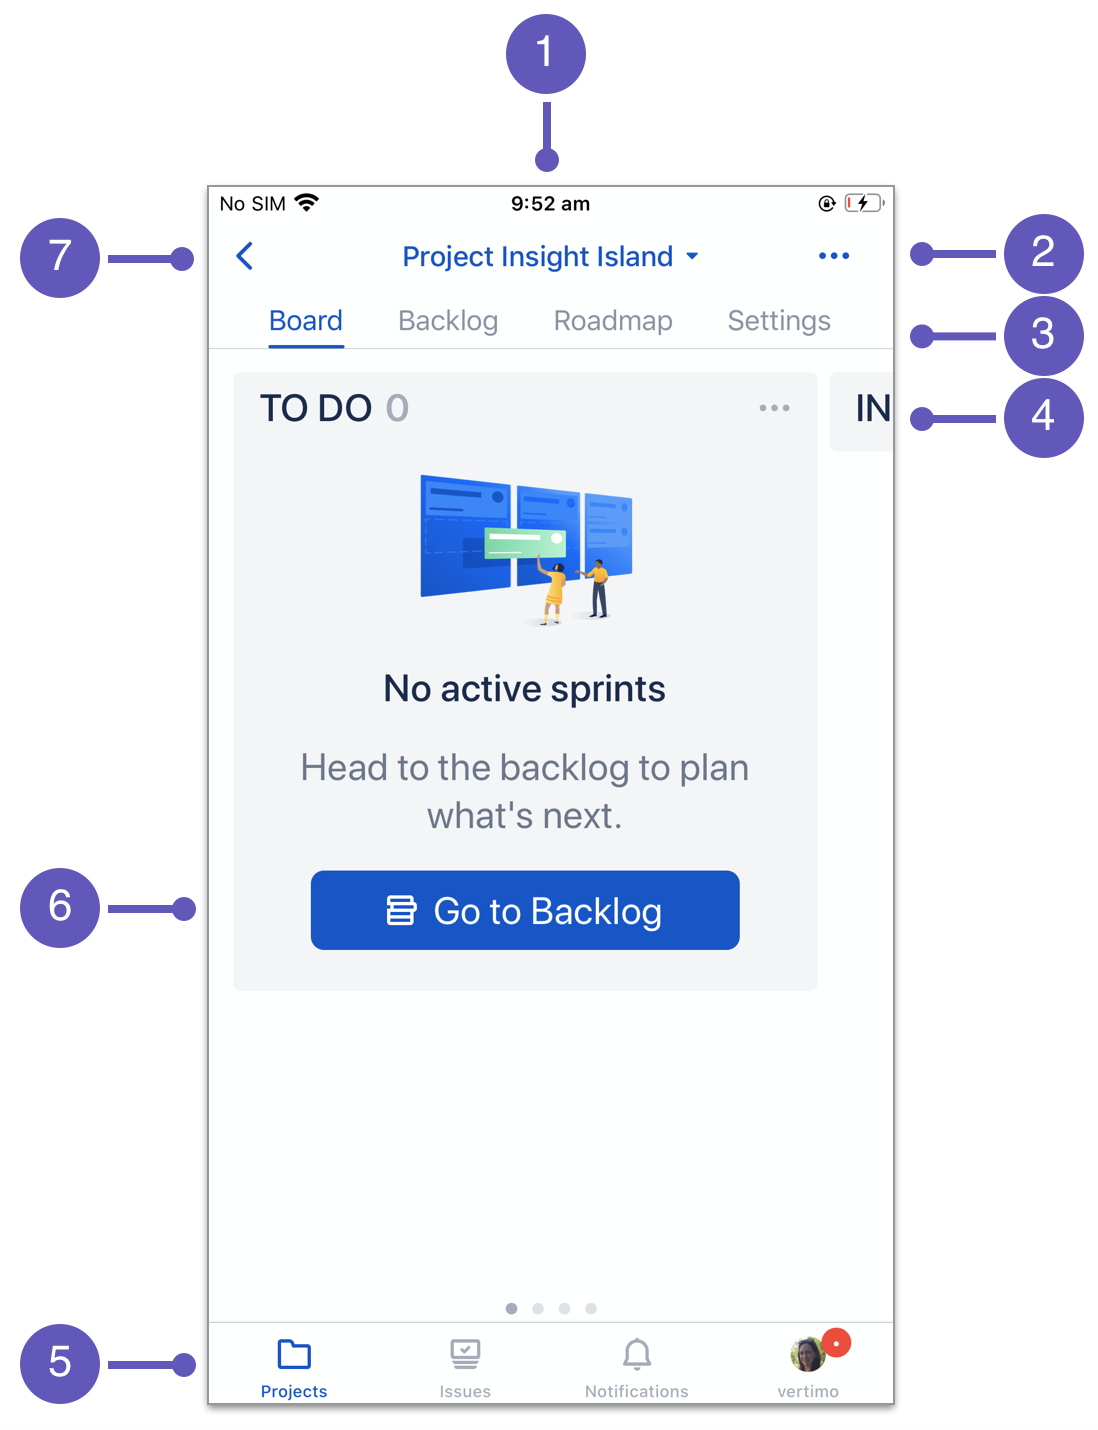
Switch between boards (if you have multiple boards within one project) by selecting the name of your board.
Select ••• for board actions, including adding a new column and enabling notifications.
Use these project tabs to switch between your project's board, backlog, roadmap, and settings*.
Select ••• at the top of the column for column actions: rename the column, move the column, set a column limit, and delete the column. Swipe right-to-left to view more columns.
Within the tab bar:
• Select Projects to go to the project you’re currently in; select it a second time to see your list of projects.
• Select Issues to see a list of issue categories, including 'Assigned to me' and 'Reported by me'; select a category to view your issues.
• Select Notifications to keep on top of changes and updates.
• Select your account name to find details of the site you’re working in (plus the option to switch between sites, if applicable), and your account settings, system updates, and more.This project has sprints enabled. Go to the backlog to begin creating issues for your first sprint. (To enable sprints, go to Settings* > Features.)
Select the 'back' icon to exit the board and go to your list of projects.
*Settings require admin permissions
NOTE: If sprints are enabled, issues will appear on your board once you start your first sprint.
Once your board displays issues:

Select the search icon to search for issues, and/or apply filters to your board.
- Create issues in each column.
- Drag-and-drop issues between or within columns by long-pressing them. Tap them once to view and edit their details.
Board shortcuts
Show issue filters by pulling the screen down. Push screen back up to hide filters. (See Searching for issues and boards below for more information about filtering issues.)
- When filters are active on your board, long-press the search icon to reveal the option to clear board filters.
Tap an empty space on your board for a wider view of your board.
- Pinch to zoom in or out.
Long-press your account name in the tab bar to move between sites.
Swipe from the left edge of the screen to exit the board and go to your projects.
Backlog basics
Your backlog is where you organise work with your team, ranking issues according to priority.

Select ••• for backlog actions, including creating a new sprint.
Within a sprint, select ••• for sprint actions: start sprint, edit sprint, and delete sprint. (To enable sprints, go to Settings* > Features.)
Create an issue in your backlog.
Create an issue in the sprint. (To enable sprints, go to Settings* > Features.)
Select the 'back' icon to return to your board.
*Settings require admin permissions
Once your backlog is populated with issues:

- Hold
 to drag-and-drop issues. Move them between sprints and to/from the backlog, and rank them according to priority.
 - View and edit an issue's details by selecting the issue.
- Simplify your view: select v to minimise the sprint. The same can be done for the backlog below.
Backlog shortcuts
Swipe an issue from right to left for quick-move options: add it to a sprint, or move it to the top/bottom of the backlog.
Swipe from the left edge of the screen to exit the backlog and go to your list of projects.
Searching for issues
Searching for issues:
To quickly search through a large amount of issues on your board, you can apply an issue filter:
- On your board: Show filters by pulling the screen down. Push screen back up to hide filters.
To search through issues in your backlog, simply select the search bar and type your search terms.
Roadmaps
A roadmap is where you can create, manage, and visualize your team's epics. Roadmaps enable you to plan large pieces of work in advance.

The two icons:
Select + to add epics to your roadmap.
Select ••• for roadmap actions: switch between list view and chart view. List view shows your epics in one simple list of text, while chart view delivers a visual representation of your team’s long-term roadmap via horizontal bars.
Here's an example of a roadmap in chart view, where epics are represented as horizontal bars:
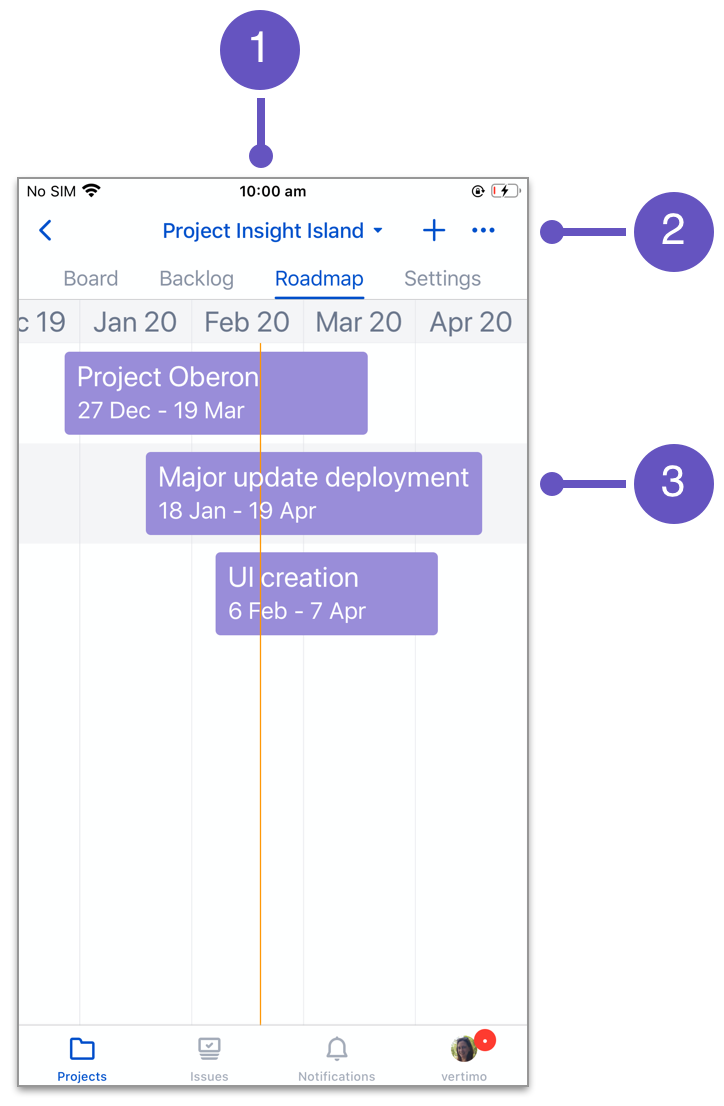
- Today's date is represented by a vertical red line.
- The two icons:
Select + to add epics to your roadmap.
Select ••• for roadmap actions: switch between list view and chart view. Within chart view, roadmap actions also include Mode: change your roadmap's display: weeks, months, or quarters.
- Select an epic to view and edit its details.
Roadmap shortcuts
Pinch to zoom in (or out), for a more (or less) detailed view of your roadmap.
Swipe from the left edge of the screen to exit the roadmap and go to your list of projects.
Changing the color of an epic is not currently supported on mobile. Epic colors can be changed in Jira Cloud for web, and viewed on mobile.
Reports
Reports enable you to track and analyze your team's progress.
To enable reports, go to:
Your project > Settings > Features.
Learn more about reporting in Jira Cloud for web.
Dark Mode
To enable/disable Dark Mode, go to:
> Account > Settings > Theme
Dark Mode went native in iOS 13. As a result, our custom Dark Mode implementation is no longer supported in iOS 11 or 12.
Didn't find what you're looking for?
Hit 'Provide feedback about this article' below ↓ and let us know what you'd like to see.