Change management
Effective service desks plan and control changes and they understand their impact on their business. An Information Technology Infrastructure Library (ITIL) change management workflow aims to make your change efforts successful.
The IT Service Desk template comes with a change management workflow. This workflow ensures you record, assess, approve, and implement change requests. We recommend you start with our default workflow and adapt it to your business needs.
If done well, a change management process:
- stabilizes your IT services
- makes IT services reliable and predictable
- adapts IT services to evolving business needs
You can lessen risk, outages, and defects. And, you can prevent duplicating efforts from failed changes.
This page describes some best practices for managing changes using Jira Service Desk. You may seek formal training in how to make ITIL recommendation work best for your business.
Change management process
The IT Service Desk template connects certain requests to a change workflow. We set up the workflow to complement the following change management process. Use the workflow to transition change request records alongside these ITIL recommended activities:
- reviews
- planning
- approvals
- implementations
We recommend you start with this workflow and adapt it to your needs over time.
The ITIL change management process, in brief:

- An internal IT member requests a change. They note details like the affected systems, possible risks, and expected implementation.
- The change manager or peers determine if the change will be successful. They may ask for more information in this step.
- After review, the team plans how to put the change in place. They record details about:
- the expected outcomes
- resources
- timeline
- testing
- ways to roll back the change
- Depending on the type of change and risk, a change approval board (CAB) may need to review the plan.
- The team works to implement the change, documenting their procedures and results.
- The change manager reviews and closes the implemented change. They note whether it was successful, timely, accurately estimated, within budget, and other details.
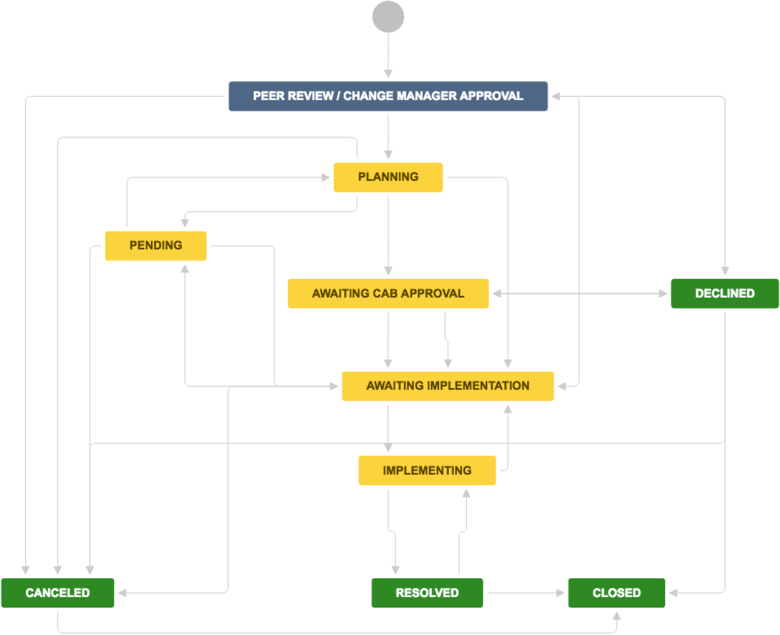
Jira Service Desk's default change workflow
Using request types, you can associate change requests with an issue type called Change. This puts the issue into the recommended change request workflow.
This workflow follows the basic process above. You can customize it to adapt to the needs of your business.
Customize your change workflow
- In your service project, select Project settings (
 ) > Workflows.
 - Select the edit icon (a pencil), in the entry titled Change Management workflow for Jira Service Desk.
- Use the workflow editor to add or remove steps and transitions.
Read more about editing workflows.
Enforce an approval step for change reviews
The change management workflow includes two review stages: a change manager or peer review, and a change advisory board (CAB) review. By default, the template doesn't force approvals for these steps. Any service agent or admin has the right to transition an issue through a review.
You can easily enforce strict approvals, making it mandatory to be reviewed by a one or more specific team members. As an example, here's how to add an approval on the change advisory board review stage in the workflow:
- Follow the steps above to customize the Change Management workflow for Jira Service Desk.
- Select the AWAITING CAB APPROVAL step in the workflow.
- Tick the Add approval checkbox and select Configure.
- From the Get approvals from dropdown menu, select CAB.
- Select Create.
- Publish your workflow.
You can do the same for your change manager or peer reviews. Repeat this process for the Change manager / Peer review stage of the workflow, selecting to get approval from Change managers or your Team.
Designate your approvers
The steps above enforce a review approval, but the issue doesn't know who your approvers are. Designate your approvers in their corresponding issue fields.
For example, to designate your CAB members:
- Go to the issue.
- Select Edit.
- Enter CAB members into the CAB field.
The process is the same for change manager or peer/team reviews.
Depending on how you configure your approvals, all or some of these members need to approve the request before the change can proceed to the Awaiting implementation stage.
You may find your CAB doesn't change membership very often. In this case, you can designate them automatically when setting up a change request type.
- In your service project, select Project settings () > Request types.
- Next to change request that you want to add pre-designated CAB approvers to, select Edit fields.
- Select Add field.
- Tick the checkbox next to CAB and select Apply.
- The CAB appears in the list of visible fields. In the CAB entry, select Hide.
- Designate your CAB members and select Set.
Similarly, you can pre-designate the change manager or peer reviewers for each request type.
Auto-approve standard changes
ITIL defines a standard change as a request that is pre-approved. The IT Service Desk template comes with an automation rule that pre-approves standard changes.
It works by looking at change requests that have the Change type set to Standard. It transitions these through the Peer review / Change manager approval stage to the Planning stage.
You can disable or fine-tune this rule in your automation settings:
- In your service project, select Project settings () > Automation.
- Edit the rule named Auto-approve standard change requests.
You can create a custom rule to approve changes in the Awaiting CAB approval stage, as well.
Learn more about automation and custom rules.
Set the time limit for reviewing normal changes
The IT Service Desk template includes an SLA that limits the amount of time to review a normal change. You can use this to track change reviews times or create automatic reminders for reviewers.
We set up the SLA to effect changes whose Change type is set to Normal. The SLA allows five business days for approvers to act before it breaches. It counts the time between an approval stage and an approval outcome.
You can change the time allowance in an SLA named Time to approve normal change. To edit or view this SLA:
In your service project, select Project settings (![]() ) > SLAs.
) > SLAs.
Remind change reviewers automatically
Approvers are often busy. To ensure timely changes, you can set up an automation rule to remind them of pending approvals when their time limit is up.
For example, to add a reminder for your CAB to approve a normal change:
- In your service project, select Project settings () > Automation.
- Select Add rule.
- Choose Custom rule and select Next.
- Use or adapt the following recipe:
| WHEN | IF | THEN |
|---|---|---|
SLA time remaining SLA: Time to approve normal change Event: Breached | Issue matches Advanced: status = "Awaiting CAB approval" AND issueType = Change | Add comment Comment text: CAB members, we're trying to complete the change review cycle in a timely manner. If you haven't already, please review it today. Thanks! Comment type: Public |
Coordinate changes with a calendar
With Confluence, you can schedule changes. Use Team Calendars to track changes, and schedule change to coincide with business events. Try Team Calendars for Confluence for free.
To set up a change calendar with Team Calendars for Confluence:
- In Confluence, go to your team's space.
- From the sidebar, select Calendars.
- Select Add calendar.
- Viewing the calendar, select Add event.
- Select the Event Type drop down and choose Jira Issue Dates.
- Under Display, select the JQL (advanced) and enter the following:
project = "Your IT service desk project name" AND issuetype = Change
- Under Date range, select Add start and end date… Select Change start date as the start date. Select Change completion date as the end date.
- Select OK.
The calendar automatically picks up the start and end dates of change requests from your service desk. Then, it plots them on the calendar.
Default form fields for change requests
Jira Service Desk allows you to customize the fields of information collected from customers. Additionally, you can customize the fields of information used by your agents. Jira Service Desk does this through issue type fields and screens. Fields help agents assess, approve, and categorize the request for reporting or querying.
By default, we include the following fields in your agent's view of a change request. If needed, you can add custom fields. Find out more about fields in Jira.
Field name | Description |
|---|---|
| Summary | A short description of the request. |
| Reporter | The person who submitted the request. |
| Component/s | Segments of your IT infrastructure that relate to the request. For example, "Billing services" or "VPN server". These are used for labelling, categorization, and reporting. |
| Attachment | Files or images added to the request. |
| Description | A long, detailed description of the request. |
| Linked Issues | A list of other requests that affect or are affected by the request. If your business uses other Atlassian products, this list may include linked development issues. |
| Assignee | The team member assigned to work on the request. |
| Priority | The importance of the request's resolution, usually in regards to your business needs and goals. Sometimes, priority is calculated by impact and urgency. |
| Labels | A list of extra custom labels used for categorizing or querying records. |
| Request participants | A list of extra customers who take part in the request, for example, people from other teams, or vendors. Read more about participants. |
| Approvers | A list of people responsible for approving the request, usually business, financial or technical contacts. |
| Organizations | A list of customer groups interested in the request's resolution. Learn more about organizations in Jira Service Desk. |
| Impact | The effect of the change, usually in regards to service level agreements. |
| Urgency | The time available before the business feels the request's impact. |
| Change type | The category of the change (usually standard, normal, or emergency). For example, a standard change does not require action from change managers. A normal change does. |
| Change reason | A short description or code that indicates why the reporter needs the change. |
| Change risk | The risk of implementing the change determined by the change advisory board. Usually based on complexity, scope, testing, recovery, timing, etc. |
| Change start date | The scheduled date the change's implementation. |
| Changecompletiondate | The date the change's implementation is complete. |
| Change advisory board (CAB) | A list of individuals responsible for assessing, approving and scheduling the change. |
| Pending reason | A short description or code that indicates why the change is not progressing. |
Learn more about IT service management (ITSM)
Get more tips and tricks for successful ITSM, view case studies, and learn how to take your service desk to the next level. Check out the ITSM resources on IT Unplugged.