Configuring an incoming mail server with POP, IMAP, or Microsoft Graph API
To have comments and issues created from email in Jira, you should first enable Jira to receive emails from one of the available incoming mail services: POP, IMAP, or Microsoft Graph API.
For all of the following procedures, you must be logged in as a user with the Jira administrators global permission.
If your mail server supports SSL, you can use it to encrypt email communications between Jira and the server. To do this, import the mail server certificate to a Java keystore. Learn more about how to import the certificate in Connecting to SSL Services.
Adding a POP or IMAP mail server
To create a POP or IMAP mail server:
- In the upper-right corner of the screen, select Administration , then System.
In the left-side panel, select Mail > Incoming mail.
Select Add mail server to start configuring a new incoming mail server.
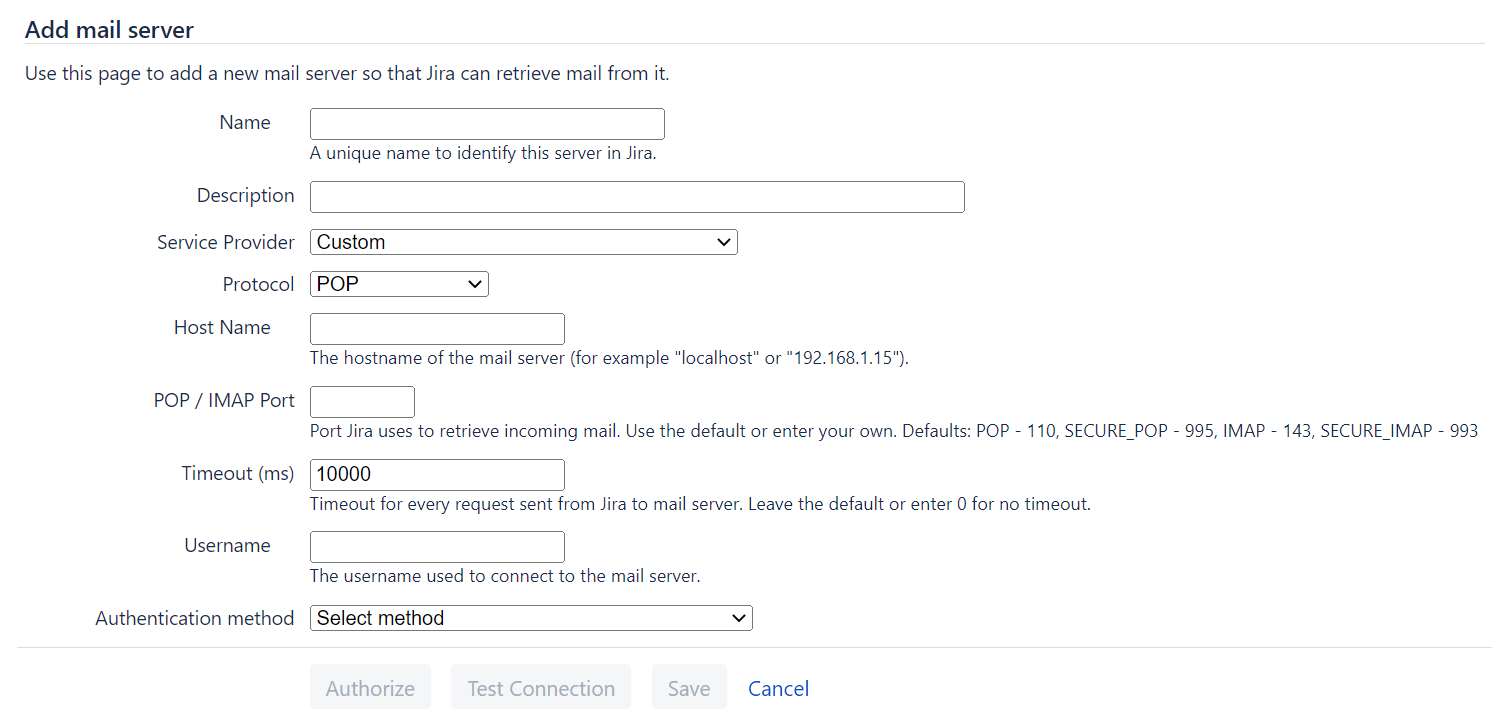
In the Name field, enter the name of the mail server. For example, the name can be the email address of a mail server.
Optional: In the Description field, enter a brief description of the mail server. For example, explain its purpose or specifics. The description appears below the Name of a mail server in the Mail servers table.
- In the Service provider field, select one of the following options to use preconfigured fields for a quick set-up:
- Custom for your own mail server of any type
- Google Apps Mail / Gmail (POP3) for a POP mail server
- Google Apps Mail / Gmail (IMAP) or Microsoft Exchange Online / Outlook (IMAP) for an IMAP mail server
Yahoo! Mail Plus for a Yahoo! POP mail server
If you select any of the Gmail or Yahoo! options and switch back to Custom, some of the fields will be automatically populated with values relevant for these service providers.
If you’ve selected the Custom option for a service provider, select a standard or secure protocol for it in the Protocol field.
In the Host Name field, set the hostname or IP address of the mail server. For example,
pop.yourcompany.comorimap.yourcompany.com.Optional: In the POP/IMAP port field, set the port Jira will use to retrieve email from your POP or IMAP account. The default ports are
POP: 110; SECURE_POP: 995andIMAP: 143; SECURE_IMAP: 993.Optional: In the Timeout (ms) field, set the timeout in milliseconds for every request Jira sends to the mail server. The default value is
10000. If you set0or a negative number, Jira will be waiting indefinitely for a response from the mail server.In the Username field, set the name of the user Jira will apply to connect to the mail server.
- In the Authentication method field, select an outgoing link you preconfigured with the OAuth 2.0 integration. Learn more about how to configure an outgoing link
You can select Password (basic authentication) to use your OAuth 2.0 authentication password for connecting to the mail server. When editing an existing POP or IMAP mail server, select the Change Password checkbox to access and change this field.
Google and Microsoft disabled the usage of the password as an authentication method. You should configure Jira as an OAuth 2.0 client to connect to your Gmail or Microsoft Exchange Online and then select it as the authentication method. Learn how to configure Jira as an OAuth 2.0 client
Select Authorize. You'll be redirected to the service provider’s authorization page where you should log in and complete the authorization. After you do that, you’ll be redirected back to the Add mail server page in Jira. If your authorization is successful, you'll get a notification about it, and the Test Connection button will become active.
Select Test Connection. If a connection can be established, the Save button will become active.
Select Save.
Adding a Microsoft Graph API mail server
Microsoft Graph API ensures robust data security in your Jira instance, protecting it from unauthorized access, corruption, and breaches.
Since Microsoft Graph API is based on OAuth 2.0, before you start setting up the mail server, you should configure your Azure Active Directory integration and then, create an incoming mail server and a mail handler in Jira Software. Learn how to configure OAuth 2.0 integration with Microsoft Azure
Before you start
Before you set up an incoming mail server with Microsoft Graph API, take the following steps.
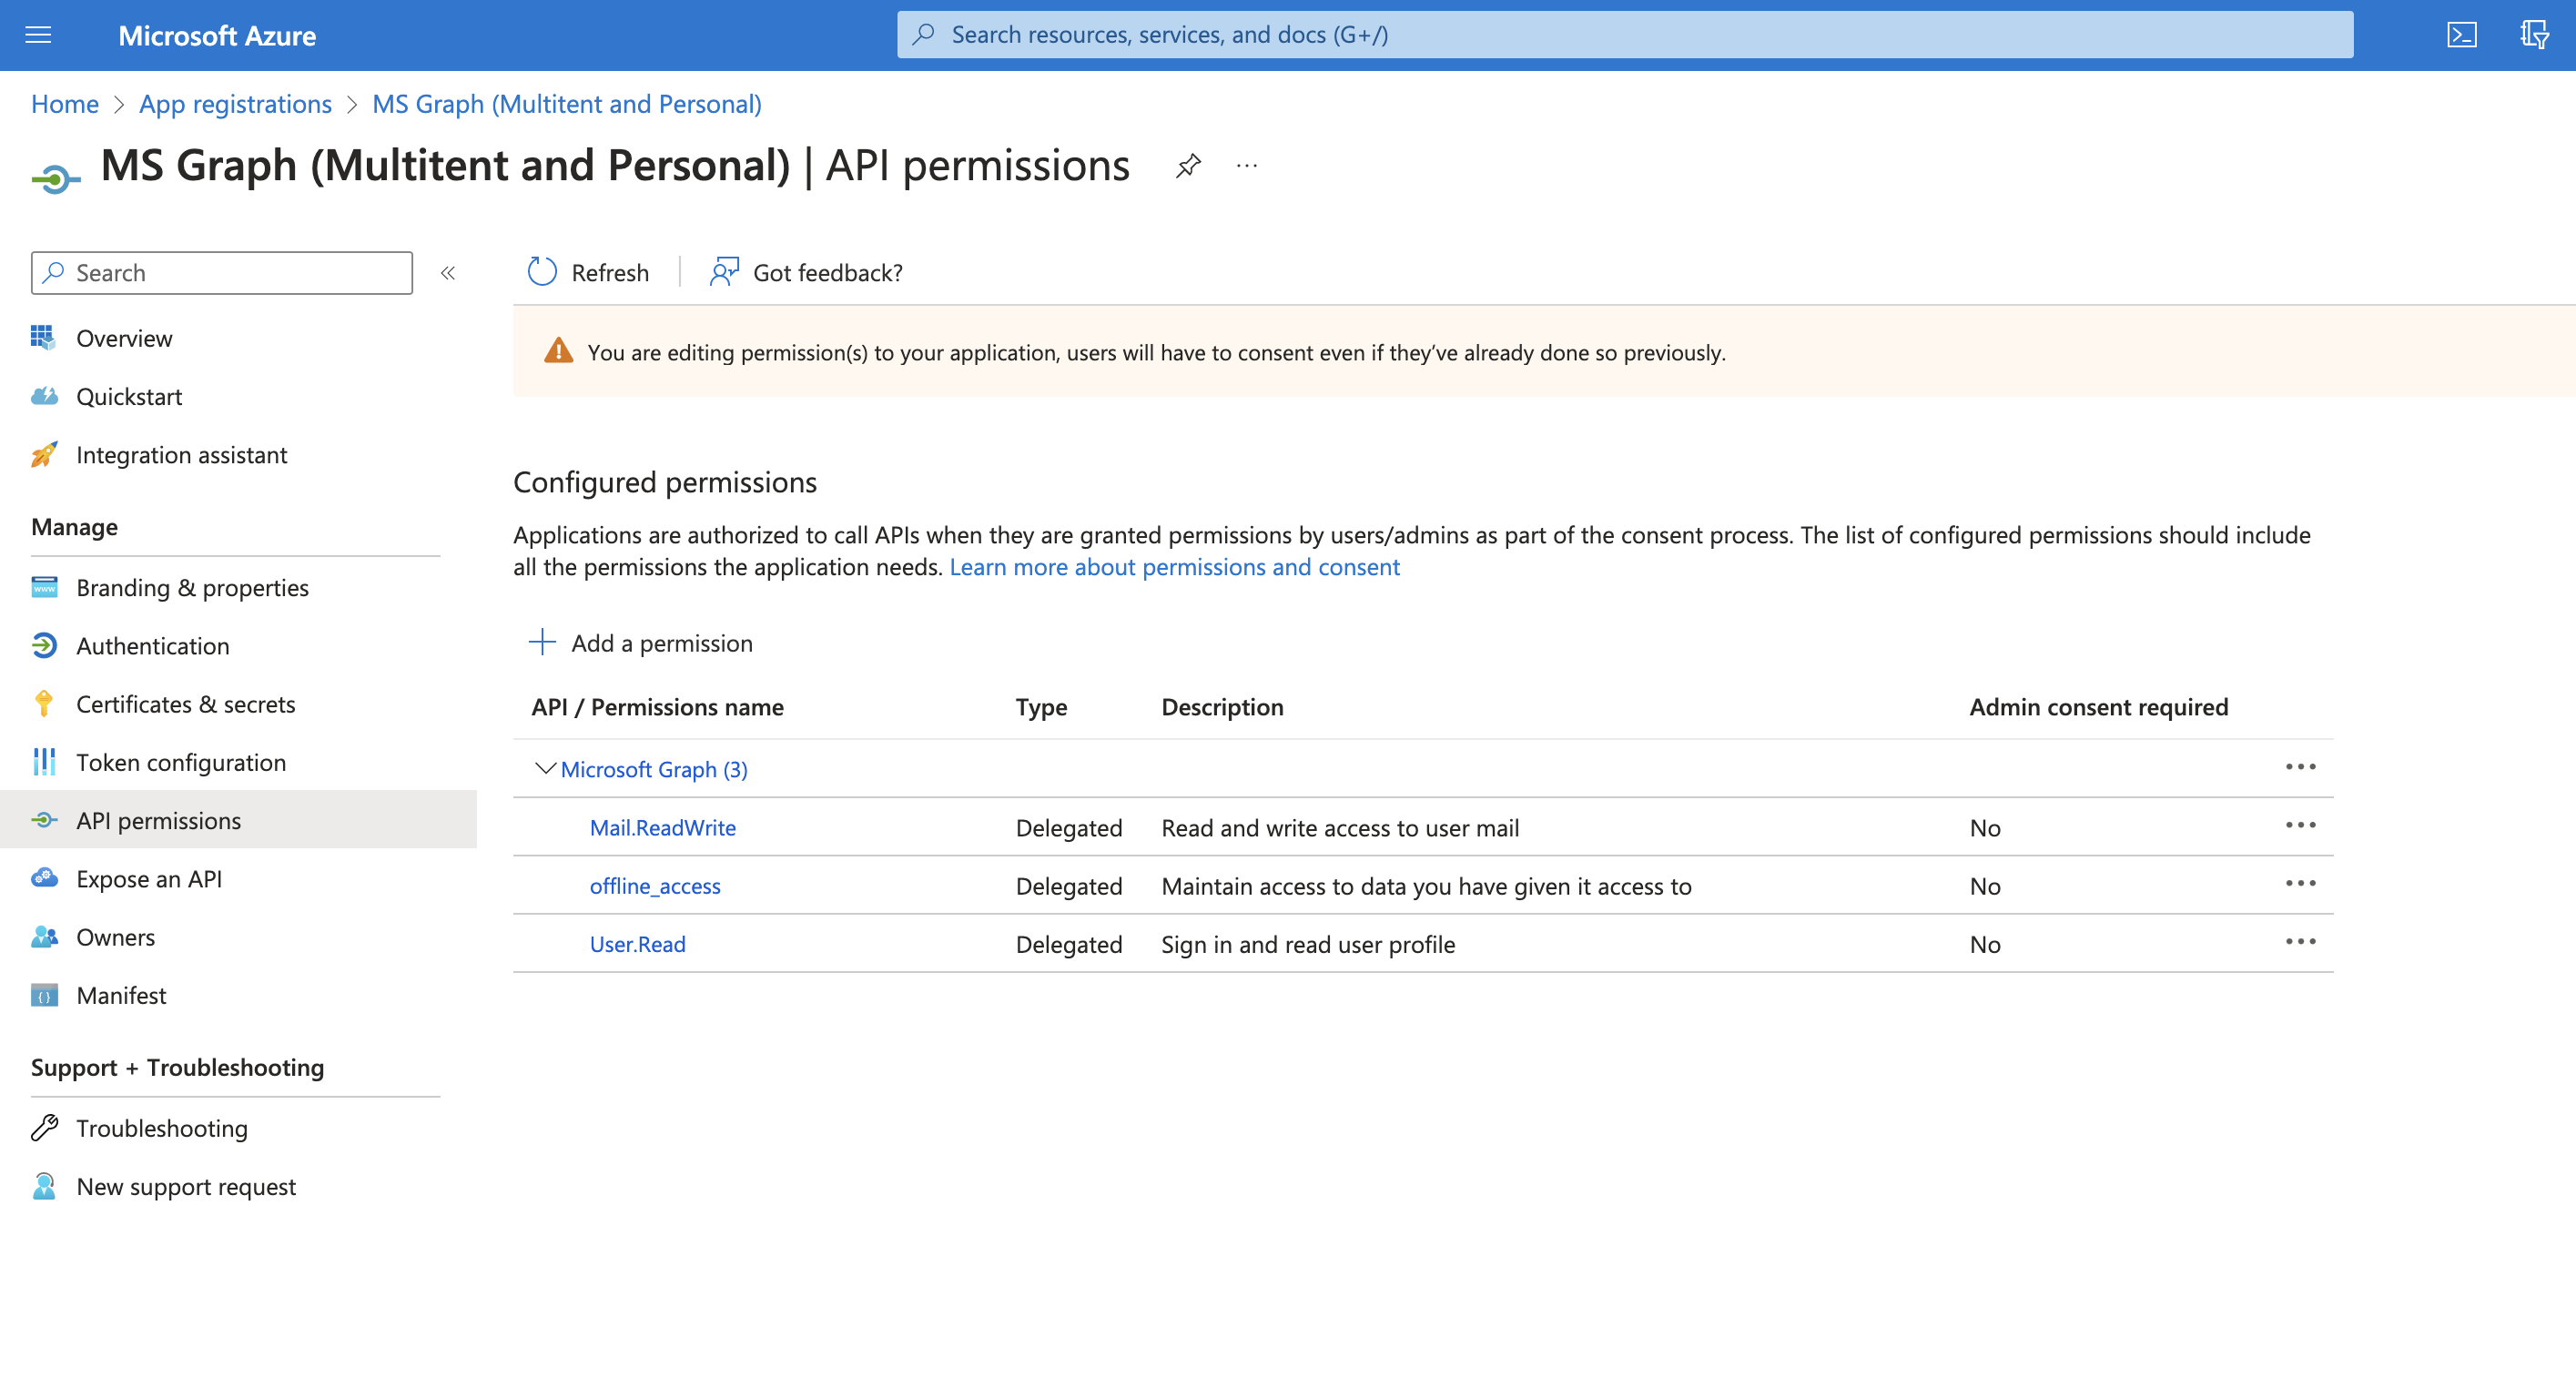
In the Azure Active Directory app registry, add the
Mail.ReadWriteandoffline_accesspermissions to your API permissions. For shared mailboxes, addMail.ReadWrite.Shared permissions.In the following screenshot, check what configuration you should have in your API permissions of the Azure Active Directory app registry.
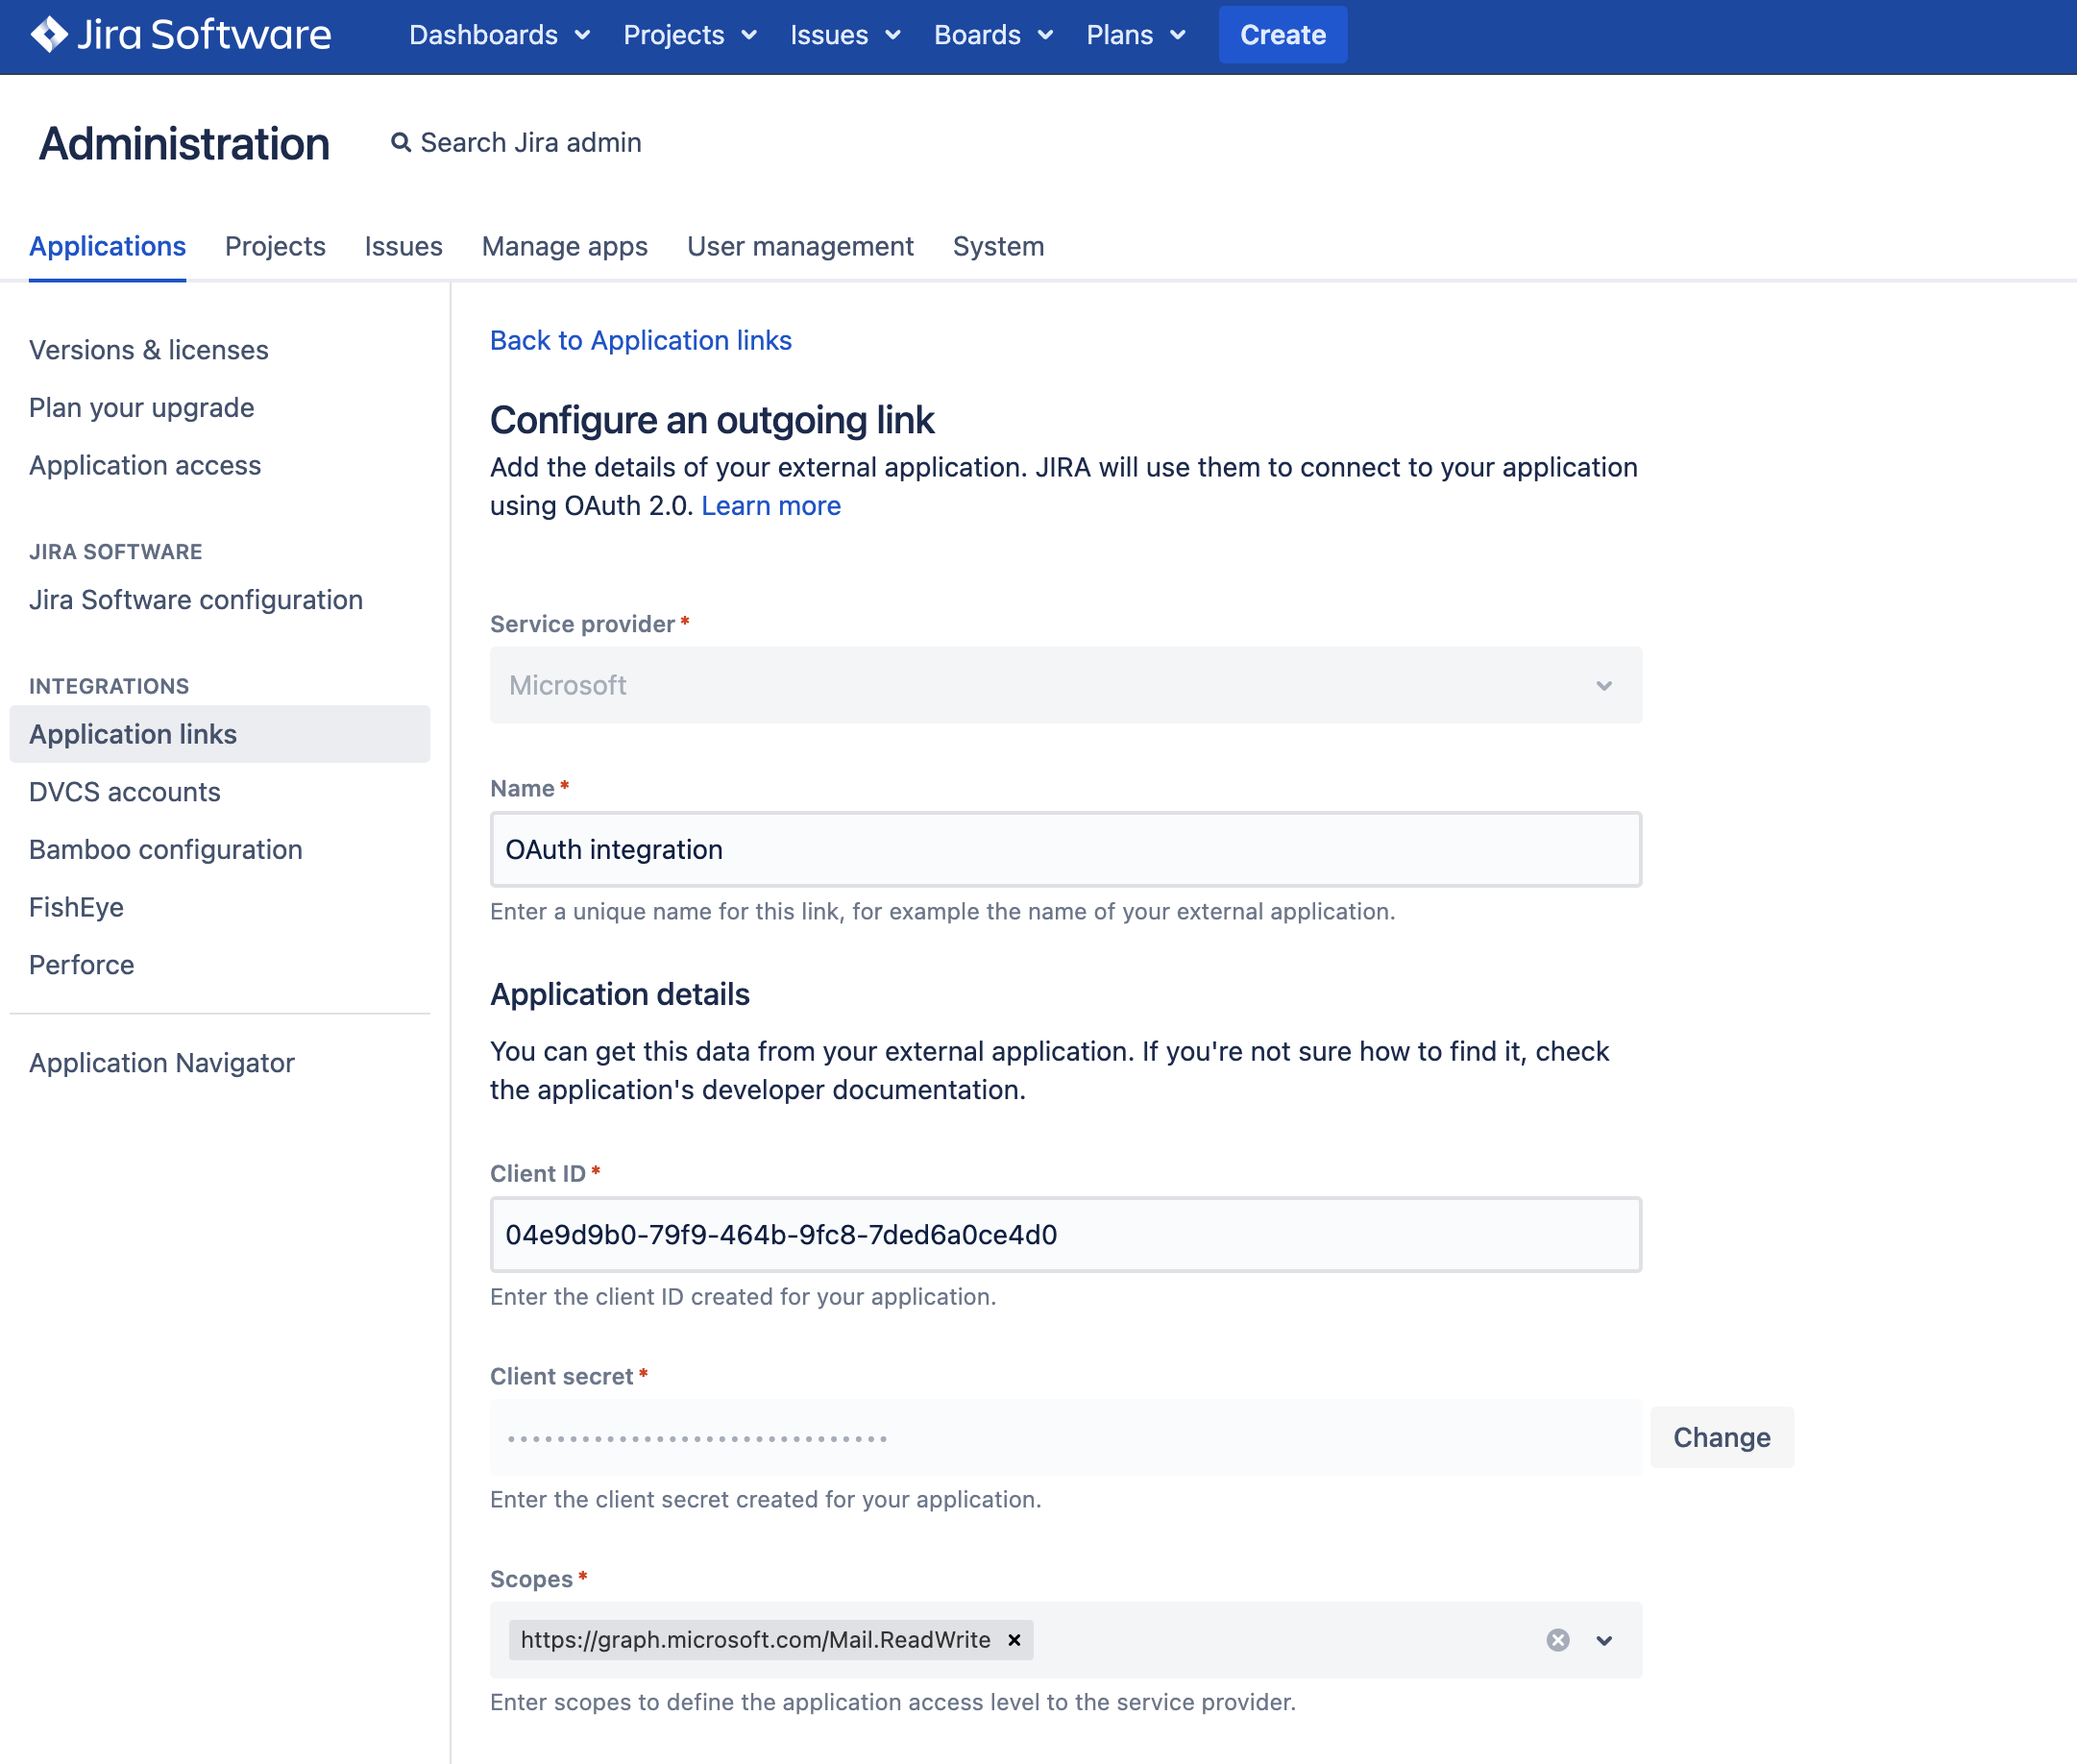
- In Jira, add the following URLs to the Scopes section in the outgoing application link configuration:
https://graph.microsoft.com/Mail.ReadWritehttps://graph.microsoft.com/offline_accesshttps://graph.microsoft.com/Mail.ReadWrite.Shared(for shared mailboxes only)
If you're using a personal account, you don't need to add https://graph.microsoft.com/offline_access. It's added by default.
For more details on how to add the scopes, check Configuring an outgoing link.
In the following screenshot, check what outgoing link configuration you should have in Jira. If you're using a personal account, you don't need the scope https://graph.microsoft.com/offline_access.
The set permissions and scopes allow Jira to pull mail using the conventional HTTPS protocol.
Configuring a mail server with Microsoft Graph API
Now, you can set up an incoming mail server with Microsoft Graph API in Jira:
- In the upper-right corner of the screen, select Administration , then System.
In the left-side panel, select Mail > Incoming mail.
Select Add mail server to start configuring a new incoming mail server.
In the Name field, enter the name of the mail server. For example, the name can be the email address of a mail server.
Optional: In the Description field, enter a brief description of the mail server. For example, explain its purpose or specifics. The description appears below the Name of a mail server in the Mail servers table.
In the Service provider field, select Microsoft Graph API to use preconfigured fields for a quick set-up.
In the Timeout (ms) field, set the timeout in milliseconds for every request Jira sends to the mail server.
In the Username field, set the name of the user Jira will apply to connect to the mail server.
In the Authentication method field, select the outgoing link you preconfigured.
Select Authorize. You'll be redirected to the Microsoft Authorization page where you should finish the authorization before being redirected back to the Add mail server page in Jira. If your authorization is successful, you'll get a notification about it, and the Test Connection button will become active.
Select Test Connection. If a connection can be established, the Save button will become active.
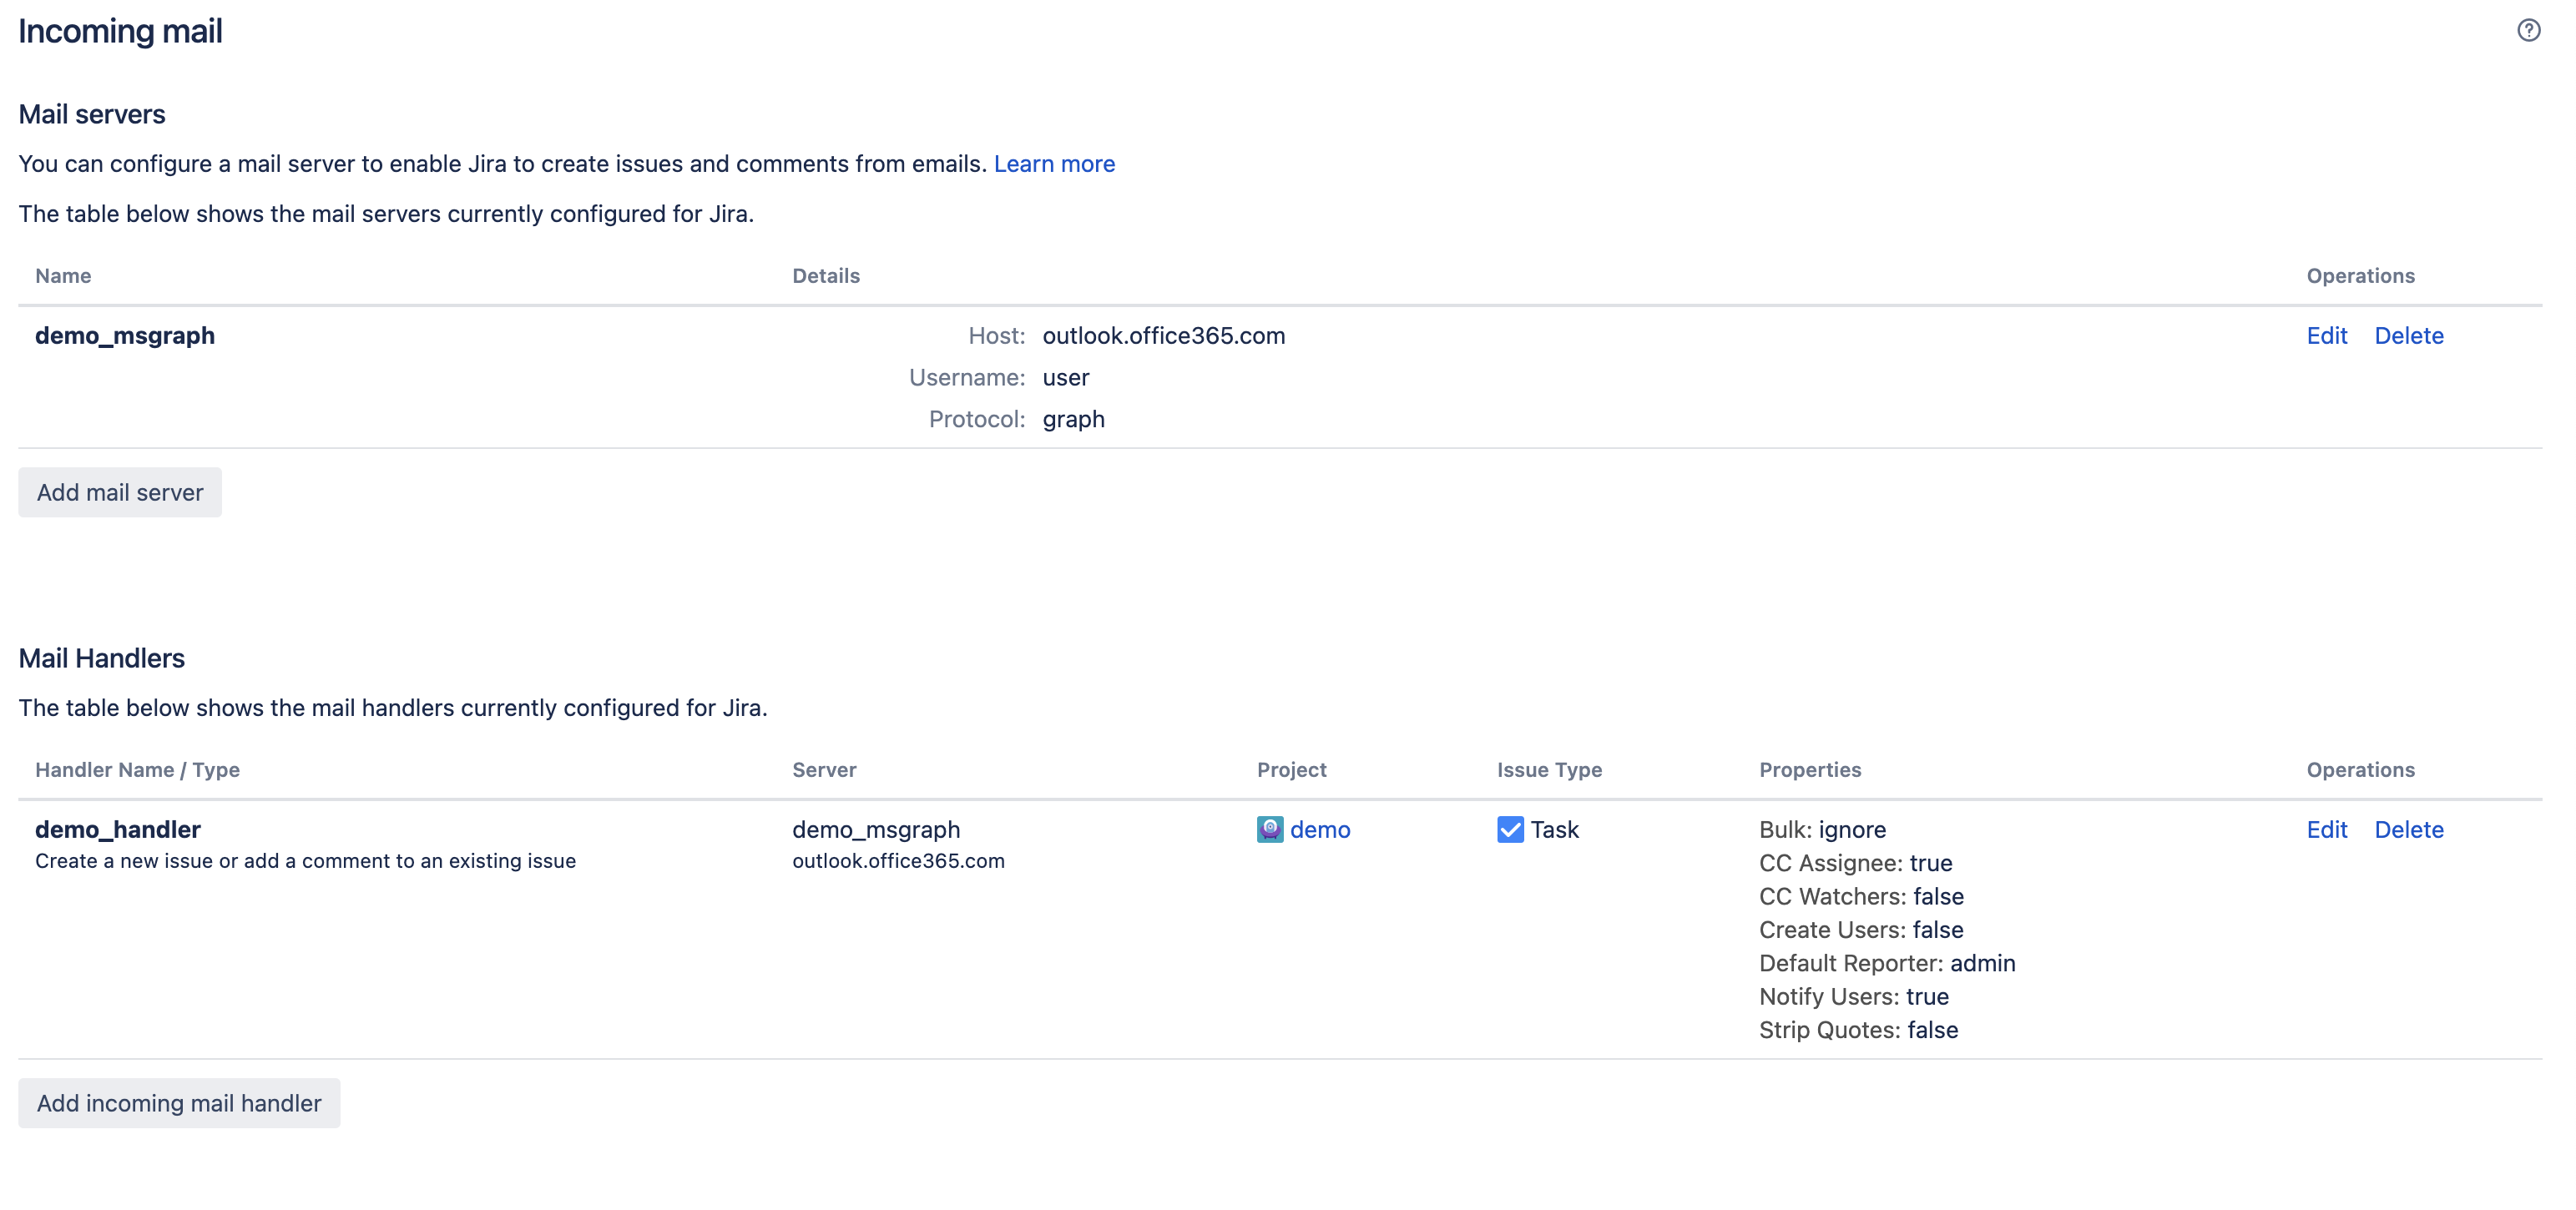
Select Save. You'll be redirected back to the Incoming mail page where you’ll find the configured Microsoft Graph API mail server.
You also need a mail handler to activate the mail server. Learn how to configure a mail handler in Create issues and comments from email.
The following screenshot shows the fully configured mail server and mail handler.


