Importing data from CSV
Preparing your CSV file
If you want to import issues but don't have admin rights, use Bulk issues import instead.
The Jira Importers plugin assumes that your CSV file is based off a default Microsoft Excel-styled CSV file:
- Fields are separated by commas.
- Any content that must be treated literally, such as commas and new lines/"carriage returns" themselves are enclosed in quotation marks.
For Microsoft Excel and OpenOffice, it is not necessary to quote values in cells as these applications handle this automatically.
CSV file requirements
In addition to being "well-formed", CSV files have the following requirements.
Each CSV file must possess a heading row with a Summary column
The CSV file import wizard (see more details below) uses a CSV file's header row to determine how to map data from the CSV file's 2nd row and beyond to fields in Jira.
The header row shouldn't contain any punctuation, except for the commas separating each column. Otherwise, the importer may not work correctly.
The header row must contain a column for the issue's "Summary" data.
Commas (as column/field separators) cannot be omitted
For example, the following format is valid:
Summary, Assignee, Reporter, Issue Type, Description, Priority
"Test issue", admin, admin, 1, ,
While this one is not valid:
Summary, Assignee, Reporter, Issue Type, Description, Priority
"Test issue", admin, admin, 1
Encapsulating Jira data structure in your CSV file
In this section, you’ll find solutions for the following issues:
Capturing data that spans multiple lines
Use double-quote marks (") in your CSV file to capture data that spans multiple lines. For example, during import, Jira will treat the following as a valid CSV file with a single record:
Summary, Description, Status
"Login fails", "This is on
a new line", Open
Treating special characters literally
Use double-quote marks (") around a section of text to treat any special characters in that section literally. Once this data is imported into Jira, these special characters will be stored as part of Jira's field data. Examples of special characters include carriage returns/enter characters, commas, etc.
To treat a double quote mark literally, you can "escape" them with another double quote mark character. For example:
- Your CSV file might contain the value like
"Clicking the ""Add"" button results in a page not found error". - Once imported, it will be stored in Jira as
Clicking the "Add" button results in a page not found error.
Aggregating multiple values into single Jira fields
You can import multiple values into a Jira field that accepts multiple values. For example, Fix (for) version, Affects version, Component, or Labels. To do this, your CSV file must specify the same column name for each value you wish to aggregate into the mapped Jira field. The number of column names specified must match the maximum number of values to be aggregated into the mapped field. For example:
IssueType, Summary, FixVersion, FixVersion, FixVersion, Component, Component
bug, "First issue", v1, , , Component1,
bug, "Second issue", v2, , , Component1, Component2
bug, "Third issue", v1, v2, v3, Component1,
In this example, the Component field of the second issue and the Fix version field of the third issue will generate multiple values in appropriate Jira fields upon import.
Be aware that only a limited number of Jira fields support multiple values. The CSV importer will not allow you to import aggregated data into Jira fields that only support a single value.
Importing attachments
You can attach files to issues, created from your CSV file. To do this, specify the URL of your attachment in an "Attachments" column in your CSV file.
Assignee, Summary, Description, Attachment, Comment
Admin, "Issue demonstrating the CSV attachment import", "Please check the attached image below.", "https://jira-server:8080/secure/attachment/image-name.png", "01/01/2012 10:10;Admin; This comment works"
Admin, "CSV attachment import with timestamp,author and filename", "Please check the attached image below.", "01/01/2012 13:10;Admin;image.png;file://image-name.png", "01/01/2012 10:10;Admin; This comment works"
URLs for attachments support the HTTP and HTTPS protocols and can be any location that your Jira server must be able to access. You can also use the FILE protocol to access files in the import/attachments subdirectory of your Jira home directory.
Creating subtasks
Note that when you import subtasks through a CSV file, Jira creates a new custom field called External issue ID. Issues with an Issue ID that duplicates an existing External Issue ID value won’t be imported.
You can create subtasks of issues through a CSV file import by encapsulating this structure in your CSV file. To do this:
The CSV file must have two additional columns whose headings should be named similarly to Issue ID and Parent ID.
Ensure that each regular (non subtask) issue is given a unique (sequential) number in the Issue ID column. Do not include any value in the Parent ID fields for regular issues.
To create a subtask of a regular issue in your CSV file, reference the unique Issue ID number of the regular issue in the Parent ID column. Don't set any value in the Issue ID fields for subtasks.
For example:
IssueType, Summary, FixVersion, FixVersion, FixVersion, Component, Component, Issue ID, Parent ID, Reporter
Bug, "First issue", v1, , , Component1, , 1, , jbloggs
Bug, "Second issue", v2, , , Component1, Component2, 2, , fferdinando
Bug, "Third issue", v1, v2, v3, Component1, , 3, , fferdinando
Sub-task, "Fourth issue", v1, v2, , Component2, , , 2, jbloggs
In this example, the fourth issue will be imported as a subtask of the second issue, assuming you match the "Issue ID" and "Parent ID" fields in your CSV file to the Issue ID and Parent ID Jira fields respectively during the CSV file import wizard.
Importing issues into multiple Jira projects
You can import issues from your CSV file into different Jira projects through a CSV file import. To do this:
- The CSV file must have two additional columns whose headings should be named similarly to Project name and Project key.
Ensure that every issue represented in your CSV file contains the appropriate name and key in those columns for the Jira projects to which they will be imported.
The project name and key data is the minimum Jira project data required for importing issues from a CSV file into specific Jira projects.
IssueType, Summary, Project Name, Project Key
bug, "First issue", Sample, SAMP
bug, "Second issue", Sample, SAMP
task, "Third issue", Example, EXAM
In this example, the first and second issues will be imported into the "Sample" project (with project key "SAMP") and the third issue will be imported into the "Example" project (with project key "EXAM") , assuming you match the "Project Name" and "Project Key" fields in your CSV file to the Project name and Project key Jira fields respectively during the CSV file import wizard.
Handle unresolved issues
For fields mapping to Resolution, Priority, and Issue Type, you will get a select list with the available values in Jira. In addition, you can quickly create values that do not exist in Jira by selecting the green plus symbols.
For fields mapping to Status, you will get the select list with Jira's available values, but no plus symbol for creating new status values.
For these four fields, there are two special options in the select list in addition to Jira's available values:
- "Import as blank". If selected, the Jira value to be blank for that field. Note that if you are importing Unresolved issues, you should create a field mapping for the Resolution field and set the value "Unresolved" to "Import as blank".
- "No mapping". This attempts to import the value in the CSV file as-is. Note that using "No mapping" for a field value will result in a failed import if the value is not valid for that Jira field. For fields mapping to Status and Issue Type, default values are used when the "Import as blank" option is selected.
Importing worklog entries
Your CSV file can contain worklog entries. For example:
Summary,Worklog
Only time spent (one hour),3600
With a date and an author,2012-02-10 12:30:10;wseliga;120
With an additional comment,Testing took me 3 days;2012-02-10 12:30:10;wseliga;259200
To track time spent, you need to use seconds.
Importing to multi-select custom fields
Your CSV file can contain multiple entries for the one Multi Select Custom Field. For example:
Summary,Multi Select,Multi Select,Multi Select
Sample issue,Value 1,Value 2,Value 3
This will populate the Multi Select Custom Field with multiple values.
Importing cascading choice custom fields
You can import values to a cascading choice custom field using the following syntax:
Summary, My Cascading Custom Field
Example Summary, Parent Value -> Child Value
The '->' separator allows you to import the hierarchy.
Currently, Jira doesn't support importing multi-level cascading select fields via CSV ( JRA-34202 - Getting issue details... STATUS ).
Updating existing issues
From version 4.3 of Jira Importers plugin, you can update existing issues. Your CSV file needs to contain a column that will be mapped to Issue Key during the import. If an issue exists for a given key, it will be updated. For example:
issue key,summary,votes,labels,labels
TT-1,Original summary,1,label1,label2
TT-1,,7,label-1,label-2
TT-1,Changed summary,,,
TT-2,Original summary 2,1,label-1,label-2
TT-2,,<<!clear!>>,<<!clear!>>,
The first row will create an issue, the second row will set votes to 7 and add two labels. The following row will change the summary. Issue TT-2 will be created with two labels, but the second row will remove those labels with a special marker <<!clear!>>.
Importing a CSV to update existing issues will reset columns to their default values if they are not specified in the CSV.
Running the CSV file import wizard
Before you begin, you need to back up your Jira data.
To use External system import to import your issues to Jira, take the following steps:
- Log in to Jira as a user with the Jira administrators global permission.
- Select Administration > System > Import & export > External system import.
- Select CSV to open the CSV file import page.
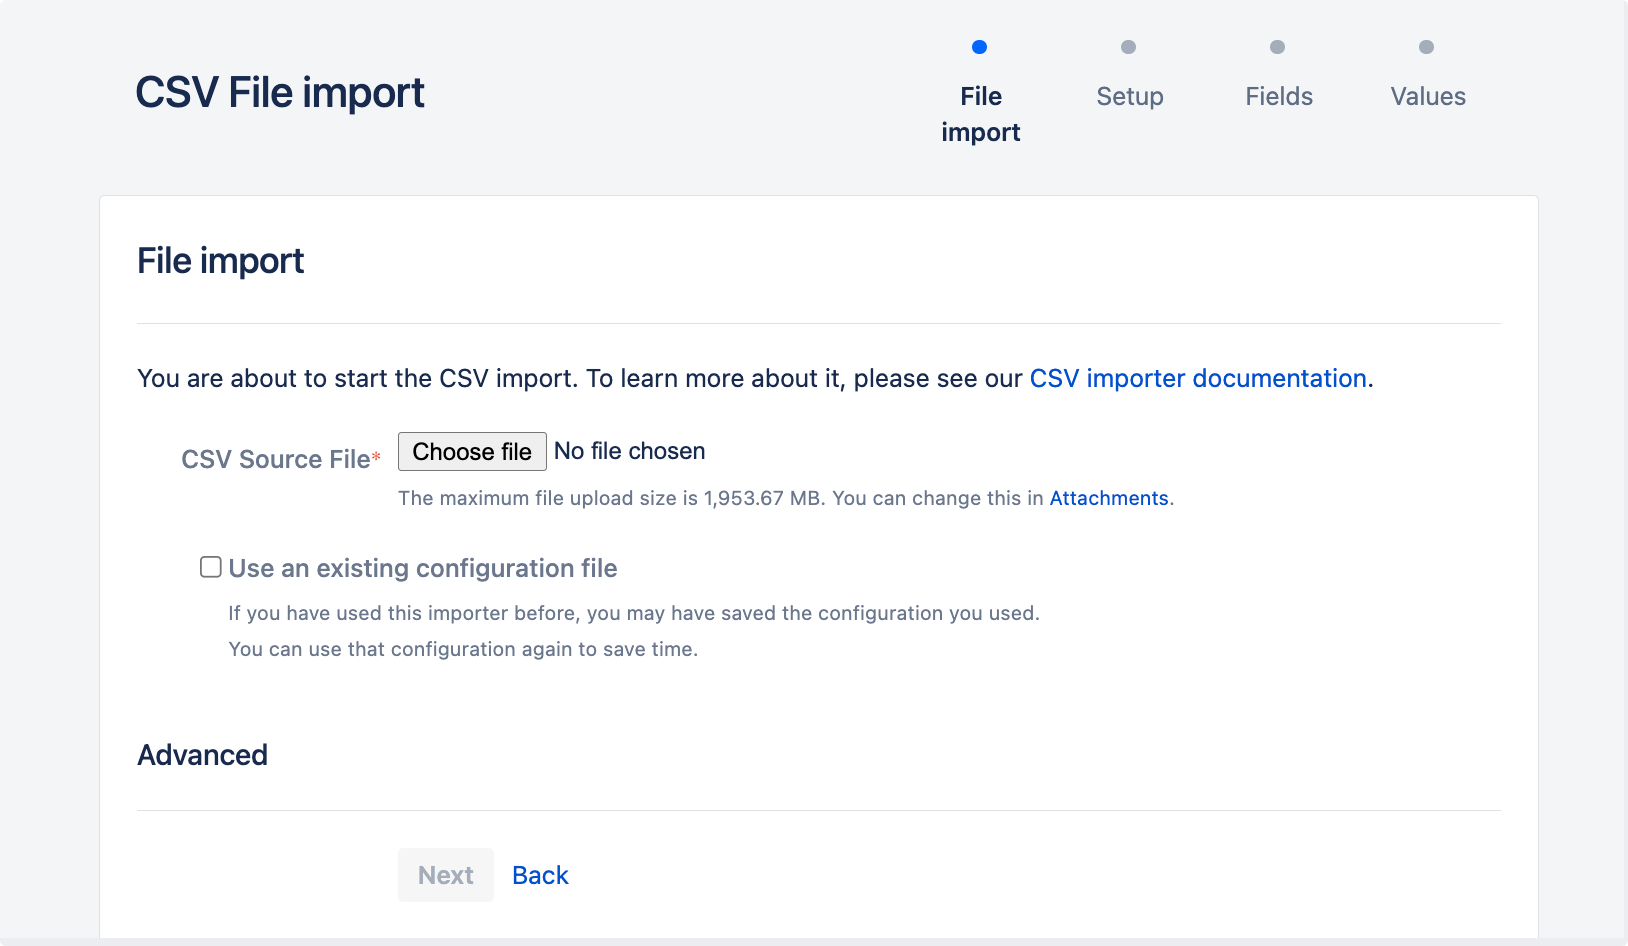
On the CSV file import page, select your CSV source file. If you want to change the file's encoding and CSV delimiter format, select the Advanced heading to reveal this option.
- The file will be imported using the File encoding type you specify here. The default file type is UTF-8.
- If your CSV file uses a different separator character other than a comma, specify that character in the CSV delimiter field.
Leave the Use an existing configuration file checkbox cleared if you do not have a configuration file or if you want to create a new configuration file. Configuration files specify a mapping between column names in your CSV file's header row and fields in your Jira installation.
- If you select this option, you will be asked to specify an Existing configuration file.
- If you do not select this option, then at the end of the CSV file import wizard, Jira will create a configuration file which you can use for subsequent CSV imports (at this step of the CSV file import wizard).
- Select Next to proceed to the Setup project mappings step of the CSV file import wizard.
On the Setup project mappings page, you can either import all your issues into either one Jira project (new or existing), or multiple Jira projects. If you choose to import to multiple projects, ensure that your CSV file includes the minimum Jira project data required, which is Jira project name and key. Complete the following fields/options:
Import to Jira Project Choose one of the following:
- Select a project. Use this option to import issues to an existing Jira project or create a new project and import issues to it.
- Start typing the name (or key) of a project that already exists in Jira or use the dropdown menu to select an existing Jira project.
- Select Create New from the dropdown menu and in the resulting Add a new project dialog box, fill in the following fields:
- Enter the project Name
Enter the project Key
This will be used as the prefix for all issue IDs in your Jira project.
- Specify the Project Lead.
- Defined in CSV. Use this option to import issues to multiple Jira projects. Ensure that every issue in your CSV file includes data for the Jira Project name and Project key. See Importing issues into multiple Jira projects for details.
E-mail Suffix for New Users Enter the email address domain for any new users specified in the CSV file that will be added to Jira during the import. Date format in import file Specify the date format used in your CSV file. Use the syntax that complies with the Java SimpleDateFormat. Check that the key of the project where you’re importing issues is the same as the issue key. Otherwise, Jira will import issues to the project but give them new issue keys.
- Select a project. Use this option to import issues to an existing Jira project or create a new project and import issues to it.
Select Next to proceed to the Setup field mappings step of the CSV file import wizard.
In the Setup field mappings page, map the fields in the CSV file to the issue fields in the selected project. In the Jira field column, select the Jira field that you want to map to the field from the CSV file. For more information about matching CSV fields to Jira fields, see Tips for importing CSV data into Jira fields below.
- The Summary field must be specified for one of your Jira fields and the Next button will remain unavailable until you do so.
If your CSV file contains more than one of the same field name specified in its header row, the CSV file import wizard will aggregate these into a single field, which will be marked by an
 icon at this step of the wizard.
For CSV fields that have been aggregated by the CSV file import wizard, you will only be able to select Jira Fields that support multiple values.
- If you are importing subtasks, remember to match the Issue ID and Parent ID fields in Jira to those in your CSV file.
- If you are importing issues into multiple projects, ensure that you selected Defined in CSV during the Setup project mappings step. Remember to match the Project name and Project key fields in Jira to those in your CSV file.
- To modify the values of any fields' data in the CSV file before they are imported into Jira, select the Map field value checkboxes next to the appropriate fields.
- Select Next to proceed to the Setup value mappings step of the CSV file import wizard.
On the Setup value mappings page, specify the Jira field values for each CSV file field value that has been detected by the CSV file import wizard.
- Any fields which Map field value checkboxes were selected in the previous step of the CSV file import wizard will be presented on this page.
Leave a field cleared or clear any content within it if you wish to import the value "as is".
You can create new Priority, Resolution, and Issue type values in Jira (i.e. based on the data in your CSV file) by selecting the Add new link next to the appropriate field.
If you are importing a username-based CSV field (e.g. Reporter or Assignee) and you didn't select the Map field value checkbox for this field in the previous step of the CSV file import wizard, then the importer will automatically map imported usernames from the CSV file to (lowercase) Jira usernames.
Regardless of whether or not you select the Map field value checkbox, Jira will automatically create usernames based on the data in your CSV file if they haven't been defined in Jira yet.
Select the Begin Import button when you are ready to begin importing your CSV data into Jira. The importer will display updates as the import progresses, then a success message when the import is complete.
- If you experience problems with the import (or you are curious), select the download a detailed log link to view detailed information about the CSV file import process.
- If you need to import another CSV file with the same (or similar) settings to what you used through this procedure, select the save the configuration link to download a CSV configuration file, which you can use at the first step of the CSV file import wizard.
Congratulations, you have successfully imported your CSV data into Jira! If you have any questions or encounter any problems, please contact Atlassian support.
Tips for importing CSV data into Jira fields
The following are some helpful tips when importing data from your CSV file into specific Jira fields.
If a field in your CSV file is missing on an issue screen in Jira, this field won't be listed in the drop-down list for field mapping. For the solution, check out this Knowledge Base article: Missing fields for mapping when importing issues through CSV in Jira Server / Data Center.
Jira field | Import notes |
|---|---|
Project | CSV data is imported on a per-project basis. You can either specify an existing Jira project(s) as the target or the importer will automatically create a new project(s) for you at time of import. |
Summary | This is the only required field. |
| Issue key | You can set the issue key for an imported issue. If an issue with a given key already exists in Jira, it will be updated instead. |
Component(s) | You can import issues with multiple components by entering each component in a separate column. |
Affects version(s) | You can import issues with multiple 'Affects versions' by entering each version in a separate column. |
Fix version(s) | You can import issues with multiple 'Fix versions' by entering each version in a separate column. |
Comment body | You can import issues with multiple comments by entering each comment in a separate column. |
Date created | Please use the date format specified on the second step of the CSV import wizard. |
Date modified | Please use the date format specified on the second step of the CSV import wizard. |
Due date | Please use the date format specified on the second step of the CSV import wizard. |
Issue type | If not specified in your CSV file, imported issues will be given the default (i.e. first) Issue Type as specified in your Jira system Defining issue type field values. You can also create new Jira values on-the-fly during the import process. |
Labels | Import issues with multiple labels by:
|
Priority | If not specified in your CSV file, imported issues will be given the default (i.e. first) Priority as specified in your Jira system Defining priority field values. You can also create new Jira values on-the-fly during the import process. |
Resolution | If not specified in your CSV file, imported issues will be given the default (i.e. first) Resolution as specified in your Jira system Defining resolution field values. You can also create new Jira values on-the-fly during the import process. Also, see How to handle unresolved issues for helpful tips. |
Status | Can only be mapped to existing workflow statuses in Jira. If not specified in your CSV file, imported issues will be given the default (i.e. first) Status as specified in your Jira system. |
Original estimate | The value of this field needs to be specified as number of seconds. |
Remaining estimate | The value of this field needs to be specified as number of seconds. |
Time spent | The value of this field needs to be specified as number of seconds. |
Users | You can choose to have the importer automatically create Jira users for any values of the Assignee or Reporter field.
|
| Watchers | If you have users specified as Watchers in your CSV file, and these users do not exist in Jira, they will not be imported. A user must be available in Jira before you can import them as a watcher on a specific issue. |
Other fields | If you wish to import any other fields, you can choose to map them to specific Jira custom field(s). If your custom fields don't yet exist in Jira, the importer can automatically create them for you. If your custom field is a date field, please use the date format specified on the second step of the CSV import wizard. |
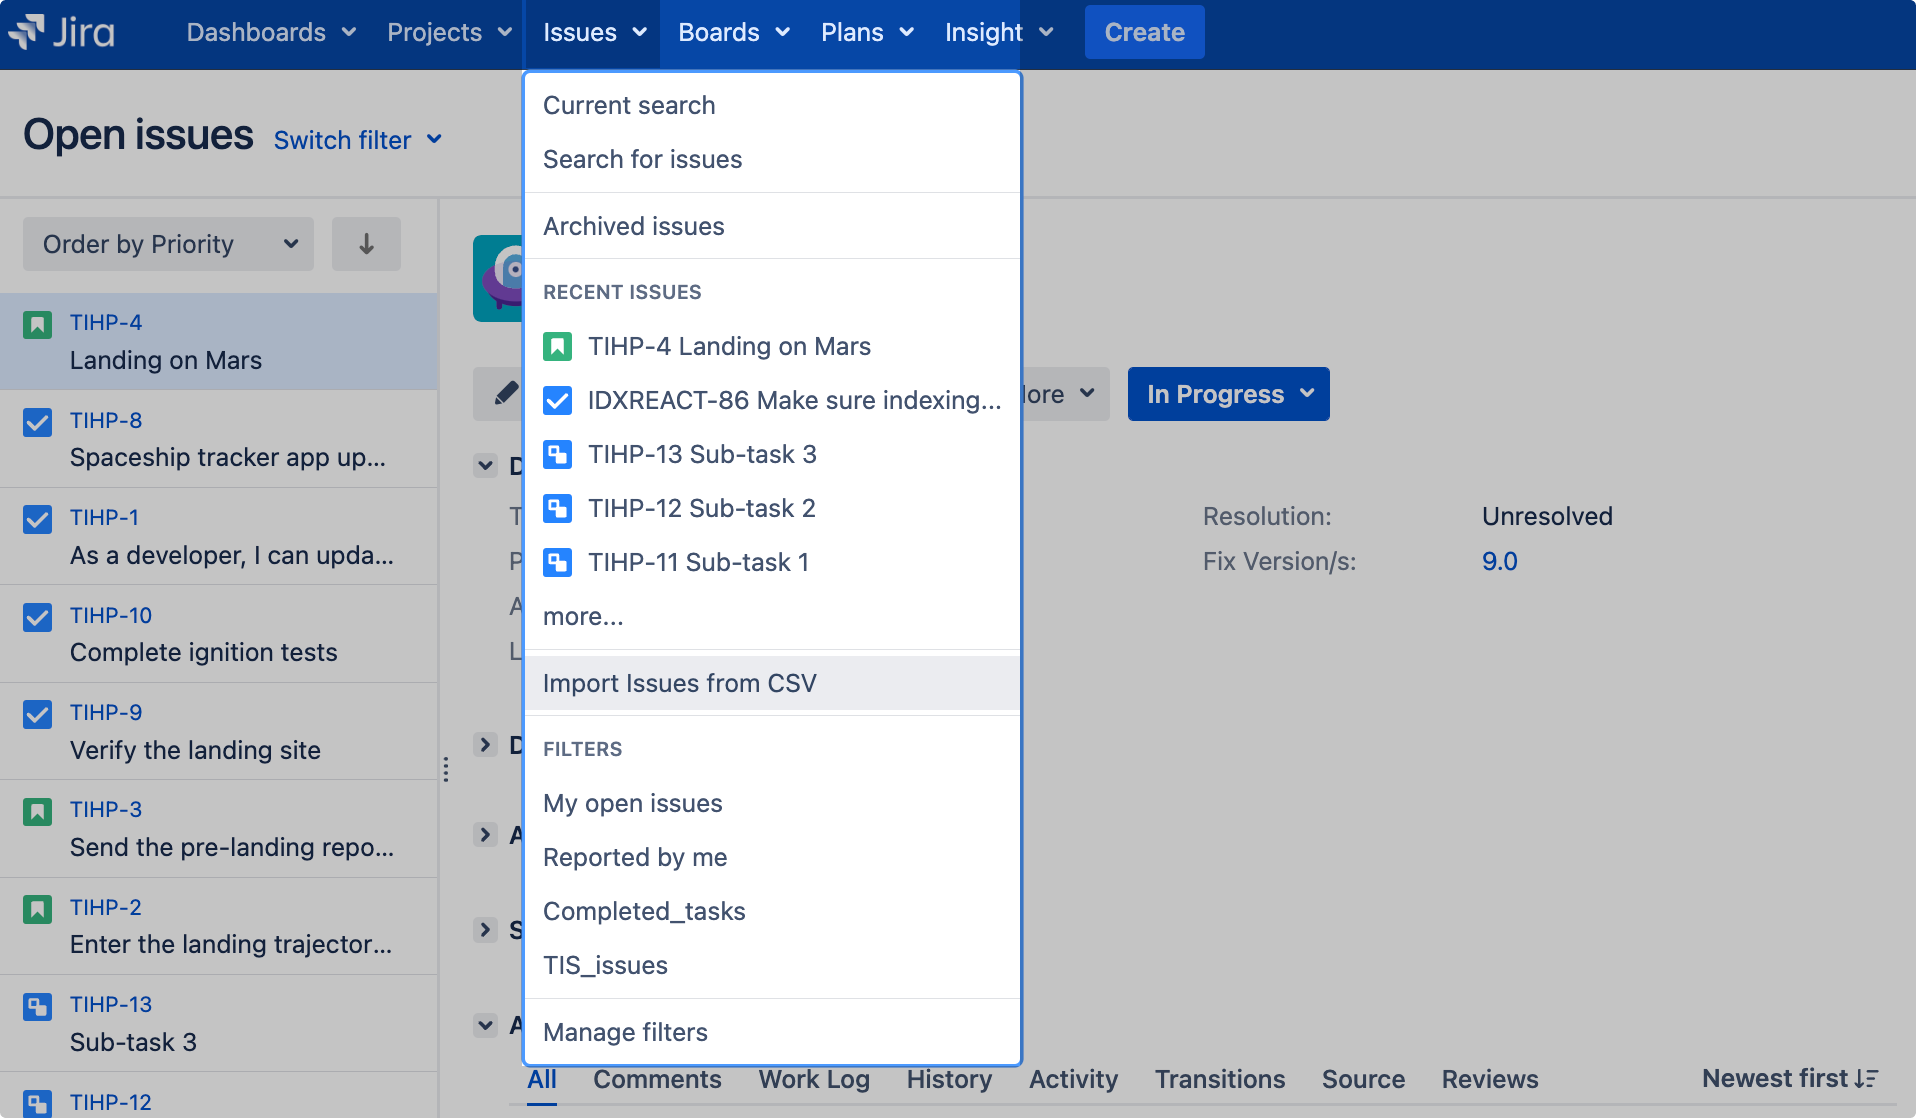
Importing issues in bulk
The Bulk issues import feature allows non-administrative users to import issues to Jira. External system import, which is described above, is available only for Jira administrators.
With Bulk issues import, you should also import issues from a CSV file. But the entry point and steps to run Bulk issues import differ from External system import.
The Bulk issues import functionality has the following restrictions:
- New users won’t be created.
- New projects won’t be imported. You should import issues only to existing projects.
- Custom fields and resolution values can’t be created in issues.
- Some fields in issues may be missing. See the complete list of such fields in Missing fields for mapping when importing issues through CSV in Jira.
Prepare the CSV file with your Jira issues as described here. To import the file:
- Select Issues > Import issues from CSV.
- Select the CSV file that you want to import.
- Leave the Use an existing configuration file checkbox cleared if you don’t have a configuration file or if you want to create a new configuration file. In this case, Jira will create the configuration file that you can use for further imports. If you select the checkbox, you should upload the existing configuration file.
- Select the Next button.
- Fill in the fields. Select the project where you want to import the issues, file encoding type, delimiter, and date format. If the CSV file uses a different separator, specify the character in the Delimiter field instead of a comma. If the separator is a tab, specify it as /t.
- Select the Next button.
Map the fields in the CSV file to the issue fields in the selected project. If you want to map a specific field value in the CSV file to a specific Jira field value, select the Map field value checkbox.
You must map at least one field in the CSV file to the Jira Summary field because each Jira issue must have a summary. If, instead of the Jira field for mapping,"Fourth issue", you see the “Don’t map this field” note, it means that Jira can’t provide the right mapping for the field from the CSV file. To solve this issue, see Missing fields for mapping when importing issues through CSV in Jira.
Select the Next button.
If you selected the Map field value checkbox for some fields, you should map the values of these fields from the CSV file to the specific values of corresponding Jira issue fields. For example, you may want to map the CSV field value “Feature Request” to the Jira issue type’s field value “New Feature”.
If you want to check your configuration for errors or warnings before running the import, select Validate. If needed, you can download the detailed log of the validation.
If needed, save the configuration for further use. For example, you may want to use the same field or value mappings for the next imports.
Select Begin import when you’re sure of the configuration.
You’ve successfully bulk-imported your issues to Jira! If you have any questions or problems, contact Atlassian support. If you’re a Jira Administrator, we recommend using the External system import to avoid inconsistencies and errors.