Enable Smart Commits
When you manage your project's repositories in Bitbucket or GitHub, or use Fisheye to browse and search your repositories, you can process your Jira Software issues using special commands in your commit messages.
You can:
- comment on issues
- record time tracking information against issues
- transition issues to any status (for example 'Resolved') defined in the Jira Software project's workflow.
Learn more about using Smart Commits: Processing issues with Smart Commits.There are other commands available if you use Crucible for code reviews. See Using Smart Commits in the Fisheye/Crucible documentation.
Get Smart Commits working
There are a couple of things you need to set up to get Smart Commits working.
First, link Jira Software to the other application
Smart Commits relies on either the Jira DVCS Connector Plugin or an application link:
| Application | Connect with | Notes |
|---|---|---|
Bitbucket Cloud, GitHub | Jira DVCS Connector | The Jira DVCS Connector Plugin is bundled with Jira Software, but if necessary, a Jira administrator can install it directly from within the Jira administration area. See Installing Marketplace apps for more information. A Jira administrator with access to the Bitbucket Cloud or GitHub account must set up OAuth authentication with Jira Software. |
Bitbucket Server, Fisheye, Crucible | Application link | See Linking a Bitbucket or GitHub repository with Jira. |
Then enable Smart Commits in Jira Software
Smart Commits must be enabled in Jira Software:
| Application | Notes |
|---|---|
Bitbucket Cloud, GitHub | All new repositories added to your linked Bitbucket Cloud or GitHub account have Smart Commits enabled by default. However, a Jira administrator can disable that if necessary, and can also enable or disable Smart Commits for individual repositories. Control whether Smart Commits are enabled for new repositories:
Enable or disable Smart Commits on individual repositories:
|
| Bitbucket Server, Fisheye, Crucible | A Jira administrator can control Smart Commits for each account in the connected application (Bitbucket Server, Fisheye or Crucible). Enable or disable Smart Commits on individual accounts:
|
Note that elevated access rights in Jira applications can result from the way that Git (and Mercurial) allow commits to be attributed to a user other than the user pushing a change to the repository.
If this seems like a risk for your situation, then you should consider disabling Smart Commits in your Jira application instance.
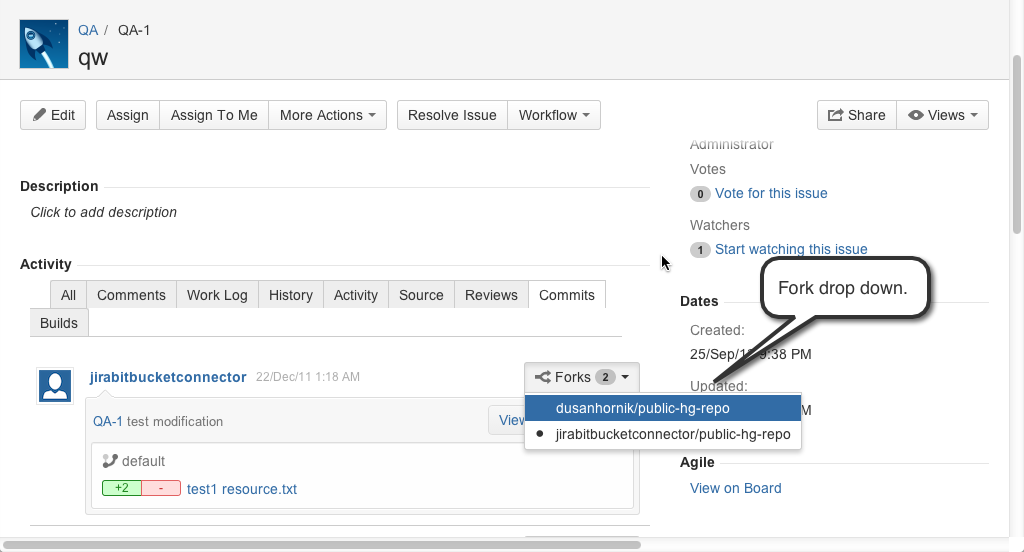
Forks and Smart Commits
If you use forks in your workflow, the DVCS Connector records each repository that contains a Smart Commit message. It actually processes the Smart Commit message only the first time it encounters it. When you view the commit tab in Jira Software, you can see which forks include that particular commit:


