Connecting Jira applications to SQL Server 2022
These instructions will help you connect Jira to the Microsoft SQL Server 2022 database.
Before you begin
- If you're Migrating Jira applications to another server, create an export of your data as an XML backup. You'll then be able to transfer data from your old database to your new database, as described in Switching databases.
- Stop Jira before you begin, unless you just started the installation and are running the Setup Wizard.
1. Create and configure the SQL Server database
When creating the database, remember your database name, user name, schema name, and port number. You'll need them later to connect Jira to your database.
Create a database for Jira (for example,
jiradb).Make sure the collation type is case-insensitive.
SQL Server uses Unicode encoding to store characters. This is sufficient to prevent any possible encoding problems.
Create a database user which Jira will connect as (for example,
jiradbuser). This user shouldn't be the database owner, but should be in thedb_ownerrole.Create an empty schema in the database for the Jira tables (for example,
jiraschema).Make sure that the database user has permission to connect to the database, and to create and populate tables in the newly-created schema.
- Make sure that TCP/IP is enabled on SQL Server and is listening on the correct port. A default SQL Server installation uses port number 1433.
Make sure that SQL Server is operating in the appropriate authentication mode.
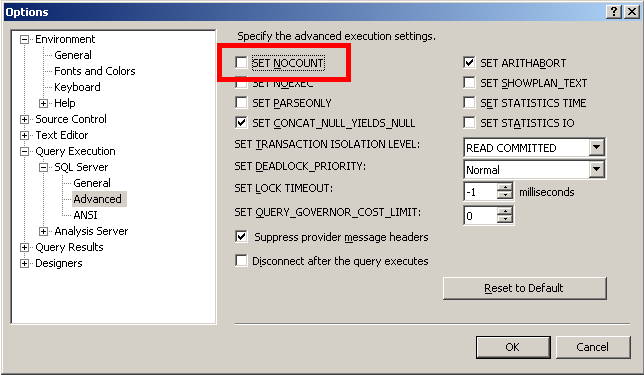
- Turn off the SET NOCOUNT option.
- Open SQL Server Management Studio.
- Go to Tools > Options > Query Execution > SQL Server > Advanced and clear the SET NOCOUNT check box.
Right-click your server in the Object Explorer and go to Properties > Connections > Default Connections. Clear the no count option.

Access the Query Console by right-clicking on the created database and selecting New Query. Run the following command to set the isolation level:
ALTER DATABASE THE-NEW-DATABASE-CREATED-FOR-JIRA SET READ_COMMITTED_SNAPSHOT ON
2. Configure Jira to connect to the database
There are two ways to configure the Jira server to connect to the SQL Server database.
The Jira setup wizard — use this method if you've just installed Jira and are setting it up for the first time. Your settings will be saved to the
dbconfig.xmlfile in your Jira application home directory.The Jira configuration tool — use this method if you have an existing Jira instance. Your settings will be saved to the
dbconfig.xmlfile in your Jira application home directory.How to launch the Jira configuration tool?- Run the Jira configuration tool as follows:
- Windows: Open a command prompt and run
config.batin thebinsub-directory of the Jira installation directory. - Linux/Unix: Open a console and execute
config.shin thebinsub-directory of the Jira installation directory. This may fail with the error as described in our Unable to Start Jira applications Config Tool due to No X11 DISPLAY variable was set error KB article. Please refer to it for the workaround.
- Windows: Open a command prompt and run
- Navigate to the Database tab and set Database type to SQL Server.
- Fill out the fields as described in the Database connection fields section.
- Test your connection and save.
- Restart Jira.
- Run the Jira configuration tool as follows:
Database connection fields
The table shows the fields you'll need to fill out when connecting Jira to your database. You can also refer to them and to the sample dbconfig.xml file under the table if you'd like to create or edit the dbconfig.xml file manually.
| Setup wizard / Configuration tool | dbconfig.xml | Description |
|---|---|---|
| Hostname | Located in the | The name or IP address of the machine that the SQL Server server is installed on |
| Port | Located in the | The TCP/IP port that the SQL Server database server is listening to. You can leave this parameter blank to use the default port. |
| Database | Located in the | The name of your SQL Server database to which Jira will save data. You should have created it in Step 1. |
| Username | Located in the | The user that Jira uses to connect to the SQL Server database server. You should have created it in Step 1. |
| Password | Located in the <password> tag:<password> jiradbuser </password> | The user's password — used to authenticate with the SQL Server server. |
| Schema | Located in the <schema-name> tag:<schema-name> dbo </schema-name> | The name of the schema that your SQL Server database uses. You should have created it in Step 1. |
Sample dbconfig.xml file
For more information about the child elements of <jdbc-datasource/> beginning with pool in the dbconfig.xml file, see Tuning database connections.
<jira-database-config>
<name>defaultDS</name>
<delegator-name>default</delegator-name>
<database-type>mssql</database-type>
<schema-name>jiraschema</schema-name>
<jdbc-datasource>
  <url>jdbc:sqlserver://dbserver:1433;databaseName=jiradb</url>
  <driver-class>com.microsoft.sqlserver.jdbc.SQLServerDriver</driver-class>
  <username>jiradbuser</username>
  <password>password</password>
  <pool-min-size>20</pool-min-size>
  <pool-max-size>20</pool-max-size>
  <pool-max-wait>30000</pool-max-wait>
  <pool-max-idle>20</pool-max-idle>
  <pool-remove-abandoned>true</pool-remove-abandoned>
  <pool-remove-abandoned-timeout>300</pool-remove-abandoned-timeout>

  <validation-query>select 1</validation-query>
  <min-evictable-idle-time-millis>60000</min-evictable-idle-time-millis>
  <time-between-eviction-runs-millis>300000</time-between-eviction-runs-millis>

  <pool-test-while-idle>true</pool-test-while-idle>
  <pool-test-on-borrow>false</pool-test-on-borrow>
</jdbc-datasource>
</jira-database-config>
Both the Jira setup wizard and database configuration tool also add the element <validation-query>select 1</validation-query> to the dbconfig.xml file, which is usually required when running Jira with default MySQL installations. See Surviving connection closures for details.
3. Schedule regular database maintenance tasks
Schedule a daily maintenance task for hot tables
Hot tables are the most active tables in your database. For example, propertyentry, changeitem, and changegroup are large data tables that are used frequently and require regular updating of statistics.
To set up a daily maintenance task for hot tables, run the following command:
UPDATE STATISTICS <table.name>Schedule a weekly maintenance task for the whole database
To set up a weekly maintenance task for the whole database, run the following command:
UPDATE STATISTICS <table.name> with fullscanFor large databases, updating statistics with fullscan might take a long time to complete. To minimize the impact on your production environment, schedule this maintenance task for off-peak hours.
For more information on how to update MS SQL Server statistics, see the official Microsoft documentation.
4. Start Jira
You should now have Jira configured to connect to your SQL Server database. The next step is to start it up!
Known issues
The following table lists known issues that might occur during the database operation or the execution of database procedures. We are aware of these issues and have planned their resolution in future releases.
| Issue | Solution |
|---|---|
| SQL Server doesn't allow more than 2000 parameters in a query. | This is a known limitation set by SQL Server. According to SQL Docs, a procedure can have a maximum of 2100 parameters. The issue is tracked in the ticket JRASERVER-63290 - Getting issue details... STATUS Feel free to leave comments on the ticket so we know your use cases better and understand how this issue is impacting your operations. |