Improving instance stability with rate limiting
When automated integrations or scripts send requests to Jira in huge bursts, it can affect Jira’s stability, leading to drops in performance or even downtime. With rate limiting, you can control how many external REST API requests automations and users can make and how often they can make them, making sure that your Jira instance remains stable.
Rate limiting is available for Jira Software Data Center and Jira Service Management Data Center.
Skip to
How rate limiting works
Here’s some details about how rate limiting works in Jira.
How to turn on rate limiting
You need to be a Jira System Administrator to turn on rate limiting.
To turn on rate limiting:
In Jira, go to Administration > System > Rate limiting.
Change the status to Enabled.
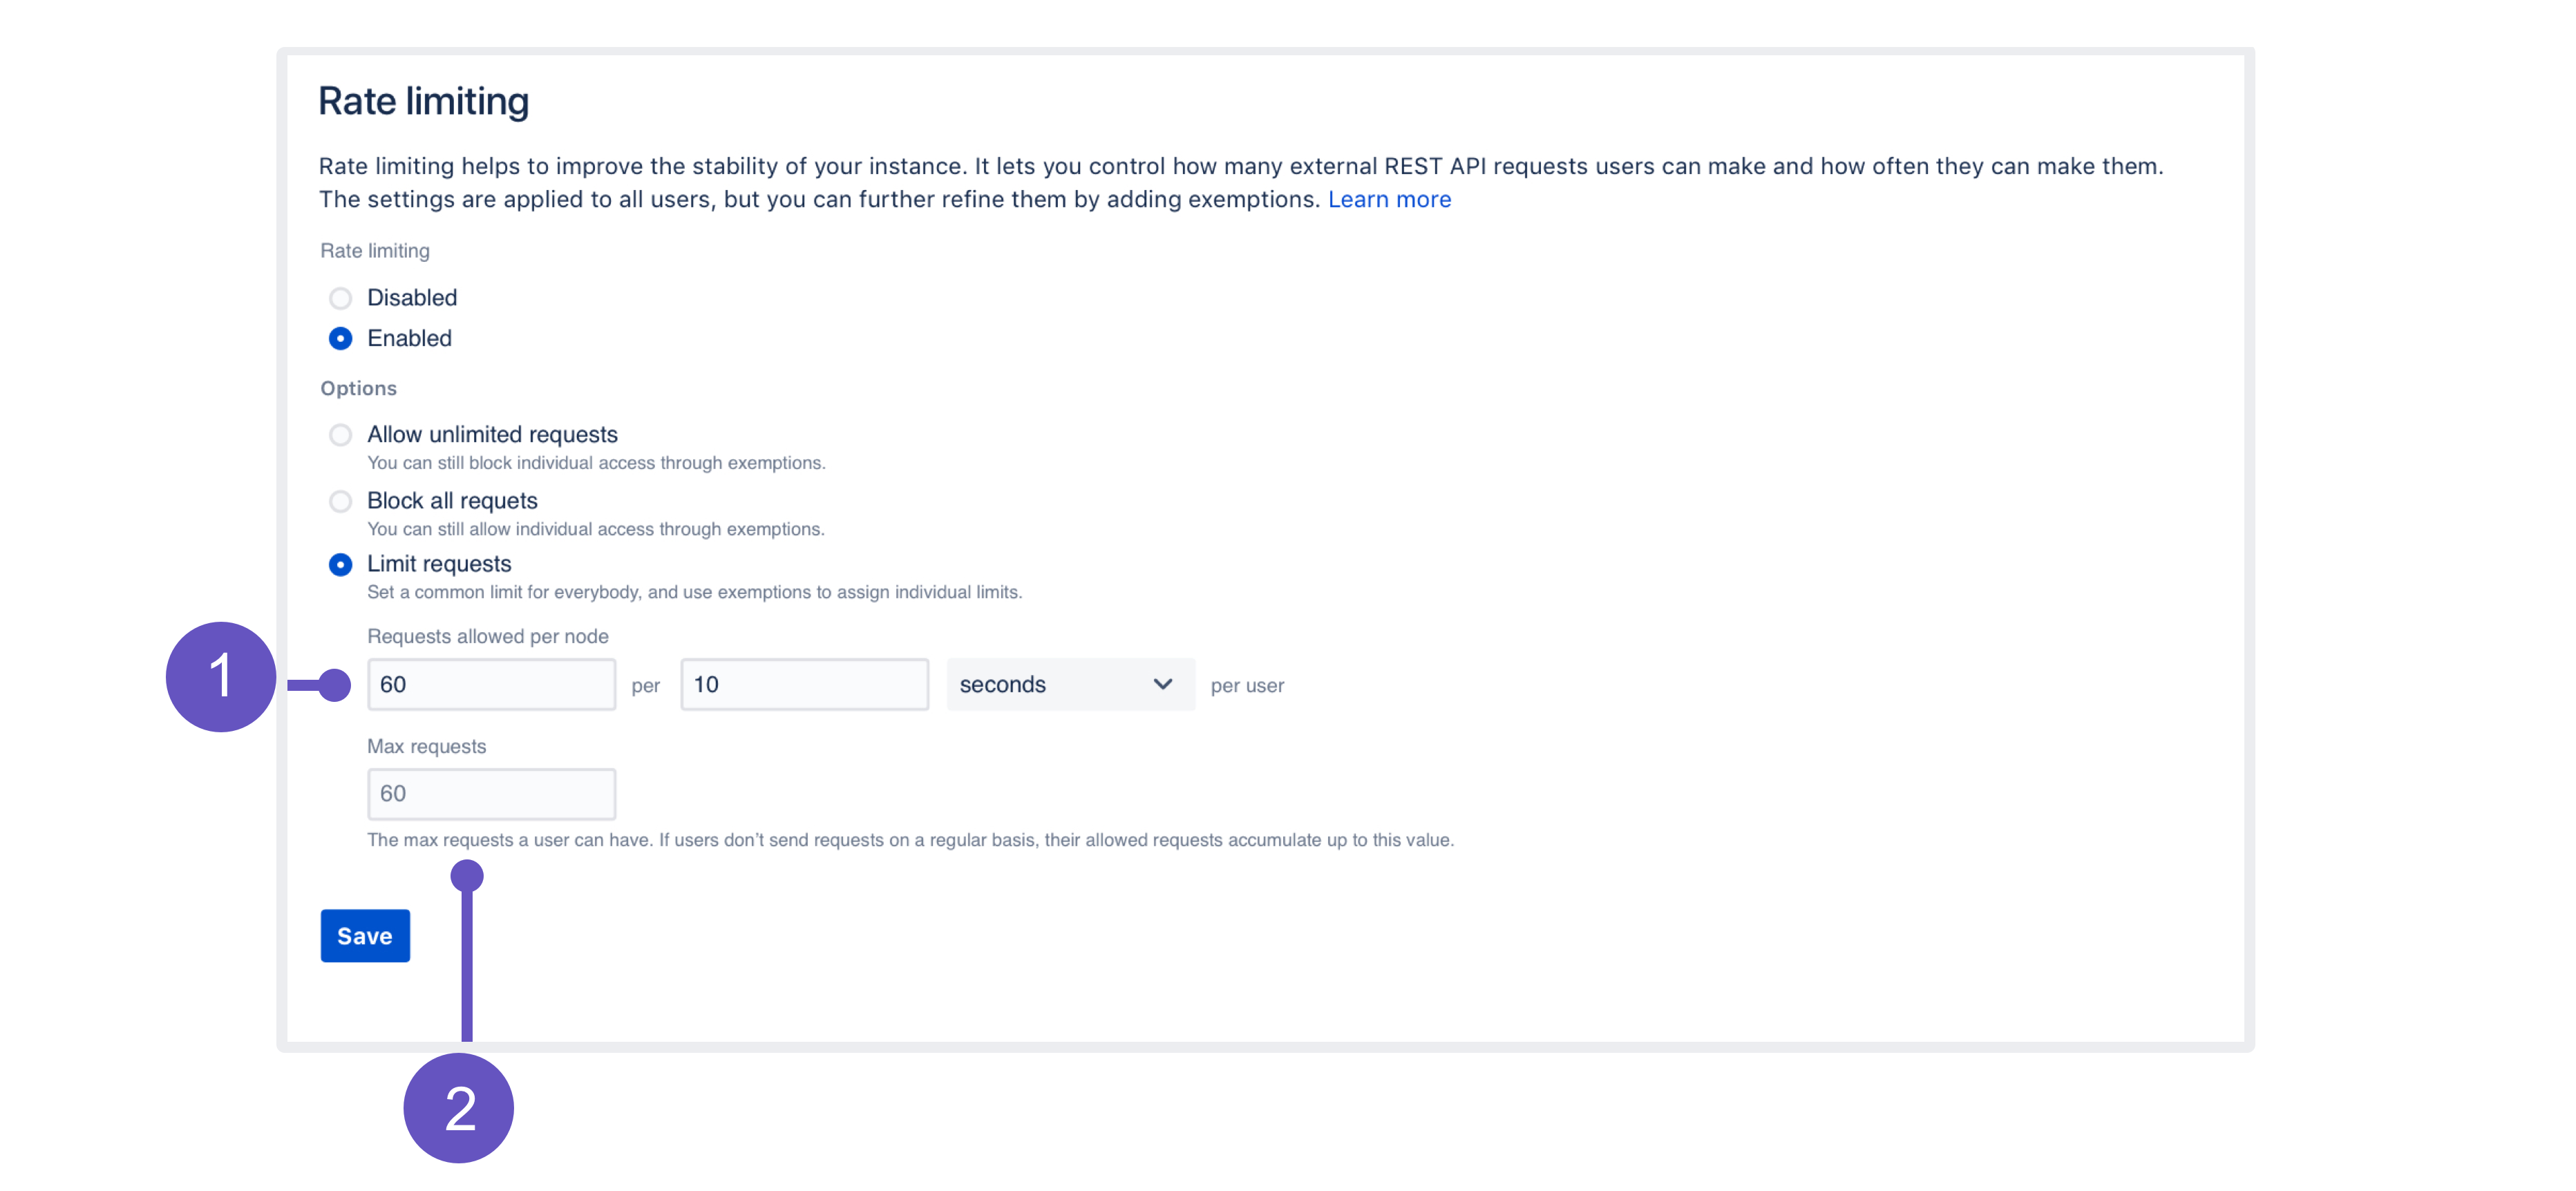
Select one of the options: Allow unlimited requests, Block all requests, or Limit requests. The first and second are all about allowlisting and blocklisting. For the last option, you’ll need to enter actual limits. You can read more about them below.
Click Save.
Make sure to add exemptions for users who really need those extra requests, especially if you’ve chosen allowlisting or blocklisting. See Adding exemptions.
Limiting request — what it’s all about
As much as allowlisting and blocklisting shouldn’t require additional explanation, you’ll probably be using the Limit requests option quite often, either as a global setting or in exemptions.
Let’s have a closer look at this option and how it works:
Requests allowed: Every user is allowed a certain amount of requests in a chosen time interval. It can be 10 requests every second, 100 requests every hour, or any other configuration you choose.
Jira always translates the time interval in seconds, regardless of which unit of time you select (seconds, minutes, or hours).
- Max requests (advanced): Allowed requests, if not sent frequently, can be accumulated up to a set maximum per user. This option allows users to make requests at a different frequency than their usual rate (for example, 20 every 2 minutes instead of 10 every 1 minute, as specified in their rate), or accumulate more requests over time and send them in a single burst. Too advanced? Just make it equal to Requests allowed, and forget about this field — nothing more will be accumulated.
Examples
Finding the right limit
Adding exemptions
Exemptions are, well, special limits for users who really need to make more requests than others. Any exemptions you choose will take precedence over global settings.
After adding or editing an exemption, you’ll see the changes right away, but it takes up to 1 minute to apply the new settings to a user.
To add an exemption:
Open the Exemptions tab.
Click Add exemption.
Find the user and choose their new settings.
You can’t choose groups, but you can select multiple users.
The options available here are just the same as in global settings: Allow unlimited requests, Block all requests, or assign custom limit.
Click Save.
If you want to edit an exemption later, just click Edit next to a user’s name in the Exemptions tab.
Recommended: Add an exemption for anonymous access
Jira sees all anonymous traffic as made by one user: Anonymous. If your rate limits are not too high, it might happen that a single user drains the limit assigned to anonymous. It’s a good idea to add an exemption for this account with a higher limit, and then observe whether you need to increase it further.
Identifying users who have been rate limited
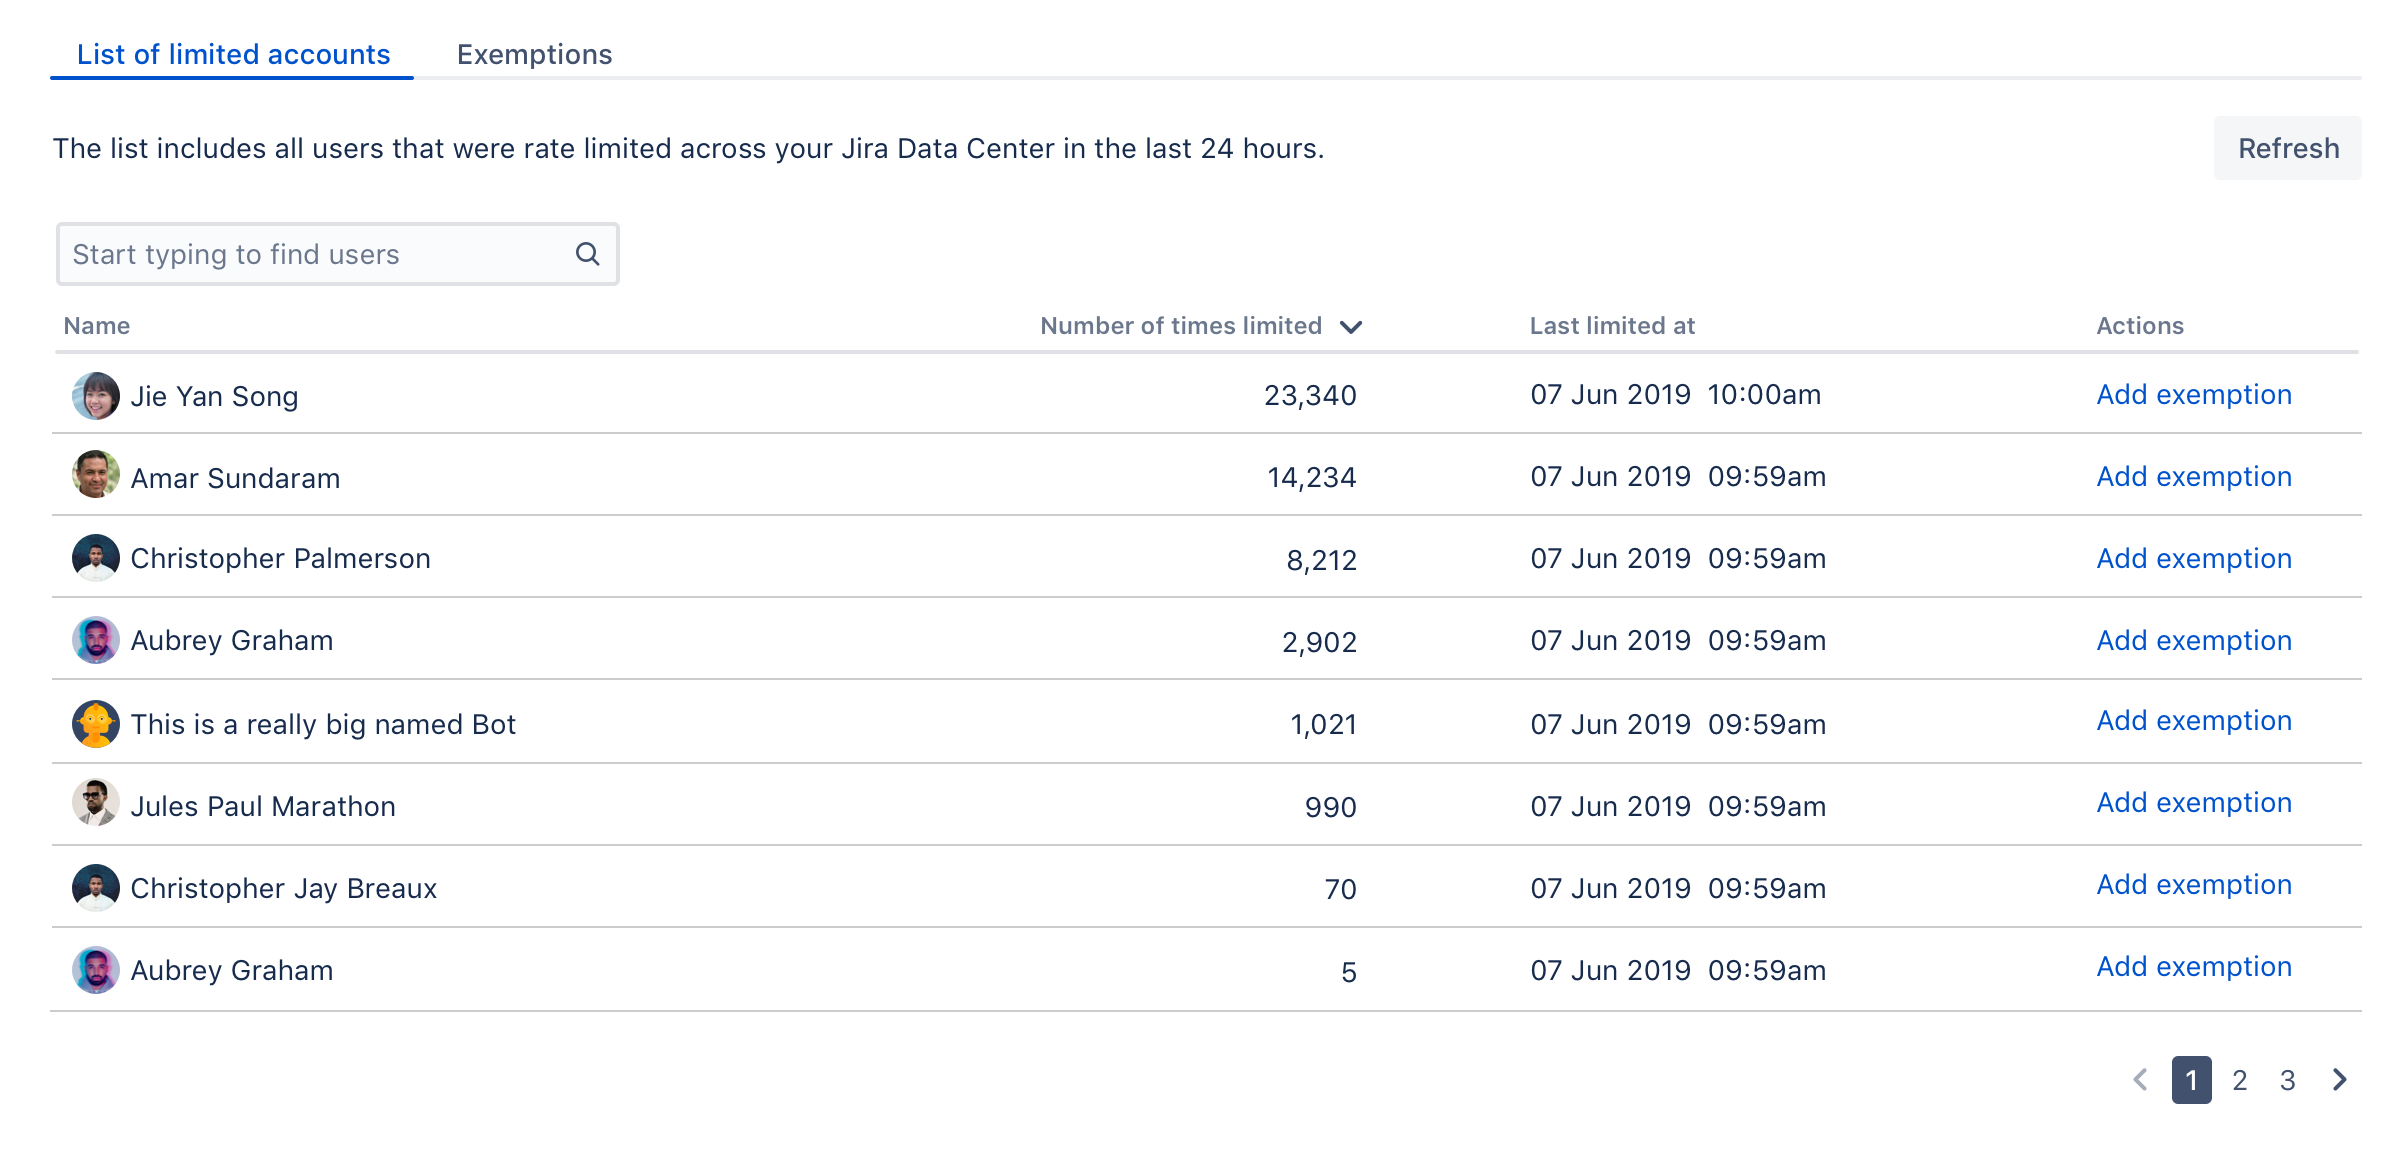
When a user is rate limited, they’ll know immediately as they’ll receive an HTTP 429 error message (too many requests). You can identify users that have been rate limited by opening the List of limited accounts tab on the rate limiting settings page. The list shows all users from the whole cluster.
When a user is rate limited, it takes up to 5 minutes to show it in the table.
Unusual accounts
You’ll recognize the users shown on the list by their name. It might happen, though, that the list will show some unusual accounts, so here’s what they mean:
Unknown: That’s a user that has been deleted in Jira. They shouldn’t appear on the list for more than 24 hours (as they can’t be rate limited anymore), but you might see them in the list of exemptions. Just delete any settings for them, they don’t need rate limiting anymore.
Anonymous: This entry gathers all requests that weren’t made from an authenticated account. Since one user can easily use the limit for anonymous access, it might be a good idea to add an exemption for anonymous traffic and give it a higher limit.
Adding limited requests to the log file
You can also view information about rate limited users and requests in the Jira log file. This is useful if you want to get more details about the URLs that requests targeted or originated from.
Getting rate limited — user’s perspective
When users make authenticated requests, they’ll see rate limiting headers in the response. These headers are added to every response, not just when you’re rate limited.
| Header | Description |
|---|---|
| The maximum number of requests (tokens) you can ever have. New tokens won’t be added to your bucket after reaching this limit. Your admin configures this as Max requests. |
| The remaining number of tokens. This is what you have and can use right now. |
| The time interval in seconds. You get a batch of new tokens every such time interval. |
| The number of tokens you get every time interval. Your admin configures this as Requests allowed. |
| How long you need to wait until you get new tokens. You can send a request successfully when the |
When you’re rate limited and your request doesn’t go through, you’ll see the HTTP 429 error message (too many requests). You can use these headers to adjust scripts and automations to your limits, making them send requests at a reasonable frequency.
Allowlisting URLs and external applications
Allowlisting URLs and resources
We’ve also added a way to allowlist whole URLs and resources on your Jira instance. This should be used as quick fix for something that gets rate limited, but shouldn’t.
Go to Administration > System > General configuration.
Click Advanced settings.
Find the
com.atlassian.ratelimiting.whitelisted-url-patternsproperty, and enter your URLs as a comma-separated list, for example:/**/rest/applinks/**,/**/rest/capabilities,/**/rest/someapi
For more info on how to create URL patterns, see AntPathMatcher: URL patterns.
Allowlisting external applications
You can also allowlist consumer keys, which lets you remove rate limits for external applications integrated through AppLinks.
Getting the consumer key looks differently for Atlassian cloud products. If you want to remove rate limits for cloud, see Removing rate limits for Atlassian cloud products.
Find the consumer key of your application.
Go to Administration > Applications > Application links.
Find your application, and click Edit.
Open Incoming Authentication, and copy the Consumer Key.
Allowlist the consumer key.
Go to Administration > System > General configuration.
Click Advanced settings.
Enter the consumer key as the value of
com.atlassian.ratelimiting.whitelisted-oauth-consumers. You can enter multiple consumer keys as a comma-separated list.
After entering the consumer key, the traffic coming from the related application will no longer be limited.
Adjusting your code for rate limiting
We’ve created a set of strategies you can apply in your code (scripts, integrations, apps) so it works with rate limits, whatever they are. For more info, see Adjusting your code for rate limiting.
Known issues
If the Jira rate limiting configuration doesn’t work as expected, check this knowledge base article for solutions.
To check if the issue is with cookies or headers in the requests, check this knowledge base article for the fix.


