Custom reports
The code for this project is available in our public repository here.
In this example, we are going to be creating a new report type to display payroll information. This custom report will accept parameters from the user, output clearly defined data, and generate a report based on that data.
The finished product will look something like this:
To create the custom report, we will start by creating a new Jira plugin following the instructions provided by Atlassian. Next, we will implement the Insight Widget Framework in the basic plugin, which allows us to use the report interfaces that are exposed. Finally, we will implement the Widget Module in the plugin descriptor, which registers our custom report widget as a plugin within Assets.
Creating a new Jira app
You can create a new Jira plugin by following the guide provided by Atlassian. Following the example will generate a basic POM file, to which you can add the various dependencies and plugins required for the report.
The sample POM below contains the dependencies and plugins needed for our example report. This is for example purposes; you may not want to implement all of the code below.
After we've created our sample project, we will implement the Insight Widget Framework in our basic plugin which allows us to use the report interfaces that are exposed. The widget framework consists of 3 parts:
- Widget Parameters (input)
- Widget Data (output)
- Widget Module (engine)
Implementing the Widget parameters
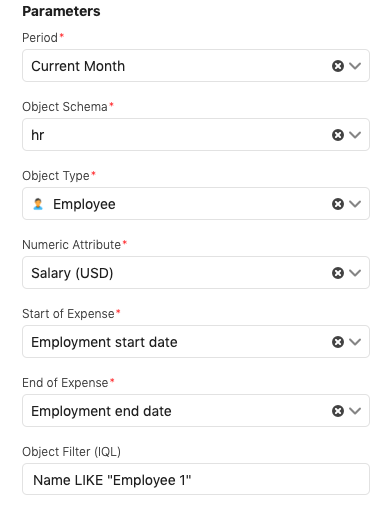
Widget parameters represent the parameters(fields) that will be used to generate the report.
To achieve this implement the WidgetParameters class.
You must also implement the insight-widget module type parameters element in the atlassian-plugin.xml plugin descriptor to make the parameters appear on-screen.
Implementing the Widget data
The widget data represents the form in which the report will be consumed by the front-end renderers. To implement this use the WidgetData class.
Implementing the Widget module
The widget module will generate the report. To achieve this implement the WidgetModule and GeneratingDataByIQLCapability classes.
These are the (currently) exposed components used to interface with Insight:
- ObjectSchemaFacade
- ObjectTypeFacade
- ObjectTypeAttributeFacade
- ObjectFacade
- ConfigureFacade
- IqlFacade
- ObjectAttributeBeanFactory
- ImportSourceConfigurationFacade
- InsightPermissionFacade
- InsightGroovyFacade
- ProgressFacade
Customizing the widget framework
If you examine the example above, you can see there are three places that we allow for customization within the widget framework:
- Validation
- Query building
- Generating the report
Let's take a closer look at each of these below.
Validating the parameters
It's important to validate that the widget parameters have been created correctly.
|
In the example above, you can see that we are making sure that the object attribute types still correspond to the actual object attributes. If, for example, the Employee has a salary attribute that was expected as a numeric type but is now textual, an exception will be thrown.
Building the IQL query
You will also need to build a query from the widget parameters. This query will be used to fetch the objects. In the above example:
|
Generating the report
Finally, you can generate the widget data from the returned objects. In the above example:
|
The ProgressId corresponds to the progress of the current report job. Use the ProgressFacade to extract any pertinent information.
Add the Widget module to the descriptor
Now that we've implemented classes for the WidgetParameters, WidgetData, and WidgetModule, we need to modify the descriptor to register your custom report widget as a plugin within Assets.
You will need to modify the ModuleType, specify mapper and view functions, and define renderers and exporters to create a fully-functioning report.
Please note that all label names will need to be unique.
Specify the ModuleType
Points to the WidgetModule.
|
Renderers
Specifies how the report is to be rendered. The graphical display is rendered within an iFrame.
|
The Bar Chart itself includes JS components that transform and display the data generated by the backend. Example below:
Mapper and view functions
The mapper and view functions need to follow the signature below:
|
- data: widget data
- parameters: widget parameters
- baseUrl: ...
return: transformed data
|
- mappedData: the output of Mapper
- containerElementSelector: will be equal to jsRiadaWidget
- return: void
In the view function append whatever to the DOM, making sure the parent element is:
|
Place any resources to be downloaded in a tag in the plugin descriptor.
|
Define any exporters
Define any exporters for your data using the following structure.
|
The data exported will not be the WidgetData but the output of the Mapper.
|
- mappedData: output of Mapper
- return: data transformed to extension type
Exporters are displayed in the created report, but not the preview.
Parameters
These are the options displayed in the report parameters form. The key will correspond to the widget parameters field name.
|
The current parameter type options are:
- checkbox
- datepicker
- datetimepicker
- iql
- jql
- number
- objectpicker
- objectschemapicker
- objectsearchfilterpicker
- objecttypeattributepicker
- objecttypepicker
- projectpicker
- radiobutton
- schemapicker
- select
- simpleobjecttypepicker
- switch
- text
- timepicker
- userpicker
Dependencies are relative to other parameters and filters on what types are returnable.
More development possibilities...
It's possible to create nearly any kind of custom reporting in Insight by building a Jira plugin using the Insight Widget Framework.
As you can see in the example above, the framework that provides input (Widget parameters), output (Widget data), and reporting engine (Widget module) functions can also be used to provide reporting or exporting functionality to fit almost any need.


