Creating a custom elastic image - Windows
Atlassian doesn't provide support for customized images. Bamboo provides flexibility to use customized machine images, but it's impossible for us to support all individual configurations.
Use Bamboo stock images as the base for all image customizations to ensure a minimal level of consistency of your Elastic Bamboo setup.
To perform the tasks listed below, log in to your instance with an Administrator account using Remote Desktop Client.
Setting up the user account
Create the user account that will be used by the Bamboo agent. The account name is up to you, I will use Bamboo in the examples below. All builds running on your machine will use this account. It can be a regular user (i.e. it does not need to be a Power User or Administrator, unless your builds require it). Set up a password for that user. The default user on a Windows image has a user name of Bamboo with a password of Atlassian1.
Important: by default, a newly created user should be denied remote login rights (which is as we want it to be). To be on the safe side, please make sure that you indeed cannot log in using that user's credentials (unless you change the credentials to non-default ones).
You'll need to set up autologin for your Bamboo account (don’t worry, this will not let remote users in). To do this, run control userpasswords2 and uncheck User must enter a user name and password to enter this computer:

Setting up the firewall
Reconfigure the Windows firewall to accept TCP connections on port 26224. No other inbound connections are necessary for Bamboo.
You don’t need to worry about changing the EC2 security group setting for this port. Bamboo will set it up automatically:

Installing the required software
Install a supported Oracle Java version. See Supported platforms
- Download the latest version of agent installer zip from this this location (at the time this guide was written, the latest version was this). Unpack it to a desired location, we suggest using
C:\opt\bamboo-elastic-agentto match stock images distributed with Bamboo. - A batch file should launch with your Windows instance startup. In order to do this, use the Windows Task Scheduler (Start > Administrative Tools > Task Scheduler), and set up a new Action task of “Start a program" with the
<PATH TO YOUR BATCH FILE>as the Details:
Remember to select Run whether user is logged on or not in the General tab: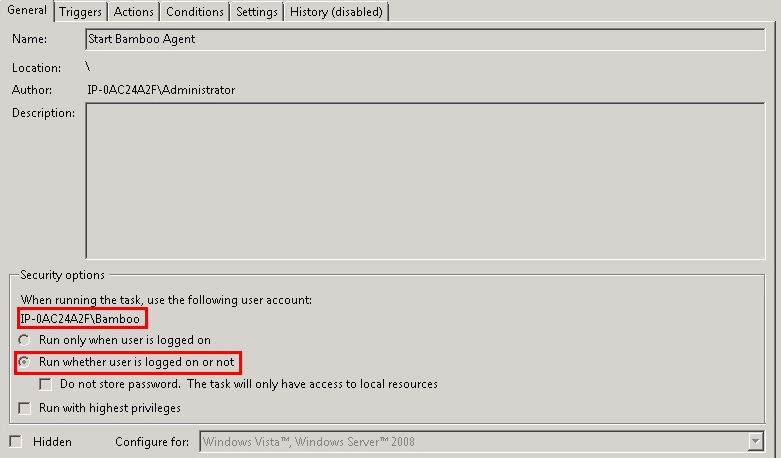
And appropriately define the Trigger task so that the agent starts up only after the network connection is up and running:
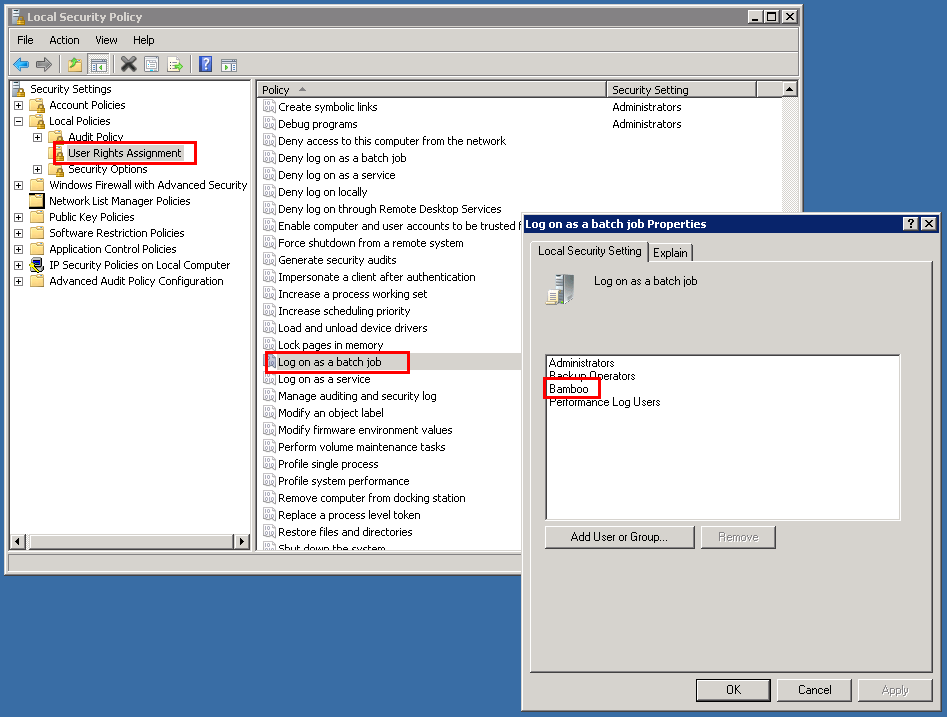
The task manager will warn you that the account needs to be able to log in as a batch job. Make sure the Log on as batch job policy is set for the user. This policy is accessible by opening the Control Panel > Administrative Tools > Local Security Policy. In the Local Security Policy window, select Local Policies > User Rights Assignment > Log on as a batch job:
Enabling EBS usage on the instance
Starting with Bamboo 5, you'll be able to use custom Elastic Block Storage with your Windows instances. To do that, you need to change the SAN policy on your instance, otherwise the disks will be attached in Offline state with status text the disk is offline because of policy set by an administrator.
You can change the SAN policy using the Diskpart utility. Run Diskpart, type
san policy=OnlineAll
and press Enter. You can then quit Diskpart; the new policy will now be active.
Testing
The easiest way to check if everything is set up correctly is to run the task you've defined using Windows Task Scheduler (Start > Administrative Tools > Task Scheduler). Right-click on the task and select Run. Always test the script using the Task Scheduler; if you run the script manually, you'll use Administrator account, which is not what we want.
Look for the %USERPROFILE%/bamboo-elastic-agent.out file. If it exists and contains an error message stating that agent was not run within an EC2 instance started by Bamboo Server, you’ve successfully completed the customization.
Run c:\opt\bamboo-elastic-agent\bin\prepareInstanceForSaving.bat
Bundle your instance. Make a note of the AMI id of the new image.
Start your image from Bamboo
If you fail to complete the following steps within ~40 minutes, Bamboo will shut down your instance, so remember to save your work if you’re running out of time (i.e. create an interim image).
In Bamboo, define an image configuration for the image you've just created, and start it from Bamboo. If everything went well, the agent will start together with the instance. It will perform the following steps:
- Update/create /opt/bamboo-elastic-agent directory structure by creating additional directories. If they appeared, Java is working correctly on that machine and the connection to S3 is working.
- Start the agent, which will create the Bamboo Agent Home directory and populate it with data pulled from the Bamboo server.
If everything went well, you should see the agent appear in the Bamboo instance list. Congratulations, you have a working Bamboo agent.
Because the agent has just synchronized itself with the Bamboo server (because it has downloaded all the jars exactly matching what you have on your server), as an extra step, you may want to save that state to speed up future instance startup and reduce bandwidth usage.
To do that, run
c:\opt\bamboo-elastic-agent\bin\prepareInstanceForSaving.bat
save the image, define a new image confguration, kill the instance, and try running it from Bamboo.