Confluence Basic Nginx Configurations for Proxy, Load balancing & Logging
Platform notice: Server and Data Center only. This article only applies to Atlassian products on the Server and Data Center platforms.
Support for Server* products ended on February 15th 2024. If you are running a Server product, you can visit the Atlassian Server end of support announcement to review your migration options.
*Except Fisheye and Crucible
Atlassian applications can be accessed through Load Balancer, however, Atlassian Support does not provide assistance for configuring it. Consequently, Atlassian cannot guarantee providing any support for it.
- If assistance with configuration is required, please raise a question on Atlassian Community.
Confluence Nginx Configurations
This article explains some basic Nginx configurations that can be used along with Confluence. For detailed information on setting up Confluence with Nginx and SSL, please refer to the article Running Confluence behind Nginx with SSL. This article does not provide the official recommend setup for Nginx for Confluence, but rather provides a combination of settings that can be used to better utilise Nginx configurations for usage with Confluence. In general, this article explains the following three areas:
- Using Nginx for Reverse Proxying
- Using Load Balancing with Nginx for Confluence
- Enabling access/error logs for capturing relevant information.
Nginx Reverse Proxy
Using Nginx for reverse proxying is pretty straight forward. Install Nginx in your machine. This step might vary depending on the operating system used. We would mostly follow the example of Linux/OS X or Linux flavoured systems. You can use any one of the utilities such as:
For Ubuntu:
apt-get update
apt-get install nginx


For OS X:
brew update
brew install nginx
Once you have installed nginx, start the service to check if the server is running. Usually Nginx runs on default port 80. To start Nginx, the commands may very depending on the OS and the type of utility that was used to installed the server. So typically this could look like:
For OS X:
brew services start nginx
There are couple of ways to confirm if Nginx is running correctly. The first and most reliable way is to check for ports in which there are applications running. You can run the following command to view the different ports and the applications occupying them:
lsof -i -P -n | grep LISTENThe above command might fetch a result set like below:
As can be noted from the above sample, nginx is running on port 8082. The reason for this is because Nginx has been custom configured to be run on this port. Typically after a fresh installation, Nginx will be found running on port 80. To configure Nginx on a desired port, the nginx.conf file needs to be updated. We will see how this can be done in the next step.
You can also check the browser by visiting the url using this port. In the above example Nginx is running on localhost using port 8082. So if the url http://localhost:8082 is visited on browser, one can see a response similar to:
Configuring nginx.conf file
To configure Nginx to be used with Confluence, the user needs to modify the conf appropriately. The conf file can be found in the following location and this location might vary depending on the OS.
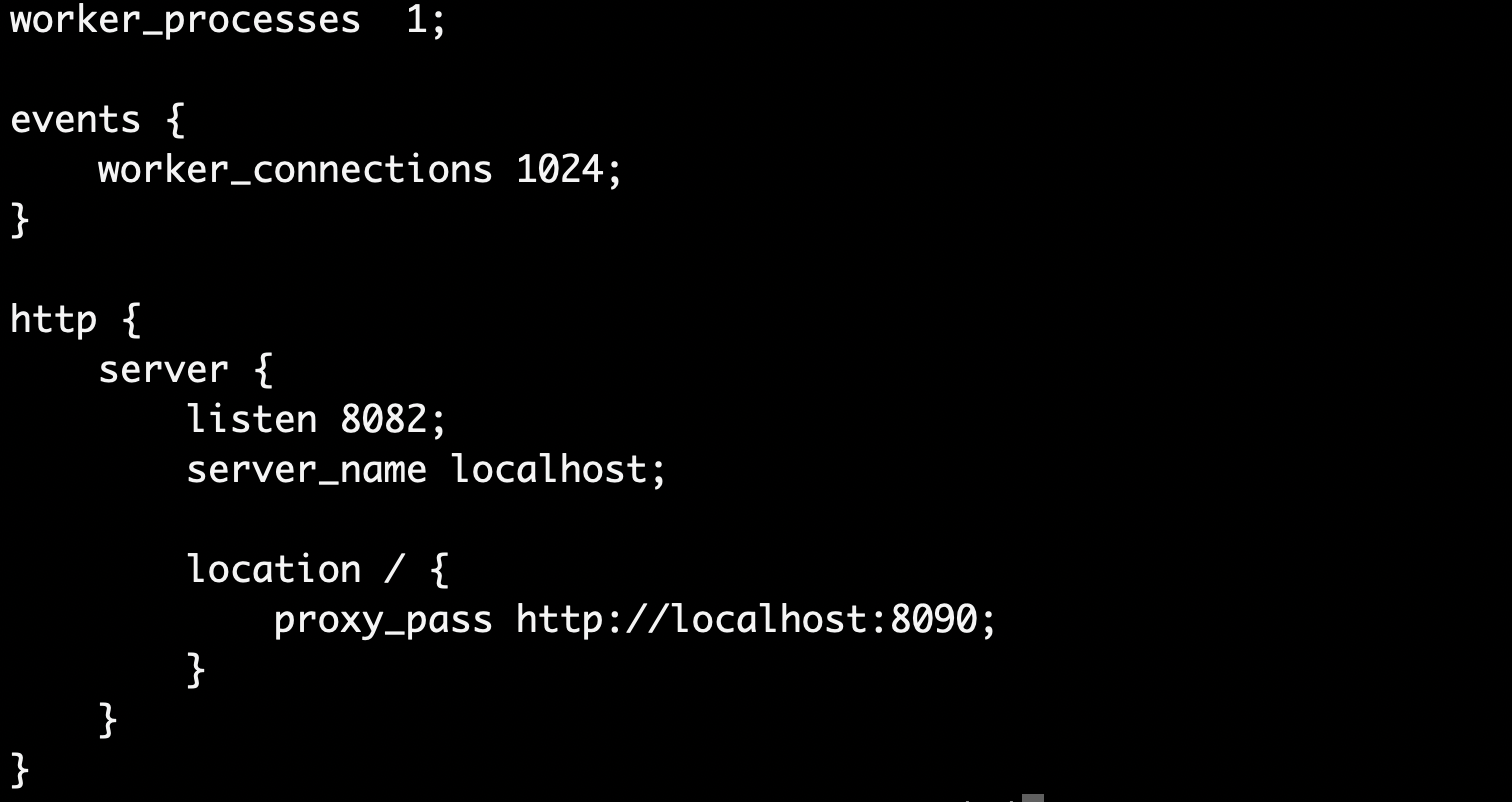
/usr/local/etc/nginx/nginx.confAssuming that Confluence is running on port 8090 using ip xx.xx.xx.xx , Nginx can be directed to receive traffic on a domain url and then direct this traffic to Confluence ip and port. For example, consider a very simple nginx.conf configuration like below:
In the above sample, Nginx listens to port 8082 for the server url "localhost". Please ensure to use the correct syntax for the nginx.conf file. Even a minor infraction of the syntax will cause the server to not start and this could make life very difficult if the .conf file is really large and has many blocks of inner settings. Ensure that the curly braces are all matched and the ";" is present after the end of every value. We will look at each relevant value and how it functions from the above sample:
Under the Server block, we have the:
listen 8082 : This ensures that Nginx listens to port 8082
server_name localhost : The domain url to which Nginx listens to. This could be an ip address or a meaningful domain name such as example.com etc. Which should resolve to an ip if a dnslookup is performed.
location / : This is the location where the context value can be configured. If a context value is provided for Confluence under the server.xml file, you can use this config to route traffic relative to that Context value. We will see more about this later. Here there is no context value set, but just a simple "/". Which means that any user visiting http://localhost:8082 will be directed to the url under proxy_pass. In this case, it is http://localhost:8090. Which is the url where Confluence is currently running.
If a context has been set for Confluence in the "Context" tab in the server.xml file, then one can use a nginx.conf file, like the one below:
The location /confluence will ensure that any traffic that is received in the url http://localhost:8082/confluence will be routed to the url http://localhost:8090/confluence. But this configuration should only be done if the Context value is set in the server.xml as explained before.
Simple Load Balancing with Nginx for Confluence
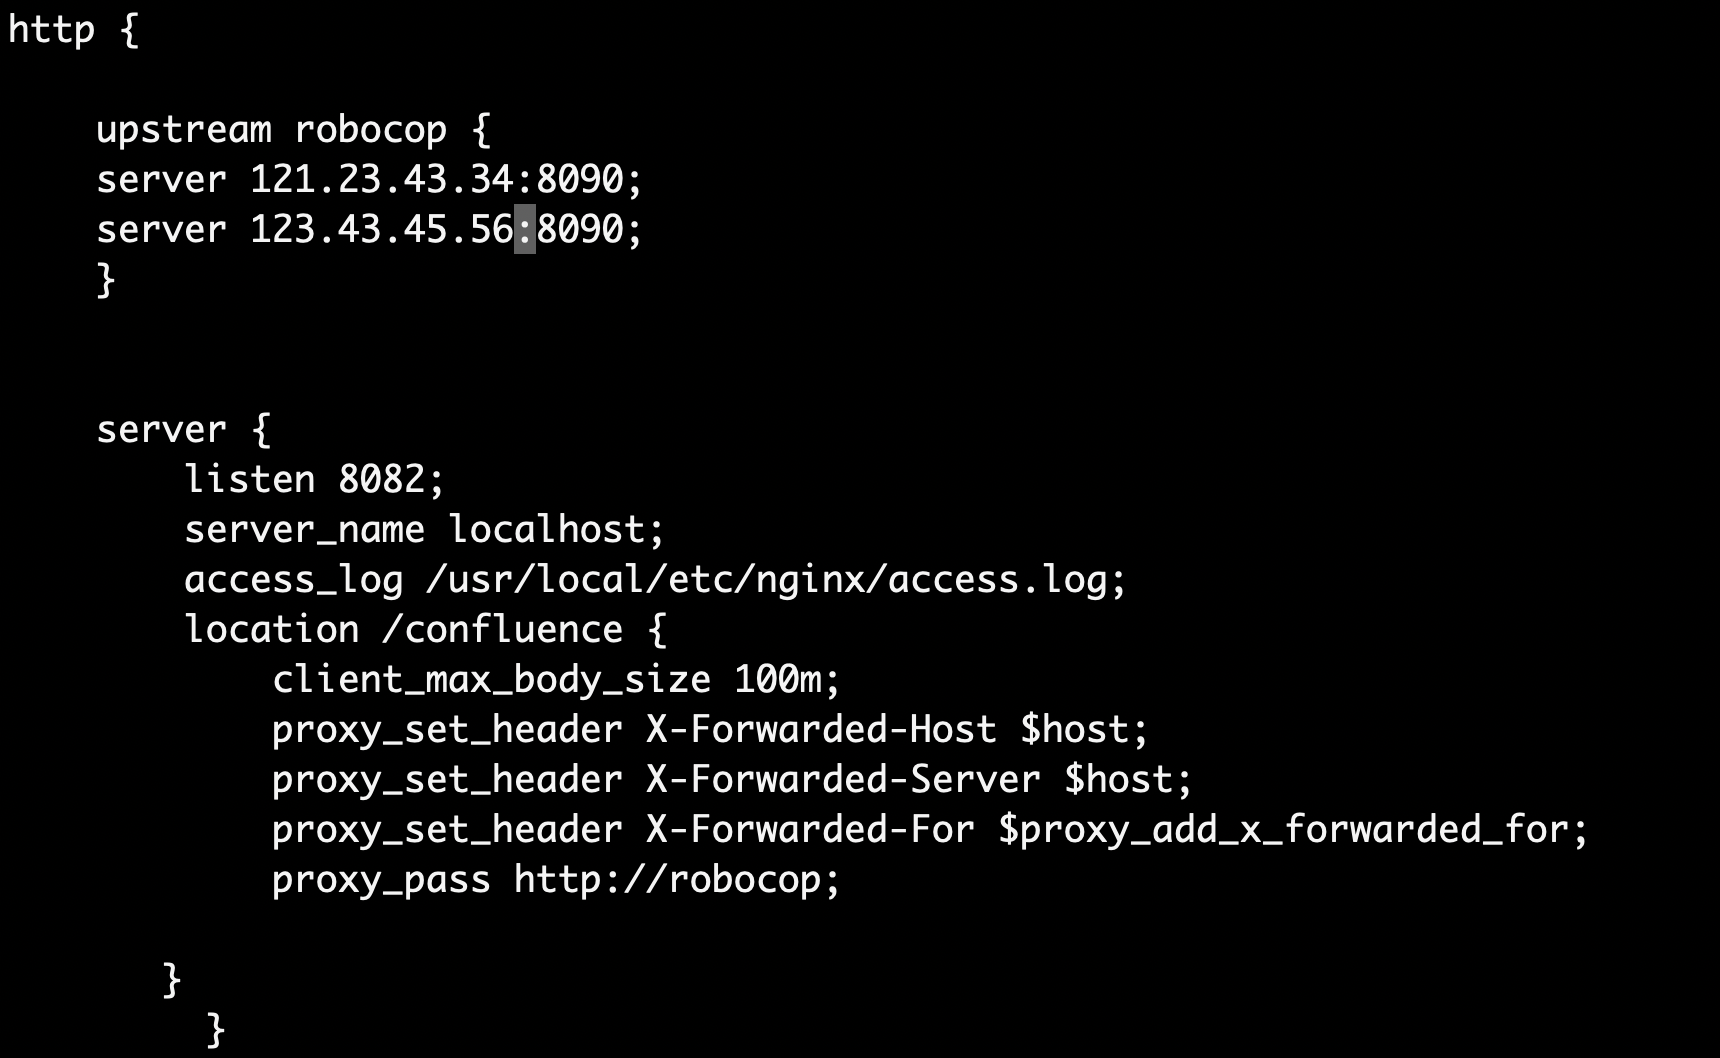
One of the most important features of a reverse proxy server such as Nginx is to provide support for load balancing. This is useful for Data Centre instances where the incoming traffic can be routed to different nodes. Nginx out of the box supports different types of load balancing logics and these can be used depending upon the type of the application and the kind of traffic balancing based on usage. A typical round robin load balancing does not require much configuration and a simple configuration can be deployed as below:
The "upstream" block depicts the servers that are part of the node. Assuming that Confluence is running on two nodes each as specified using the server keyword, the above configuration will route traffic in a round robin fashion between these two servers. The default setup of traffic routing will be round-robin. But any another routing mechanism is needed, different load balancing options can be used as described in this article here: Nginx : Different load balancing options. For example, a configuration like the below:
upstream myloadbalancer {
    least_conn;
    server backend1.example.com;
    server backend2.example.com;
}
The "least_conn" option specifies that the incoming connections will be routed to the server that has the least number of connections. Please note that a name for the loadbalancing block is used. For the above sample, this name is "myloadbalancer" and similarly for the previous example, this was "robocop". Users need to ensure that this identifier name is used within the proxy_pass value within the location block to ensure that load balancing works as expected. Also note the usage of "http:" prefix for the load balancing identifier name. Missing these details might cause the Nginx server not to start. As noted above, minor syntax errors will cause the nginx not to start and it might be difficult to locate the lines that are causing the server to fail. But Nginx does offer a variety of logging options that can help identify errors. For example, note the below sample conf file:
In the above sample, the access_log usr/local/etc/nginx/access.log specifies the location at which the access log for nginx will be stored. All usage data such as a referrer, times, device information etc will be captured and stored in these files. There is also a similar "error_log" tag that can be used only to capture error information. For example when a user tries to access a resource that is not present, then an error log is added here. Below is a sample access_log data:
This typically captures all the data that can be extracted. But this log information can be formatted so that only desired data is obtained. This can be done by adding:
http {
    log_format compression '$remote_addr - $remote_user [$time_local] '
                           '"$request" $status $body_bytes_sent '
                           '"$http_referer" "$http_user_agent" "$gzip_ratio"';
     server {

        access_log /spool/logs/nginx-access.log compression;
        ...
    }
}
And this will ensure that data is captured in the format specified above. Overall Nginx provides functions out-of-the-box for most of the reverse proxying/load balancing and logging options that one might require to run and monitor a highly available system.
Notes
Do not use the NGINX
proxy_next_upstream directive such as:
proxy_next_upstream error timeout http_500 http_504 http_404 http_403- This will result in NGINX retrying the next Node when it encounters a "normal" application error. Some of the above HTTP response codes are "normal" and the request should not be retried on another Node which can result in invalidating the Browser user session with a new JSESSIONID.


