Oauth 2.0 Configuration for Confluence
Platform notice: Server and Data Center only. This article only applies to Atlassian products on the Server and Data Center platforms.
Support for Server* products ended on February 15th 2024. If you are running a Server product, you can visit the Atlassian Server end of support announcement to review your migration options.
*Except Fisheye and Crucible
Summary
Confluence Data Center and Server provide APIs that allow external services to access resources on behalf of a user using the OAuth 2.0 protocol. OAuth 2.0 was introduced in Confluence version 7.17 and onwards.
Environment
7.17 onwards
Before you begin
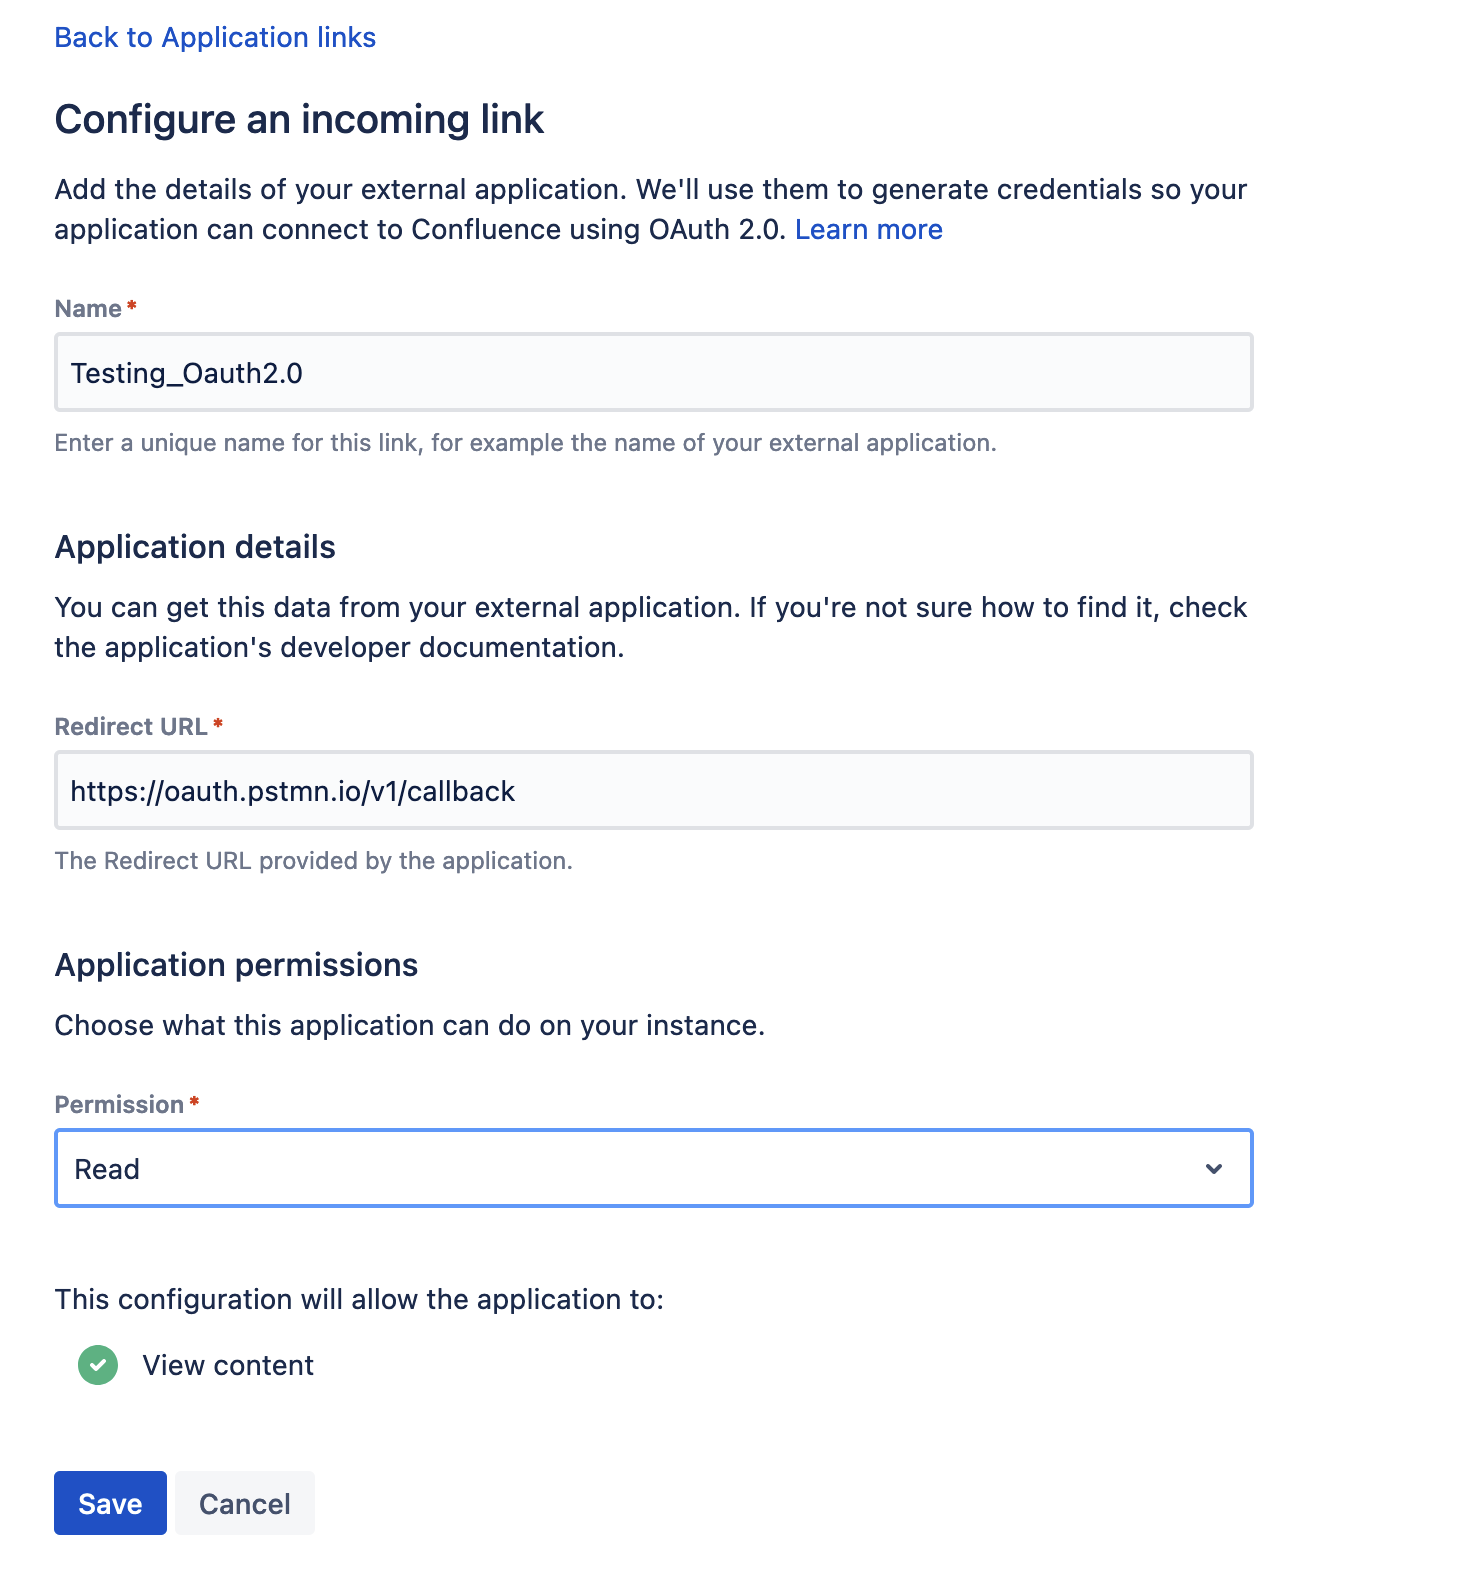
To register your application in Confluence, create an incoming link in the application links section. During the registration process, you can enable proper scopes to limit the range of resources that the application can access. Once you've created the link, you'll receive the OAuth credentials: Client ID and Client Secret. Make sure to keep these credentials secure. For more information, please refer to the documentation., see Configure an incoming link
Create an incoming link using application links
To create an incoming link:
Go to Settings > General Configuration > Application links.
Select Create link.
Select External application, and then choose Incoming or Outgoing as the direction.
Fill in the details as described in the sections below.
Provide application details
In this type of link, you only need to provide the Redirect URL (also known as Callback URL) from your external application. After authorizing the application, the user will be redirected to this URL with the authorization code.
Note: Here https://oauth.pstmn.io/v1/callback is the Postman CallbackURL which is used for testing purposes only.
Provide application permissions
Select permissions the application can have on your instance. You can choose the following permission scopes:
Read
Write
Admin
System admin
Note that even if you grant higher permissions, the application won’t be able to do more than the user authorizing it. For more info on what each of these scopes do, see OAuth 2.0 scopes for incoming links.
Copy OAuth credentials to the application
After providing the Redirect URL and selecting the scopes, Confluence will generate the OAuth credentials that include these details. You need to copy the credentials to your external application to complete the link.
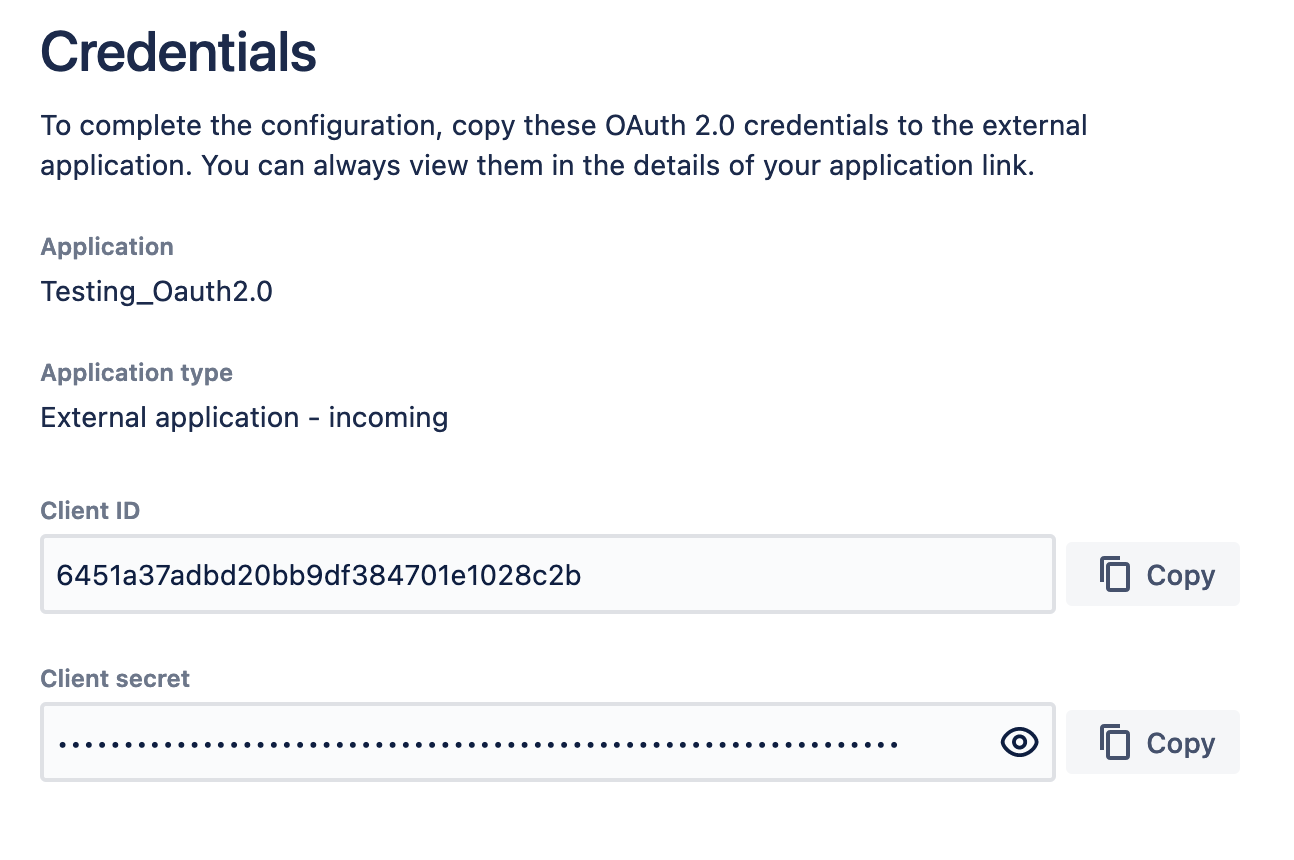
At this point, the application link has already been created in Confluence. You can view its details in Application links, including the OAuth credentials in case you needed to access them later.
View OAuth credentials for an existing link
If you lose your OAuth credentials, you can access them any time in the details of the application link you created.
To view OAuth credentials:
- Go to Settings > General Configuration > Application links.
- Find the application link you’re interested in, and select More actions > View credentials.
Authorization code with Proof Key for Code Exchange (PKCE)
This flow lets you securely perform the OAuth exchange of client credentials for access tokens on public clients.
Here are the parameters you’ll use in this flow:
| Parameter | Description | Required |
|---|---|---|
| redirect_uri | URL the user is redirected to after authorizing the request. | Yes |
| client_id | Client ID received from Confluence after registering your application. | Yes |
| response_type | Authorization code. | Yes |
| scope | Scopes that define application’s permissions to the user account. For more info, see Scopes. | Yes |
| code_challenge |
| Yes |
| code_challenge_method | Can be plain or sha256 depending on how the code_challenge was generated. | |
| code_verifier | High-entropy cryptographic random STRING using the unreserved characters: [A-Z] / [a-z] / [0-9] / "-" / "." / "_" / "~". It must be between 43-127 characters. For more info, see the RFC. | Yes |
| state | A value that can't be predicted. It will be used by the client to maintain state between the request and callback. It should also be used as a CSRF token. It can be generated in a similar manner to code_verifier. | No |
Steps
Generating authorization and access token using Postman
- As per the initial steps, the incoming link with an external application is already created and already generates the Client ID & Client Secret.
- Copy both Client ID & Client Secret and save them somewhere as these 2 values will be used for generating the access token.
- After that, Open a new request in Postman and open the Authorization tab.
- Here select the type as Oauth 2.0 and configure the new token.
- Here provide the following values:
- Token Name -> Anything
- Grant Type -> select "Authorization Code"
- Callback URL -> Use the Callback URL whatever you have. For testing we used https://oauth.pstmn.io/v1/callback"
- Authorize using browser: Uncheck this open
- Auth URL -> https://<Base URL>/rest/oauth2/latest/authorize
- Access Token URL -> https://<Base URL>/rest/oauth2/latest/token
- Client ID -> Client ID generated during the Incoming app link Configuration
- Client Secret -> Client Secret generated during the Incoming app link Configuration
- Scope -> Whatever Scope you want to define
- State -> Any unique Value
- Client Authentication -> Select "Send Client credential in the body"
- Last click on the "Get New Access Token". This will open the application login page, where you need to provide the credential:
- After authenticating the user, the application will open the consent page, where you need to allow the request:
- After this Postman, will use the authorization code and generate the access token and you will get the following screen with detail:

i. Using this access Token, Confluence REST API can be used on a user’s behalf with the OAuth 2.0 protocol.