Installing Crowd as a Windows Service
If you are trying to set up Crowd as a Windows Service on a 64 bit machine, you should refer to the workaround in this document.
For long-term use, you should configure Crowd to restart automatically when the operating system restarts. For Windows servers, this means configuring Crowd to run as a Windows service.
Running Crowd as a Windows service has other advantages. When Crowd is started manually, a console window opens - there is a risk that someone may accidentally shut down Crowd by closing the window. Also, the Crowd logs are properly managed by the Windows service (reliably found in \atlassian-crowd.log in the root Crowd directory, and rotated by file size).
Installing Crowd as a Windows Service
- Open a DOS Command prompt as Administrator (search for "cmd" in the start menu/screen, right click and "Run as Administrator").
- 'cd' to your Crowd directory, and then the Tomcat
binsubdirectory, e.g. {CROWD_INSTALL}\apache-tomcat\bin - If a directory in the path has spaces (e.g.
C:\Program Files\..), please convert it to its eight-character equivalent (e.g.c:\Progra~1\..). - Ensure the JAVA_HOME variable is set to the JDK base directory. Use
echo %JAVA_HOME%to confirm this. Run the following command:
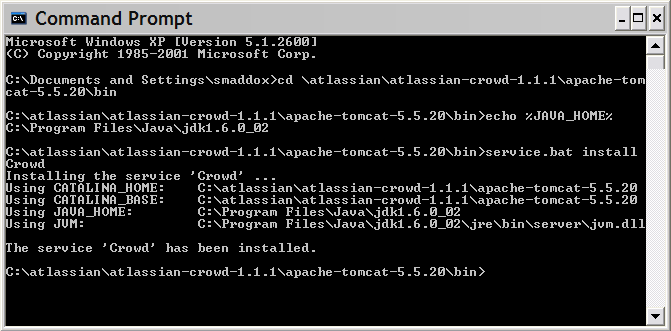
service.bat install Crowd
Screenshot: Installing Crowd as a Windows Service
Crowd should now have been installed as a service, and will be visible in the Windows Services console.
Screenshot: Windows Services Console
Run the following command, to have the Crowd service start automatically when the server starts:
tomcat6 //US//Crowd --Startup autoThe Crowd service will automatically start up the next time the server reboots.
- You can manually start the Crowd service with the command
net start Crowd, and stop it withnet stop Crowd. - To see what parameters the Crowd service is starting with, go to Start -> Run and run
regedt32.exe. There should be an entry atHKEY_LOCAL_MACHINE -> SOFTWARE -> Apache Software Foundation -> Procrun 2.0 -> Crowd.
- You can manually start the Crowd service with the command
Additional Crowd Setup Options (Optional)
To increase the maximum memory Crowd can use (the default will already be 256MB), run:
tomcat6 //US//Crowd --JvmMx 512If you are running Crowd with JIRA and/or Confluence in the same JVM, increase the MaxPermSize to 512 MB:
tomcat6 //US//Crowd ++JvmOptions="-XX:MaxPermSize=512m"- Occasionally, it may be useful to view Crowd's Garbage Collection information. This is especially true when investigating memory issues.
To turn on the Verbose GC (garbage collection) logging, execute the following command in the command prompt
tomcat6 //US//Crowd ++JvmOptions="-Xloggc:path\to\logs\atlassian-gc.log"The path (denoted by \path\to) refers to the directory in which Crowd is currently installed. For example:
tomcat6 //US//Crowd ++JvmOptions="-Xloggc:c:\crowdinstall\logs\atlassian-gc.log"
In order to check all the configurations for the service, you can access:
HKEY_LOCAL_MACHINE -> SOFTWARE -> Apache Software Foundation -> Procrun 2.0 -> Crowd -> Parameters -> Java -> Options- If you are using HSQL as your database server: after installing Crowd as a Windows service, you will need to copy your database files.
- Create a folder called c:\windows\system32\database
Copy over the database files from your
atlassian-crowd-1.1.2/database.
We recommend strongly that you use an external database server rather than the HSQL database supplied with Crowd for evaluation purposes.
Refer to the Tomcat documentation for further service options.
RELATED TOPICS


