Enabling public signup and CAPTCHA
About public signup and CAPTCHA
For some organizations, it is appropriate to enable public signup, which allows users to create their own accounts. If these users create accounts that give them access to Jira Core or Jira Software, these accounts will consume a license for these applications. If public signup is switched on for Jira Service Management, and customers create their own accounts, these accounts do not consume a license.
If public signup is not enabled, then only a Jira administrator can create new user accounts.
For security reasons, even if you enable signup, it is still necessary for users to have the appropriate project permissions before they can see or create issues. Note that you can use automatic group membership to add all new users to appropriate groups.
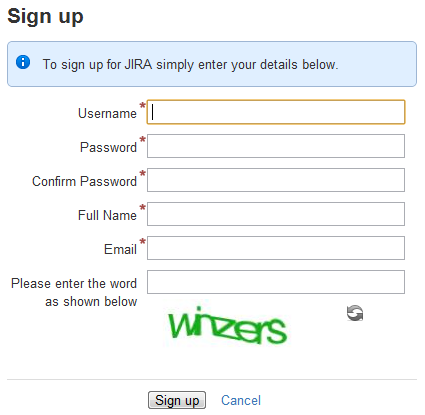
If your Jira application server is accessible from outside your organization's firewall, and you have enabled signup, then you may want to also enable CAPTCHA. CAPTCHA helps ensure that only real humans (and not automated spam systems) can sign themselves up to Jira. When CAPTCHA is enabled, visitors will need to recognize a distorted picture of a word (see example below), and must type the word into a text field. This is easy for humans to do, but very difficult for computers.
For all of the following procedures, you must be logged in as a user with the Jira administrators global permission.
Enabling public signup for Jira Core and Jira Software
- In the upper-right corner of the screen, select Administration > System.
- In the sidebar, select General configuration.
- Scroll down the page and select Edit Configuration.
- In the Mode dropdown, select Public.
- Select the Update button at the bottom of the screen.
- Log out of Jira, then click the Log in link at the top right of the screen and verify that the Sign up link is displayed at the bottom of the login screen.
Enabling public signup for Jira Service Management
With public signup enabled, agents can invite new customers to a service project, and new customers can create accounts on the Customer Portal and through email. Enabling public signup for your service project also enables a honeypot technique which helps prevent spambots from creating accounts through the customer portal.
Enabling public signup
You must first enable public signup at the system level:
- In the upper-right corner of the screen, select Administration > System.
- Scroll down to the Jira Service Management section and select Configuration.
- In the Public signup section, allow project admins to enable public signup.
Enabling verification emails
After enabling public signup, we recommend that you also enable verification emails. This adds security to your Jira instance and makes sure that all customers are exactly who they say they are. This option should be enabled by default unless you haven't configured outgoing email.
- Enable and configure outgoing email so Jira can send verification emails. For more info, see Configuring an SMTP mail server.
- In the Public signup section, enable verifications emails.
Opening a service project
You or a service project administrator can then open a service desk at the project level:
- Go to Project administration > Customer permissions.
- Select Anyone can email the service desk or raise a request in the portal.
New customers will be added to the Service Desk Customers project role. Note that customer accounts created via public signup don't count towards a Jira Service Management license.
In situations where users are unable to change their passwords, check that a Delegated Authentication Directory is not the highest in the order of User Directories. As a workaround, you can change the order of User Directories, or alternatively use a connection to a LDAP directory instead.
Enabling CAPTCHA for Jira application login screens
CAPTCHA can be enabled so that anyone attempting to sign up to your Jira instance through the Jira login screen will be presented with a random sequence of letters, that they must type to confirm they're a real person. This is to try prevent spamming, and malicious attacks.
- In the upper-right corner of the screen, select Administration > System.
- In the sidebar, select General configuration.
- Scroll down the page and select Edit Configuration.
- Find CAPTCHA on signup and select On.
- Select the Update button at the bottom of the screen.
- Log out of Jira, click the Log in link at the top right of the screen, then click the Sign up link and verify that a random sequence of letters is displayed at the bottom of the Sign up screen — e.g. "winzers" in the following screenshot:


