SLAs
JIRA Service Desk provides powerful built-in SLA management so you can track how well your team adhere to the agreements you have with your customers. JIRA Service Desk comes with a few pre-configured SLA metrics to cover some of the most common IT requirements; however you can modify them or create custom SLA metrics to reflect the SLAs you use in your business.
The SLA tools in JIRA Service Desk are extremely flexible; review this page for an introduction to how you can set up your service desk to track your team's unique SLA metrics:

Tip: JIRA Service Desk provides robust reporting tools that you can use to track your team's performance against your SLAs. Check out this page for tips on tracking your SLAs
For information about the permissions needed to see and adminster SLAs, see How JIRA and JIRA Service Desk Work Together.
A look at how an SLA is constructed
An SLA is made up of two settings: time measurement and goals for issues. Together, these criteria make up an SLA.
You can't change the name of an SLA after you've saved it, so make sure that the name you choose will support the SLA metric and any additional things you might need to measure in the future.
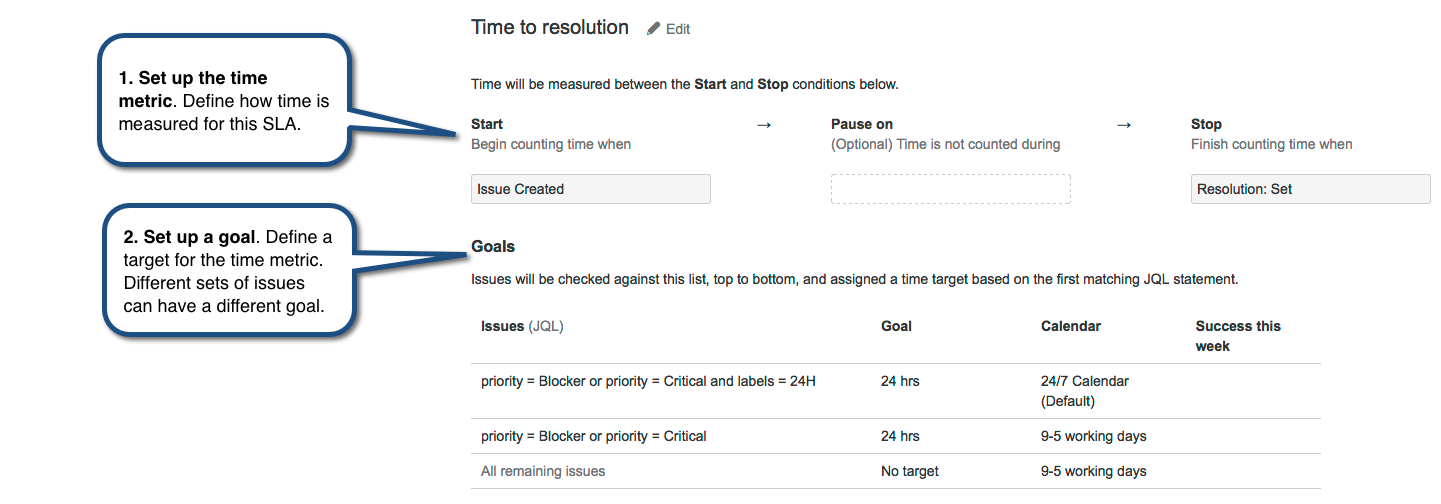
Setting up the SLA time metric
You can think of the time metric as a stopwatch that tracks time between two points in an issue's life-cycle. JIRA Service Desk lets you control exactly when time is tracked, letting you start, stop, and pause the counting based on the status of an issue or when the issue changes (for example, a comment is added). For example:
- In an SLA that guarantees issues will be resolved in a certain amount of time, the time might start counting when the issue is created and stop counting time when the issue is resolved.
- In an SLA that guarantees a certain turnaround in response times between support and the customer, the time might start counting when the issue is waiting for support. It might stop when the issue is once again waiting for the customer. Each time the issue meets the start condition, a new cycle of the SLA will begin.
- In an SLA that guarantees a certain response time excluding time spent waiting on a customer, the time might start counting when the issue is created. It might stop counting when the issue is resolved, and it will pause each time the issue is waiting for a customer.
Here's a look at how you use JIRA Service Desk SLA designer to set the conditions for the time metrics:

Notice that you can set multiple conditions for the start, stop, and pause time. Check out Example: Creating an SLA that doesn't track continuous time for an in-depth look at how you can use this functionality.
Set up the SLA goals
While the time conditions on an SLA specify what your team considers to be "trackable" time for the SLA, the goal section of the SLA designer lets you set the amount of time that's allowed for different scenarios. For example:
- An SLA that guarantees issues will be resolved in certain amounts of time might specify Blocker issues will be resolved in 24 hours and Critical issues will be resolved in 36 hours.
- An SLA might also guarantee times for very specific issue criteria. For example, an SLA for Blocker issues might specify that Blocker issues created by a member of the Build Engineering team might have a goal of being resolved in 12 hours, while Blocker issues created by a member of the Accounting team might have a goal of being resolved in 36 hours.
Here's a look at how you use the JIRA Service Desk SLA designer to set the goals for various issues:
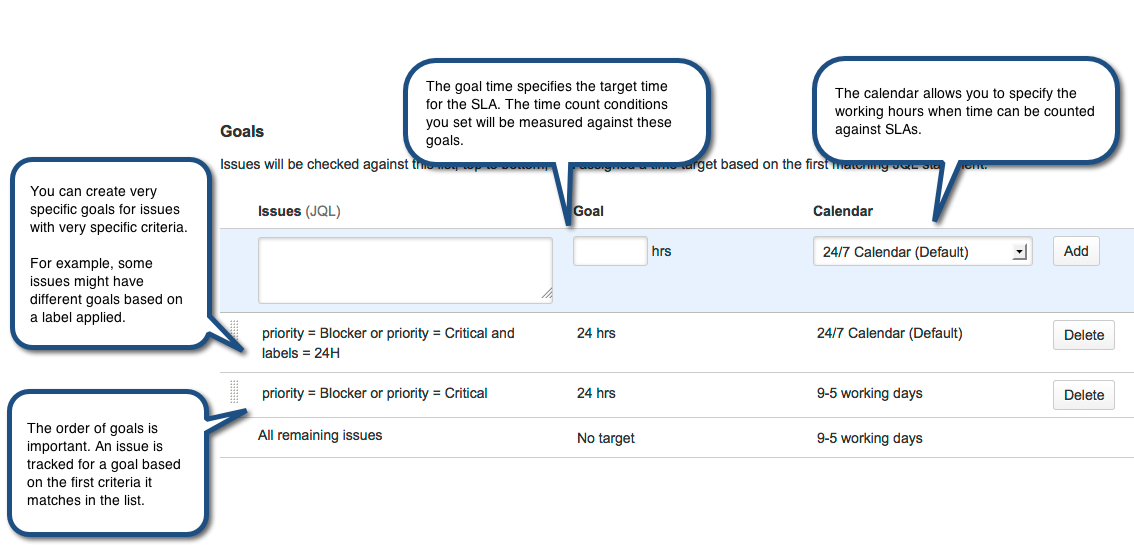
A best practice is to base a goal on criteria that doesn't change throughout an issue's lifecycle. For example, you would not create a goal based on an issue status.
You can also set up a goal to be dependent on a different SLA. For example, you can set up a goal like this: Priority = Blocker and "Time to First Response" > 30m
where "Time to First Response" is the name of a different SLA. In order to make a SLA dependent on the value of another SLA, the other goal condition for the referenced SLA must be met when you want the to SLA start. In the previous example, the "Time to First Response" SLA must have a Start condition that occurs earlier than the SLA being defined (such as "Issue Created").
Creating SLA Calendars
By default, SLAs are measured against 24/7 working days. However, you can use SLA calendars to specify the working hours during which time should count against the SLA target. For example, SLA calendars let you exclude holidays or weekends from the time that affects the SLA metrics.
Use the Calendar button on the SLA tab to create the calendars that work for your environment. Then associate them with SLAs as needed. See Example: Creating a basic SLA for an example of setting up an SLA that uses a 9-5 working day SLA calendar.
SLA calendars are unique to each service desk. If you want to use the same calendars in multiple service desks, you must re-create them in that project.
SLA usage notes
- If you edit an existing SLA, JIRA Service Desk will re-index all the existing issues in the project; the re-indexing will ensure that the SLA status on the issues accurately reflects any changed criteria. All the historical SLA data will be recalculated to measure against the new metrics.
- If issue data changes in such a way that the goals for the issue change (for example, the priority changes from Critical to Blocker), the time against the previous goal will be tracked against the new goal. In other words, if the support team spent an hour on a Critical issue, when the issue is escalated to Blocker, the hour still counts against the new goal, even if it causes the SLA to be breached.
Still confused?
The best way to understand SLAs is to look at the out-of-the box SLAs JIRA Service Desk provides, or practice making your own. Check out these detailed examples of SLAs to get an idea of the different ways you can use SLAs in your team:
Example: Creating a basic SLA
Example: Creating an SLA that doesn't track continuous time
Example: creating an SLA with multiple cycles
How your team sees SLAs
Your team members can see a read-only version of the SLA tab so they can view how the SLA is configured. In the detail view of issues, the SLA section lists even more detail about the SLA(s) that the issue is being measured against.
![]()
Review the following sections for more detail on what the SLA tracker conventions indicate.
Ongoing SLAs
The SLA tracker uses colors to indicate the urgency of a given SLA for an issue based on the time remaining.
 | SLA has greater than 1 hour remaining. |
 | SLA has less than 1 hour remaining. If the SLA goal is one hour, the SLA has 30 minutes remaining. |
 | SLA has less than 30 minutes remaining. If the SLA goal is one hour, the SLA has 15 minutes remaining. |
 | SLA has breached the target. The amount of time past the goal is shown as a negative number. |
The time count may be configured to pause on certain conditions. A paused SLA will display a paused icon:

Completed SLAs
A completed SLA displays the time remaining when the SLA was completed (or the amount of time breached) and an icon to indicate whether the SLA was completed successfully or unsuccessfully.
 | SLA completed successfully. |
 | SLA completed unsuccessfully (it breached the target) |
Multiple SLA targets
If the issue meets the criteria for multiple SLAs, trackers for each SLA will appear. In addition, if the SLA has had multiple cycles, you can hover over the symbols for more details on how the SLA was met for that particular cycle. (For example, in an SLA that is measured based on when an issue is waiting for support, you can see whether the SLA was met each time the issue started waiting for support.)

SLA sorting
When you view a list of issues (in a queue or elsewhere), you can sort them by their SLA resolution times. Ongoing issues are listed first, with the shortest time remaining at the beginning of the list. Completed issues are ranked last but aren't sorted by the remaining time.