How to build a release planning page in Confluence
About this article
By John Wetenhall, published August 31, 2015.
Every product release requires a lot of hard work and a ton of coordination between individuals and teams. In some places, a release coordinator takes this on as a full time job, while in others, a developer, product manager, or project manager might be in charge of release planning.
At Atlassian, we use Confluence to collect and organize all the work and information for each release, and to communicate what it's all about to the rest of the business.
I've written before about how we approach releases, what goes into them, and how we organize them. In this post I'll cover exactly how to build an awesome release planning page that will help you do the following:
- Identify the key objectives, people, and high level roadmap
- Collect all the relevant background information and ongoing work
- Direct your colleagues to additional details in JIRA and on related pages
You can set your release up for success from the start with a single source of truth for everyone working on it. Follow these steps to create an awesome release planning page.
Step 1: Identify the key details
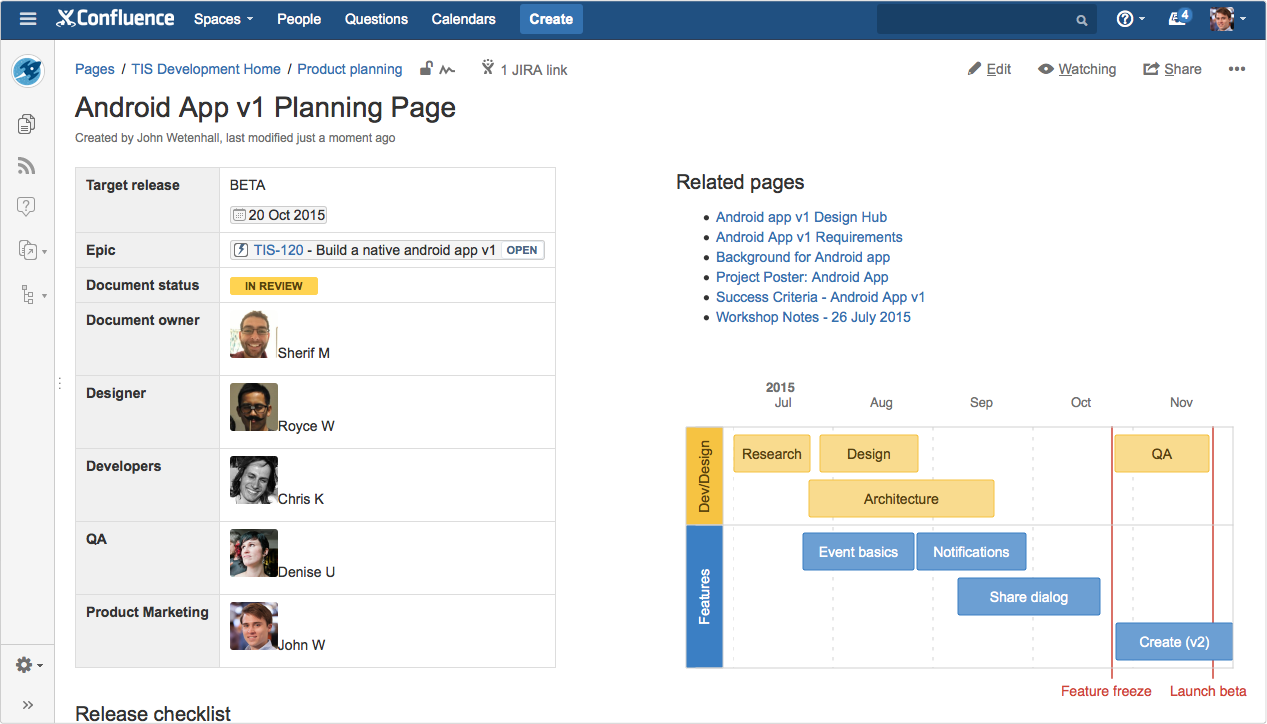
It's essential that anyone who comes to your release planning page can quickly identify who is involved, and what the goals and expected outcomes are. When you're done, the top portion will look something like this:
Start by creating a blank page and then add a two column page layout so you can fit all your key information above the fold. Page layouts are in the editor toolbar here:

Who?
Add a table inside it that displays the high level details of your release. We like to use the profile picture macro, which you can find in the macro browser or by pressing { and then typing "profile picture", to display each person's image. This helps people put a face to a name, especially when we're working in remote teams. Hover over someone's name in an @mention and you'll find a bit more information about that person.

Pro tip: Put your table inside a page properties macro so you can create a report with a summary of the key details of all your releases available for easy reference.
What?
You'll also want to capture critical details like the name of the release, expected ship date, and the status of the planning page or even the release itself. We use the status macro to communicate status of pages or individual line items. You'll find it in the "Insert more content" button in the editor toolbar or by pressing {. Change the text and the color to indicate changes in status.
Example planning page statuses: DRAFT IN REVIEW CURRENT
Example release statuses: PLANNING IN PROGRESS AT RISK SHIPPED
We also include the most important goals for the release as well as the non-goals – i.e., things that were discussed that we've actively decided not to include in the scope of the release. It can be helpful to link to decision pages or others with background on how the team established the goals.
Step 2: Visualize your plans
We like to sketch a roadmap to get a rough idea of how various streams of work will fit together and to communicate the timing within the team and to others. We use the roadmap macro in Confluence to visualize our plans at a high level. (Note: when we want to create a data driven roadmap and determine what's possible given our resources, we use JIRA Portfolio).
Insert the roadmap macro just like any other macro. You can then create as detailed or as simple a roadmap as you need by adding additional lanes for work streams, bars for epics, and markers for milestones (or whatever combination works for you!). Move the bars around to experiment with different timing, and drag them to resize.

Want to give people a little more context on a particular epic or feature you've listed as a bar? You can link any bar to a page - we often provide a link to a product spec that gives more detail. Click insert to add the roadmap to the page, and remember that if your plans change, your roadmap can, too, just edit it and move things around as necessary.
Step 3: Connect the dots
The final piece in your release planning page is all about connecting people to the information they need. You can do this in whatever way best suits your release process, but there are a few basic tips.
First, link your page to the JIRA epic where you're tracking the work for this release by simply pasting the JIRA link into your table at the top. If this release requires multiple epics, you might want to include them in a table below the fold. Paste the issues in so you get the latest status, dynamically updated.
Second, add the children display macro at the top right of your page, above your roadmap under a heading that says "Related Pages". This displays the child pages (sub pages, if you will) of the release planning page. You can specify how many pages and what content to show in the macro editor.

Encourage your colleagues to create any page that has to do with the release as a child page of the planning page so they're all collected in one spot. You may even want to move other pages to become child pages if they were created before the planning page existed. You can move a page from the "..." dropdown in the top right corner.
Pages that we typically create for a release include the following:
- Design Hub - for all the relevant UX/UI designs
- Competitor insights - an overview of how other tools tackle this problem
- Analytics - how will we measure usage? what other feature usage might be affected?
- Success criteria - what metrics do we want to hit?
- Workshop notes - takeaways and whiteboards from related spikes and workshops
- User testing - plans and notes around testing the new features with users
Finally, we like to add links and context below the fold so anyone can get to the additional information they need. Things we typically include:
- Summary of the problem we're solving for the customer
- Links to related feature requests in our public issue tracker, JIRA
- A high level view of the epics required for this release
- A list of open questions regarding the release
We finish off the page with a release checklist using tasks. Create a task list with the check box in the editor toolbar, or type a left bracket "[" then a right bracket "]" to create a task. You can assign tasks with an @mention and add a due date by typing "//". This lightweight task list makes sure we don't forget any of the little things before we release.

The end result is a page that covers what you plan to release, why, who is involved, an estimate of the timeline and links to more information for anyone who needs it.
At a glance: what did you just learn?
Creating this page might seem daunting with all the macros and information we suggest including, but once you create one, you'll get the hang of it. Here's a list of what we covered, plus links for more detail:
- Page properties macro: put the table at the top inside one of these to make collecting release pages easy.
- Page layouts: Organize your page with different column layouts
- Profile picture macro: Helps put a face to a name, especially in distributed teams
- Status macro: Communicate status or use it as a colorful label
- Roadmap macro: Sketch a visual roadmap with just a few clicks
- JIRA links: Connect your page in Confluence with your project and epics in JIRA
- Children display macro: Expose related pages and encourage organizing all release information under the planning page
- Task lists: Assign tasks with due dates to make sure the little things get done.
This post is part of our latest collection, A Software Team’s Guide to Confluence. Click the lovely green button below to see more.

Hungry for more?
Download the Software Team’s Guide to Confluence ebook to see all our tips in one place, then watch the blogs in this space to get notified when new tips articles like this are posted. And if that's still not enough, sign up for Confluence Insiders – our monthly newsletter covering all things Confluence.
Find this page helpful? Share the love on Twitter