How To Perform Data Refresh on a Jira Align Self-Hosted
Summary
In a Jira Align cloud instance, a Data Refresh from PROD to TEST instances is arranged through a technical support ticket, however, a Data Refresh of a Self-Hosted Jira Align instance has to be performed by the customer administrators. This article helps customers go through the Data Refresh for an on-prem, Self-Host SQL Server.
Environment
Jira Align Self-Hosted
Solution
If the Jira Align PROD and TEST instances are integrated to Jira PROD and TEST instances, then a Jira Data Refresh should be performed at the same time.
For Jira Align the following steps should be performed in the PROD and TEST instances, so the information is split for each one of the instances.
What Data will be overwritten? The entire target Database will be overwritten. This includes:
Organizational Data - All organizational data (hierarchies, timeframes, work items, objects) in the Test environment will be overwritten with the current Production data set. +NOTE: It is strongly recommended that you refresh your Test Jira environment at the same time as Jira Align to avoid data misalignment issues
Users - All users in the Test environment will be deleted and replaced with the current Production users. Any users that are unique to Test (that do not exist in Production) will need to be recreated post-refresh
Connectors - All connectors in the Test environment will be with the Source (Prod) settings. Connector configurations must be recreated TEST instance post-refresh.
SSO - Manual sign-on will need to be temporarily enabled in the PROD instance during the process. SSO configurations must be recreated in the TEST instance post-refresh
PROD instance
Please note that during a Data Refresh, the target instance will be unavailable (off-line) until the steps below have finished
- Login to Jira Align go to Settings > Platform > Security, make a note of the current stetting and then make sure Disable Manual Sign In is set to No and click Save Settings (this will affect how end users login until you complete step 5)
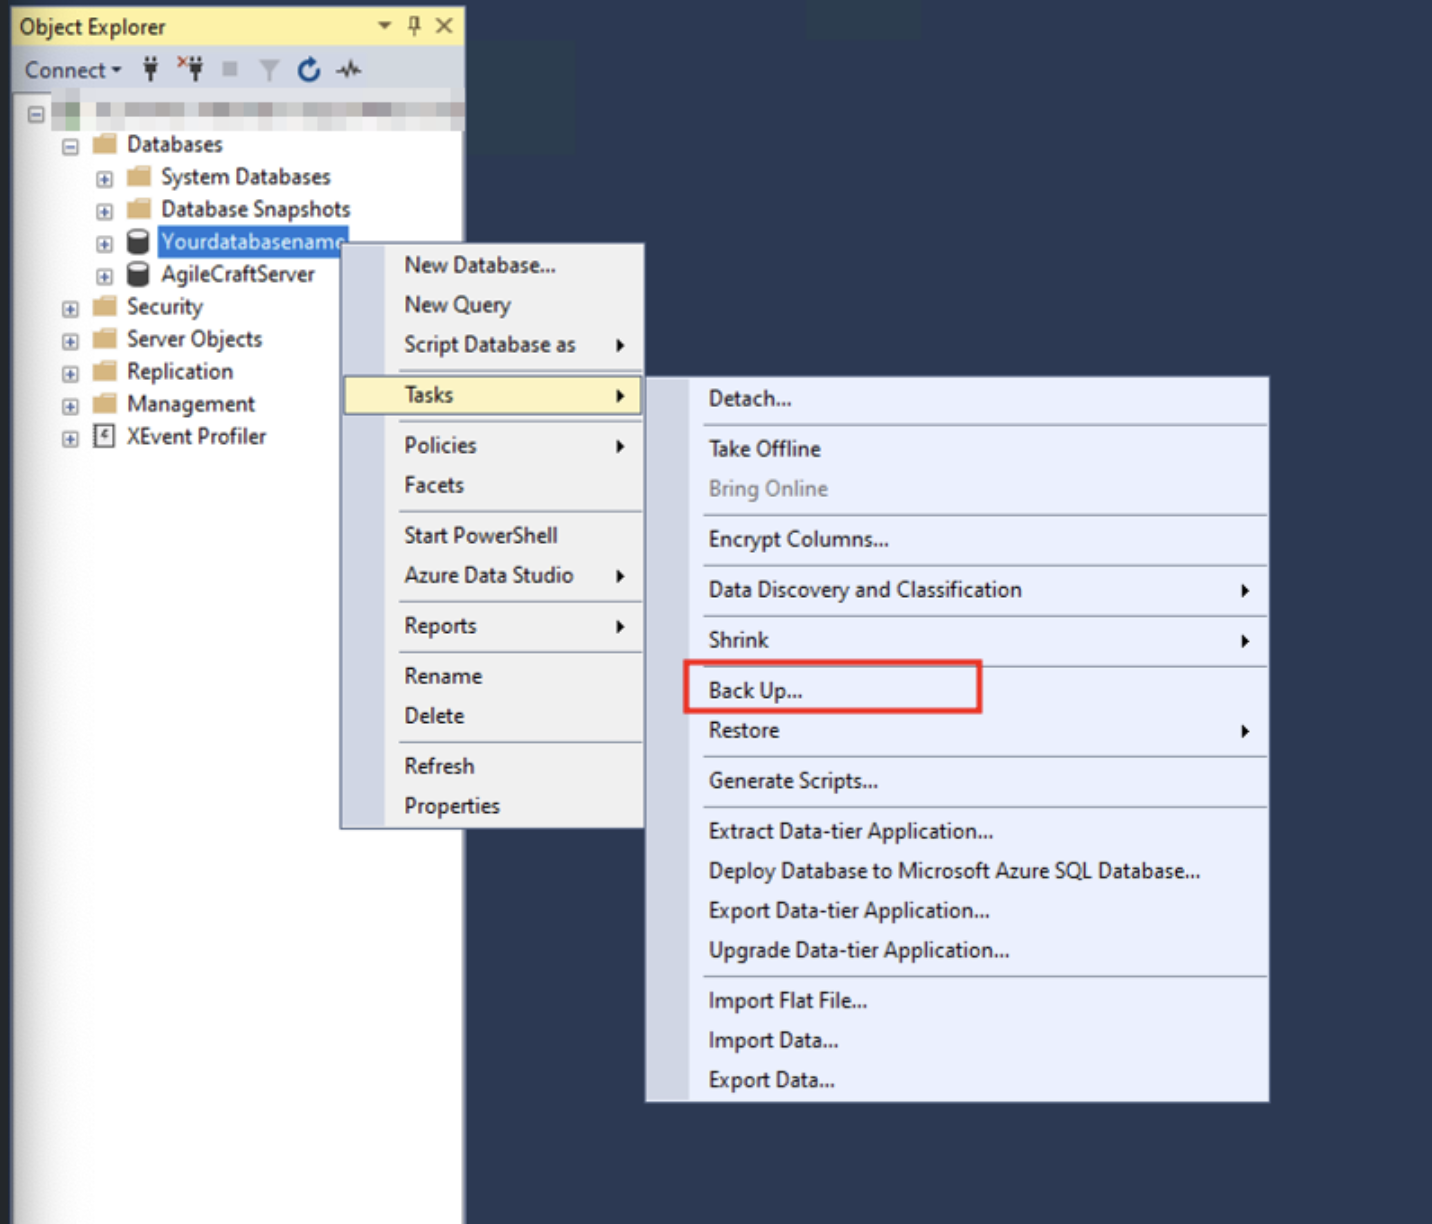
Execute a Full SQL backup of the PROD Database in the PROD instance by right-clicking on the PROD Database then Tasks > Back-Up.., in this example, it is “Yourdatabasename".
Let the Default Backup type option set as “Full” and select the destination folder and filename.bak by clicking on the ADD button. In this example, the backup is being stored on the Jira Align Folder “C:/YourCompanyName/Yourdatabasename.bak”
Copy the backup files from the PROD instance backup of PROD (in this example Yourdatabasename.bak) Database to the TEST Jira Align instance folder. In this example “C:\Yourcompanynametest”.
- Login to Jira Align got to Settings > Platform > Security, set Disable Manual Sign In back to its original setting and click Save Settings (this will re-enable the usual login method for end users)
TEST instance
Make sure to have the TEST instance on-prem license code before applying all the steps below
Note: It will be applied when the Data Refresh has finishedTake screenshots of each connector of the TEST instance on the Administration>Connectors>Jira Settings>Connector dropdown menu:
- Also take screenshots of your SSO configuration in Jira Align > Settings > Platform > Security
Stop Test IIS Website
Stop Backoffice and Jira Connectors Windows Services
Execute a Full SQL backup of the TEST Database repeating the same steps from the PROD Full SQL Backup.
Restore PROD (in this example Yourdatabasename.bak) Database backup on the TEST database by right-clicking on “Yourcompanydatabasetest” and selecting Tasks > Restore > Database:
Select the file by enabling the toggle "device” and click on the “…” button:
Then Select the PROD Database Backup file by clicking on Add (in this example the file is “Yourdatabasename.bak”) and confirm by clicking on the “ok” button:
Clicking on the Options tab the "Overwrite the existing database"(WITH REPLACE) option should be enabled:
Create the PROD admin SQL user login with the same password used in the PROD instance on the SQL Management Studio Security>Logins with the same roles enabled on PROD (check that information on the PROD SQL Management Studio)
Edit c:\[ROOT_DIRECTORY]\JiraAlign\web.config and insert the following information on the connection strings:
Data Source = localhostInitial
Catalog= Test Instance
DatabaseID = Prod SQL
LoginPassword = Prod SQL Password
<connectionStrings> <add name="Main" connectionString="Data Source={server};Initial Catalog={CUSTOMER_DATABASE};Integrated Security=False;User Id={JASQLUSER};Password={NEWPASSWORD};MultipleActiveResultSets=True;Encrypt=yes;TrustServerCertificate=True;" /> </connectionStrings>
Edit c:\[ROOT_DIRECTORY]\_Cus\web.config and insert the following information:
Data Source = localhost
Initial Catalog= Test Instance Database
ID = Prod SQL
LoginPassword = Prod SQL Password
<connectionStrings> <add name="Main" connectionString="Data Source={server};Initial Catalog={CUSTOMER_DATABASE};Integrated Security=False;User Id={JASQLUSER};Password={NEWPASSWORD};MultipleActiveResultSets=True;Encrypt=yes;TrustServerCertificate=True;" /> </connectionStrings>
Edit Jira Connector connection string
If multiple connectors, need to update each connector config file
c:\[ROOT_DIRECTORY]\Jira\AgileCraft_Jira.exe.config
Data Source = localhost
Initial Catalog= Test Instance Database
ID = Prod SQL
LoginPassword = Prod SQL Password
<connectionStrings> <add name="Main" connectionString="Data Source={server};Initial Catalog={CUSTOMER_DATABASE};Integrated Security=False;User Id={JASQLUSER};Password={NEWPASSWORD};MultipleActiveResultSets=True;Encrypt=yes;TrustServerCertificate=True;" /> </connectionStrings>
Edit BackOffice Connection String
c:\[ROOT_DIRECTORY]\BackOfficeService\AgileCraft.Backbone.exe.config
Data Source = localhost
ID = Prod SQL
LoginPassword = Prod SQL Password
<connectionStrings> <add name="Connection" connectionString="Data Source={server};Initial Catalog=AgileCraftServer;Integrated Security=False;User Id={JASQLUSER};Password={NEWPASSWORD};MultipleActiveResultSets=True;Encrypt=yes;TrustServerCertificate=True;" /> </connectionStrings>
Start Jira Align TEST website in IIS
Reset IIS
Log in JiraAlign instance and redo the connector's settings with the screenshots taken in Step 1. Also correct and redo the SSO settings from Step 2. The following guide would help:
https://community.atlassian.com/t5/Jira-Align-articles/Jira-Align-to-Jira-Cloud-Connectivity-Quick-Guide/ba-p/1505705Start Jira Connector and Backoffice Windows Services
Apply the TEST instance on-prem license code in Jira Align > Administration > Version > Enter License


