How to add/update/remove Request Participants using Automation for Jira
Platform Notice: Cloud - This article applies to Atlassian products on the cloud platform.
If you are looking a solution for Jira Server/Data Center, please refer instead to the KB article Automation for Jira - How to update the Request Participants or a multi user picker field from the content of other fields
Summary
Cover different scenarios which can be used to add Request Participants to the Issue using Automation for Jira.
Environment
Jira Service Management Cloud
Solution
Once you have configured the Automation rule trigger and defined the conditions when Request participants should be added - you can choose one of the options below to add participants to the issue.
Append/Add multiple Request participants using the Edit issue action
After adding the "Edit Issue" action we have three options for adding Request participants
Choosing a user from the list
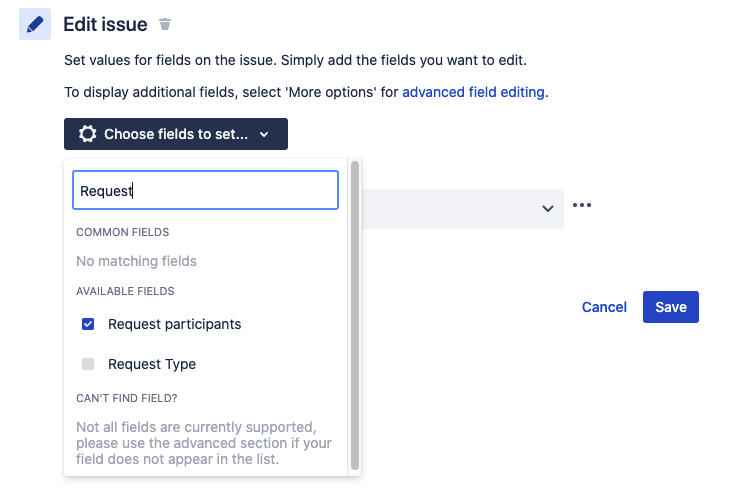
Click on "Choose fields to set..." and type "Request participants"
Enable the checkbox for "Request participants" field (as in the screenshot below)
Click on the "Request participant" field dropdown and start typing the name to search for users.

To add more users click again on the field and find a new user

Append to existing list
To Append the new users, from the Request participant dropdown choose the option "Copy from issue" followed by selecting the new list of users

Copying users from other single user or multi-user picker fields
Click on "Choose fields to set..." and type "Request participants"
Enable the checkbox for "Request participants" field (as in the screenshot below)
Click on three dots near the "Request participant" field and choose option "Copy from"

Then click on "Add Request participants from Current Issue" and you will see the options to select the Issue and the Field to copy the values from.

Append to existing list
You can check/uncheck the "Add to existing values" option to keep or remove the current Request participants value.
Using the JSON advanced field editing
Expand the More Options section below the "Choose field to set..".
Also, make sure you have not checked the Request participant field under "Choose fields to set.."
Here are a few JSON you can insert under Additional fields to update Request participant as per your requirement:
Add/remove single and multiple account Id's
To add a single account, use the below JSON:
Single account{"update": { "Request participants": [ { "add": {"id":"<accountId>"} } ] } }To add multiple accounts, use the below JSON:
Multiple accounts{"update": { "Request participants": [ { "add": {"id":"<accountId>"} }, { "add": {"id":"<accountId>"} } ] } } To remove single or multiple accounts, replace the keyword add with remove in the same JSON shared above.
 The <accountId> should be substituted by the accountId of the user you wish to add/remove. In case you have duplicated Request participants fields you can use "customfield_xxxx" instead of "Request participants" where xxxx is the id of the custom field "Request participants". Here is how-to find custom field id
Copy from another field - Single and multiple accounts
To copy a participant from another field, you can use below JSON
Single account{"update": { "Request participants": [ { "add": {"id":"{{issue.Approvers.accountId}}"} } ] } }To copy values from another multi-user picker field use the below JSON
Multiple accounts{"update": { "Request participants": [ {{#issue.Approvers}}{"add": {"id":"{{accountId}}"}}{{^last}},{{/}}{{/}} ] } }To copy values from two different multi-user picker field use the below JSON
Copy from multiple fields{"update": { "Request participants": [ {{#issue.Approvers1}}{"add": {"id":"{{accountId}}"}}{{^last}},{{/}}{{/}}, {{#issue.Approvers2}}{"add": {"id":"{{accountId}}"}}{{^last}},{{/}}{{/}} ] } }Once all users were added click the Save button.
For more examples, refer to the page Advanced field editing using JSON.
Append/Add multiple Request Participants using the Send web request action
Review the RestAPI add request participants documentation and how-to send web request using automation for Jira for additional information.
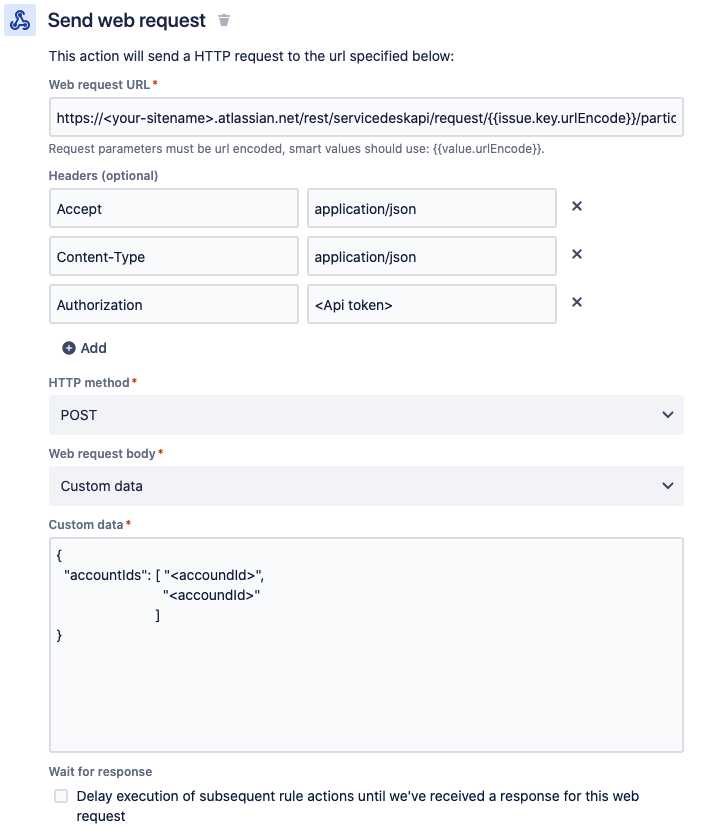
Below is "Send web request action" details:
- In Web request URL put the htttps://<your-sitename>/rest/servicedeskapi/request/{{issue.key.urlEncode}}/participant
- Add the following headers:
Accept: application/json
Content-Type: application/json
Authorization: Basic emailaddress:APItoken In the Authorization header make sure that you add the keyword Basic followed by the base64 of your emailaddress:APItoken.
So if the base64 of the emailaddress:APItoken is AB12XY45 then to the Authorization header add the value Basic AB12XY45 - HTTP method: POST
- Web request body: Custom data
Custom data: insert JSON as per recommendations from RestAPI documentation above.
JSON sample:{"accountIds": [ "<accoundId>", "<accoundId>" ] }The <accountid> should be substituted by the accountId of the user you wish to add. Below is a sample of the "Send web request" action:
- Click Save button
Contact support if you have any additional questions https://support.atlassian.com/contact