Getting started with Portfolio for Jira
Discovering Advanced Roadmaps for Jira Software Premium
On this page
Related content
- No related content found
Once you start to understand the fundamentals of long-term agile planning and how these concepts work in Portfolio for Jira, you can begin to build out your Portfolio for Jira plan.
To help bring everything together, we outlined below how to set up Portfolio for Jira with your existing Jira Software instance. This process will follow the best approach for implementing Portfolio for Jira:
- Organize your existing Jira Software projects.
- Configure Portfolio for Jira.
- Create your Plan
1. Organize your issue sources (project, boards, or filters)
When you create a Portfolio for Jira plan, you need to select the issue sources you want to pull into your plan. Issue sources are projects, boards, or filters that contain the issues you will use to forecast a roadmap for your plan. Since this setup practices a scrum methodology, we recommend using boards, because they provide the most functionality for managing with Portfolio for Jira.
Note
Do not make Fix Version a ‘hidden’ field as this is a MUST HAVE for Portfolio for Jira. Also, be careful when setting up ‘required’ custom fields as they can prevent issues from being created inside Portfolio for Jira.
If you plan to use a custom hierarchy such as initiatives we recommend you create a separate project and store those issues independently. In that project configure the issue types and, if you do not already have one, create an issue type for your custom hierarchy issue type. If you’re not using a custom hierarchy, you can skip to step 3.
If you're not sure about hierarchy, you can revisit them later and just work with epics and stories initially.
2. Configure a custom hierarchy (optional)
Now that you have a project and an issue type for your custom hierarchy set up, you will need to configure Portfolio for Jira so that it knows what issue type to link to the hierarchy level.
1. Go to Administration > Add-ons > Portfolio Hierarchy Configuration.
2. Create levels and map them to your Jira issue types.
Note
You can edit these levels any time and Portfolio for Jira will reconfigure your roadmap accordingly - nothing is set in stone!
This feature aggregates the story points (or estimation) from sub-task all the way up to the uppermost level, in that way it gives you accurate estimates for large, cross-team, cross-project pieces of work (all of which is essential in creating a useful roadmap).

One of the key components of portfolio management - and indeed any agile process - is visibility; it is essential to have end-to-end traceability from board strategy to team tasks. Portfolio for Jira has a 1:1 relationship with native Jira Software, meaning these issue types can be viewed in the normal Jira issue view with their hierarchical parent and child links.
When you decide on your hierarchy, you need to configure this in the Portfolio for Jira Administration settings. Since this is a global setting it is important to have all the teams using the hierarchy feature in Portfolio for Jira aligned.
To see this relationship in your Jira Software project, just add the parent link field to your screens to expose this link and provide full top-down (and bottom-up) visibility:
- Administration > Issues > Screens.
- Edit the screen you wish to add the field to.
- Add the field Parent-link.
Note
The parent link field can be searched using JQL, so you can create a filter for Kanban boards that show the child issues of certain features/initiatives. If you want to get the list of child issues from a parent issues, type: “Parent Link” = EX-000 To get the child issues from multiple parent links, type: “Parent Link” in (EX-000, EX-001, EX-002, EX-003).
3. Create a plan
Now that your issue sources and hierarchy are in order, it is time to create a plan.
Note
This step along with the steps above are typically done by a product owner or product manager who ultimately has ownership of the roadmap.
To create a plan you first need to select the Portfolio tab in the header of Jira Software. Then follow these steps:
- Click Create Plan.
- Enter a name for the plan.
- Select the scope of work you are planning for. Remember that you can connect to multiple sources to create cross-team, multi-project plans. There are three types of issue sources: Board – all issues on that board are included.
- Project – pulls all issues in that project
- Filter – for custom issue selection using JQL.
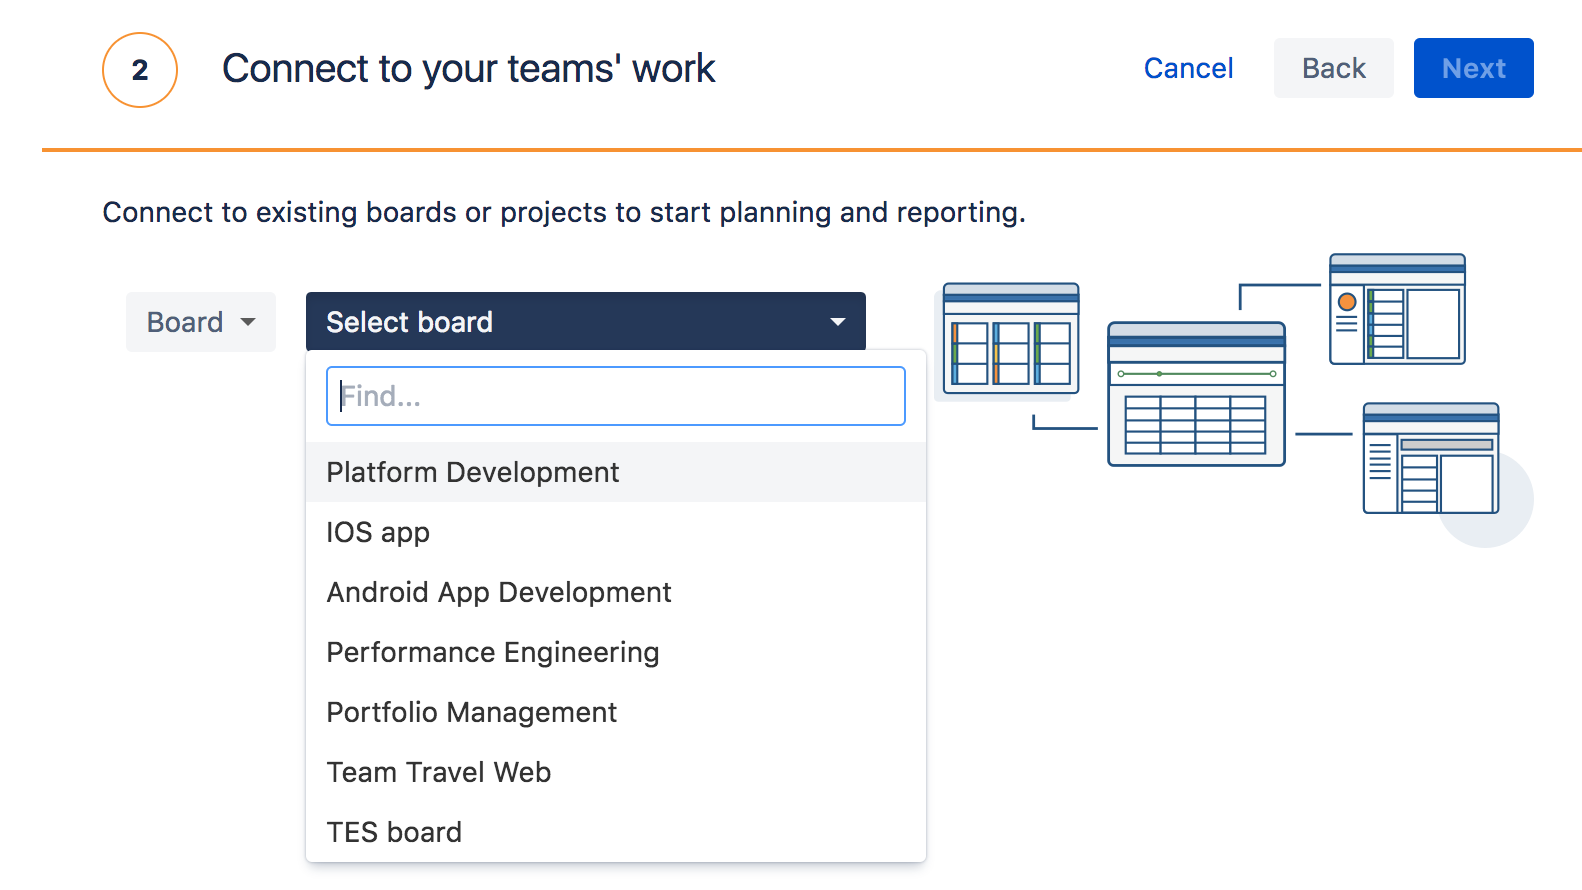
- Next select the relevant Releases you want to work with. These map to the fix versions from your issue sources.
- Then you will be prompted with Teams where you can add teams. By default, Portfolio for Jira creates a team per issue source. (These can be amended at any time once the plan has been created.)
- Finally, Confirm the issues that you wish to import – you can toggle the view between epics and stories. If an epic is selected than every issue associated with that epic will be imported. If you do not want to import specific epics or stories, de-select the box next to them.
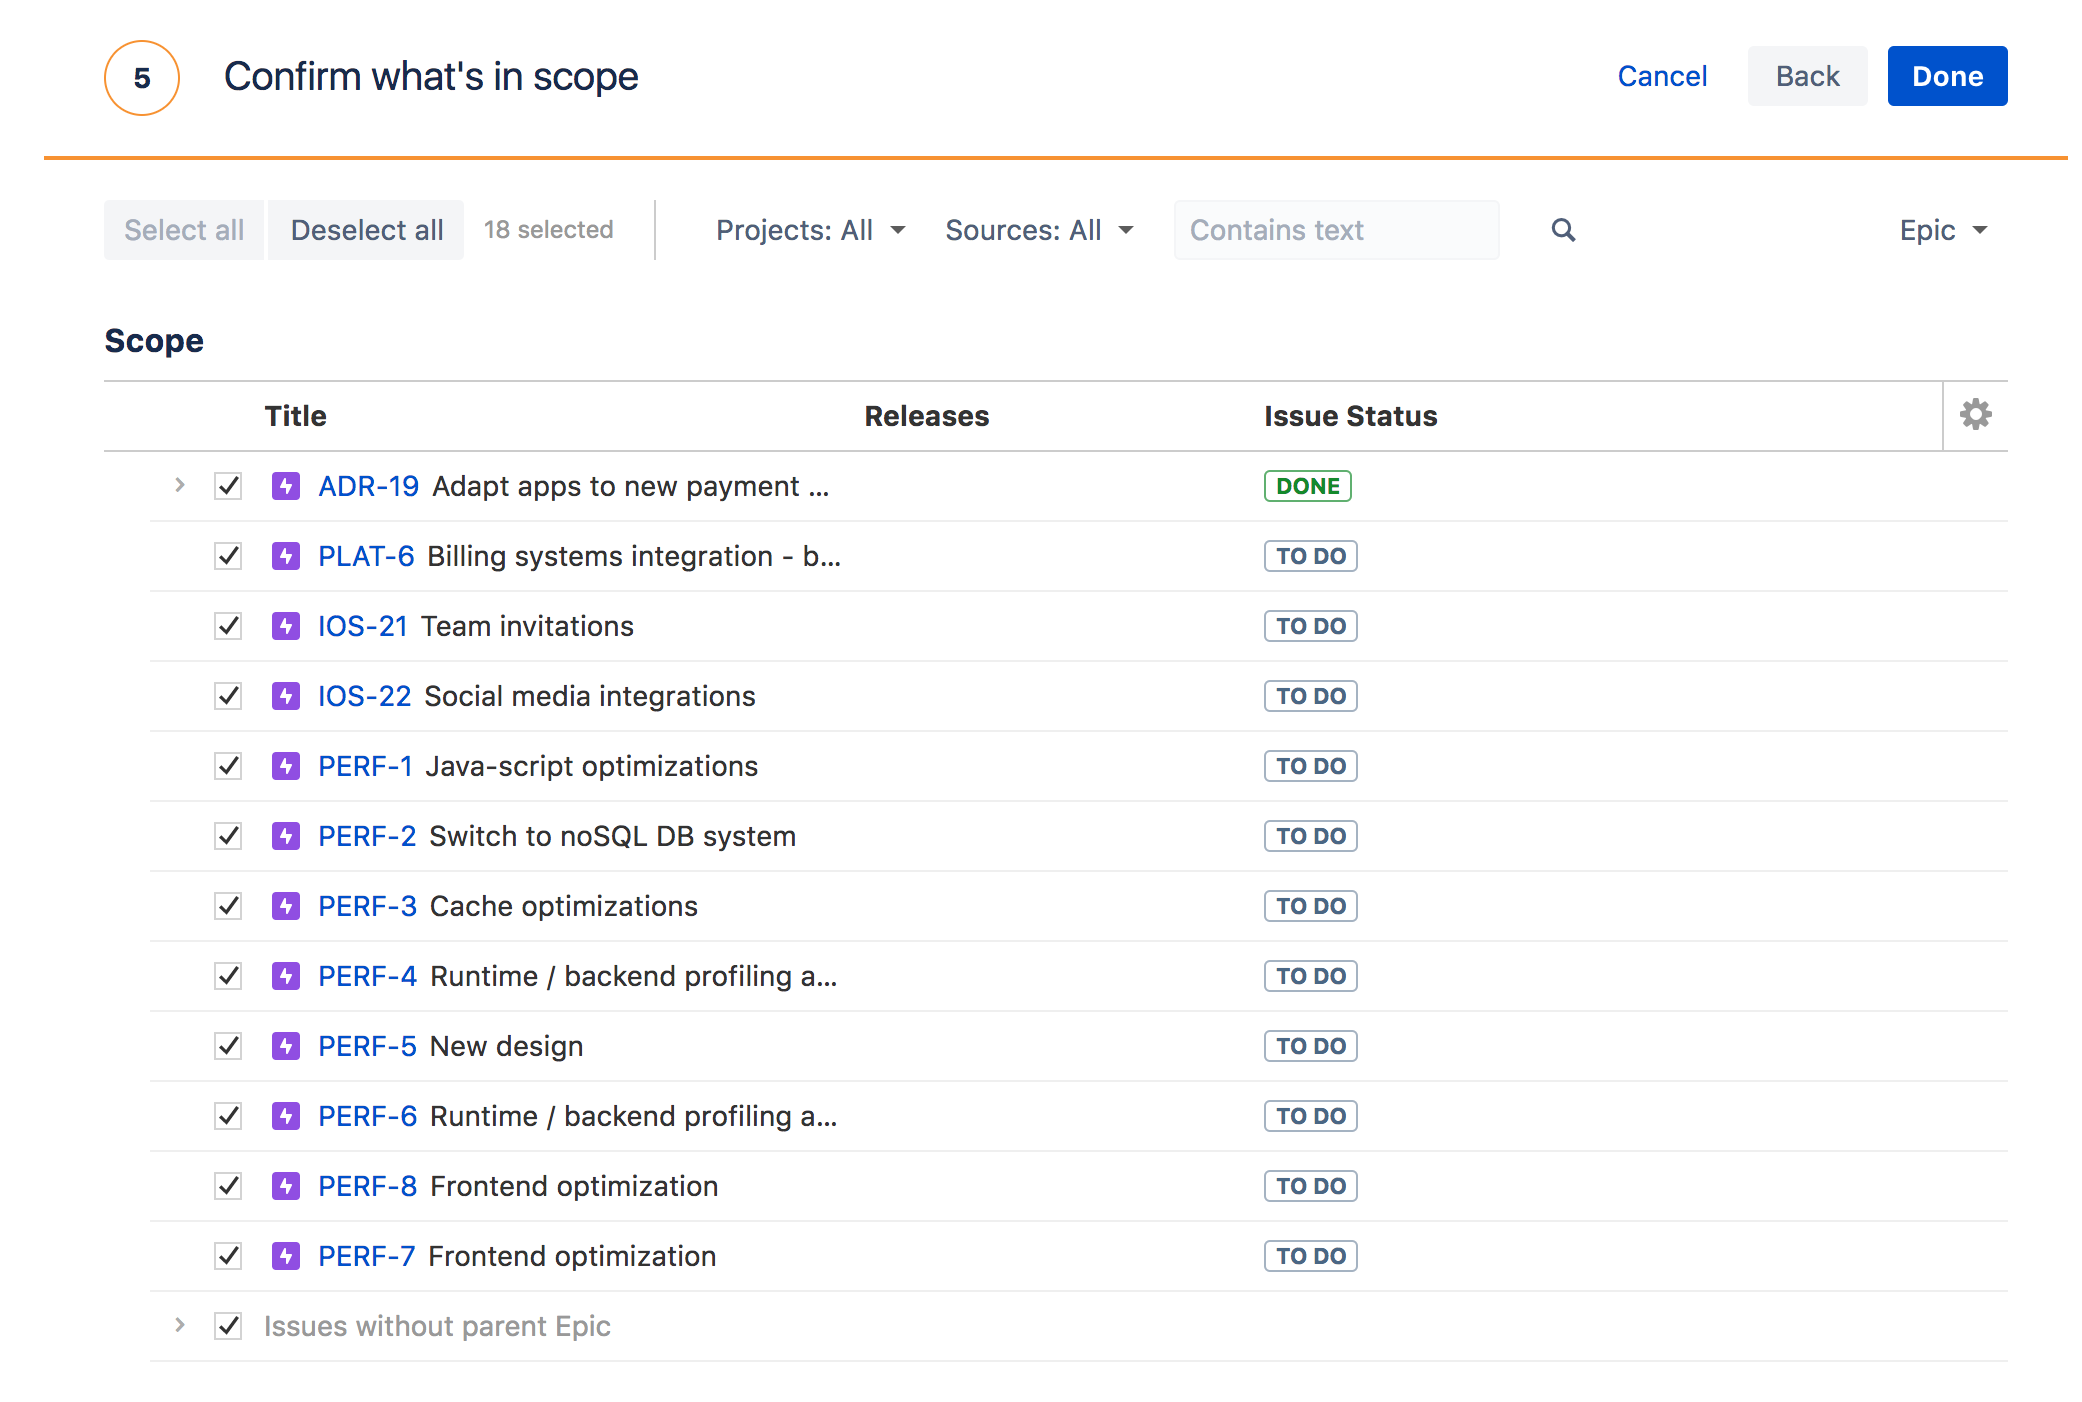
Your roadmap at this stage will be produced based on your issue priorities, team velocities, issue estimates, and any fix versions you have sourced into your plan. Note that if your issues do not have estimates, you can create a plan, but the schedule – which is the visual roadmap – will not appear on your plan until your issues and/or epics have estimates.
You will see in the upper right-hand corner the three main areas of a plan that you can manage: Scope, Teams, and Releases. The reporting section provides functionality to present your information in a more digestible view as well as provide visibility to others.
4. Configure your teams
Once you have your plan created it is important to go into the team section to make sure that your team configuration – think velocity and capacity metrics – are set up properly.
If you are happy with team configurations set in the plan creation wizard you can ignore this step and go to Step 5.
Team velocity
- For Scrum boards, Portfolio for Jira can work out your expected sprint velocity based on the average of your past sprints. This can be changed manually at any time to account for team changes (when you are first getting started with Portfolio for Jira, this does not need to be adjusted).
- For Kanban, set the average hours of work per week that the team gets through. Remember, this is an average number of hours of work completed, which is not the same as the number of hours the team is at work!
Once your team velocity is set, you have the option to add team members. You can choose to manage your people at either the team or individual level. Planning from an individual level lets you provide additional variables about availabilities and skills, so our algorithm can calculate a more accurate roadmap. Additionally, while the Capacity view is a great feature for development team leads to consider how much work is on the team’s plate, planning from an individual level allows you to dig much deeper into each individual’s capacity.
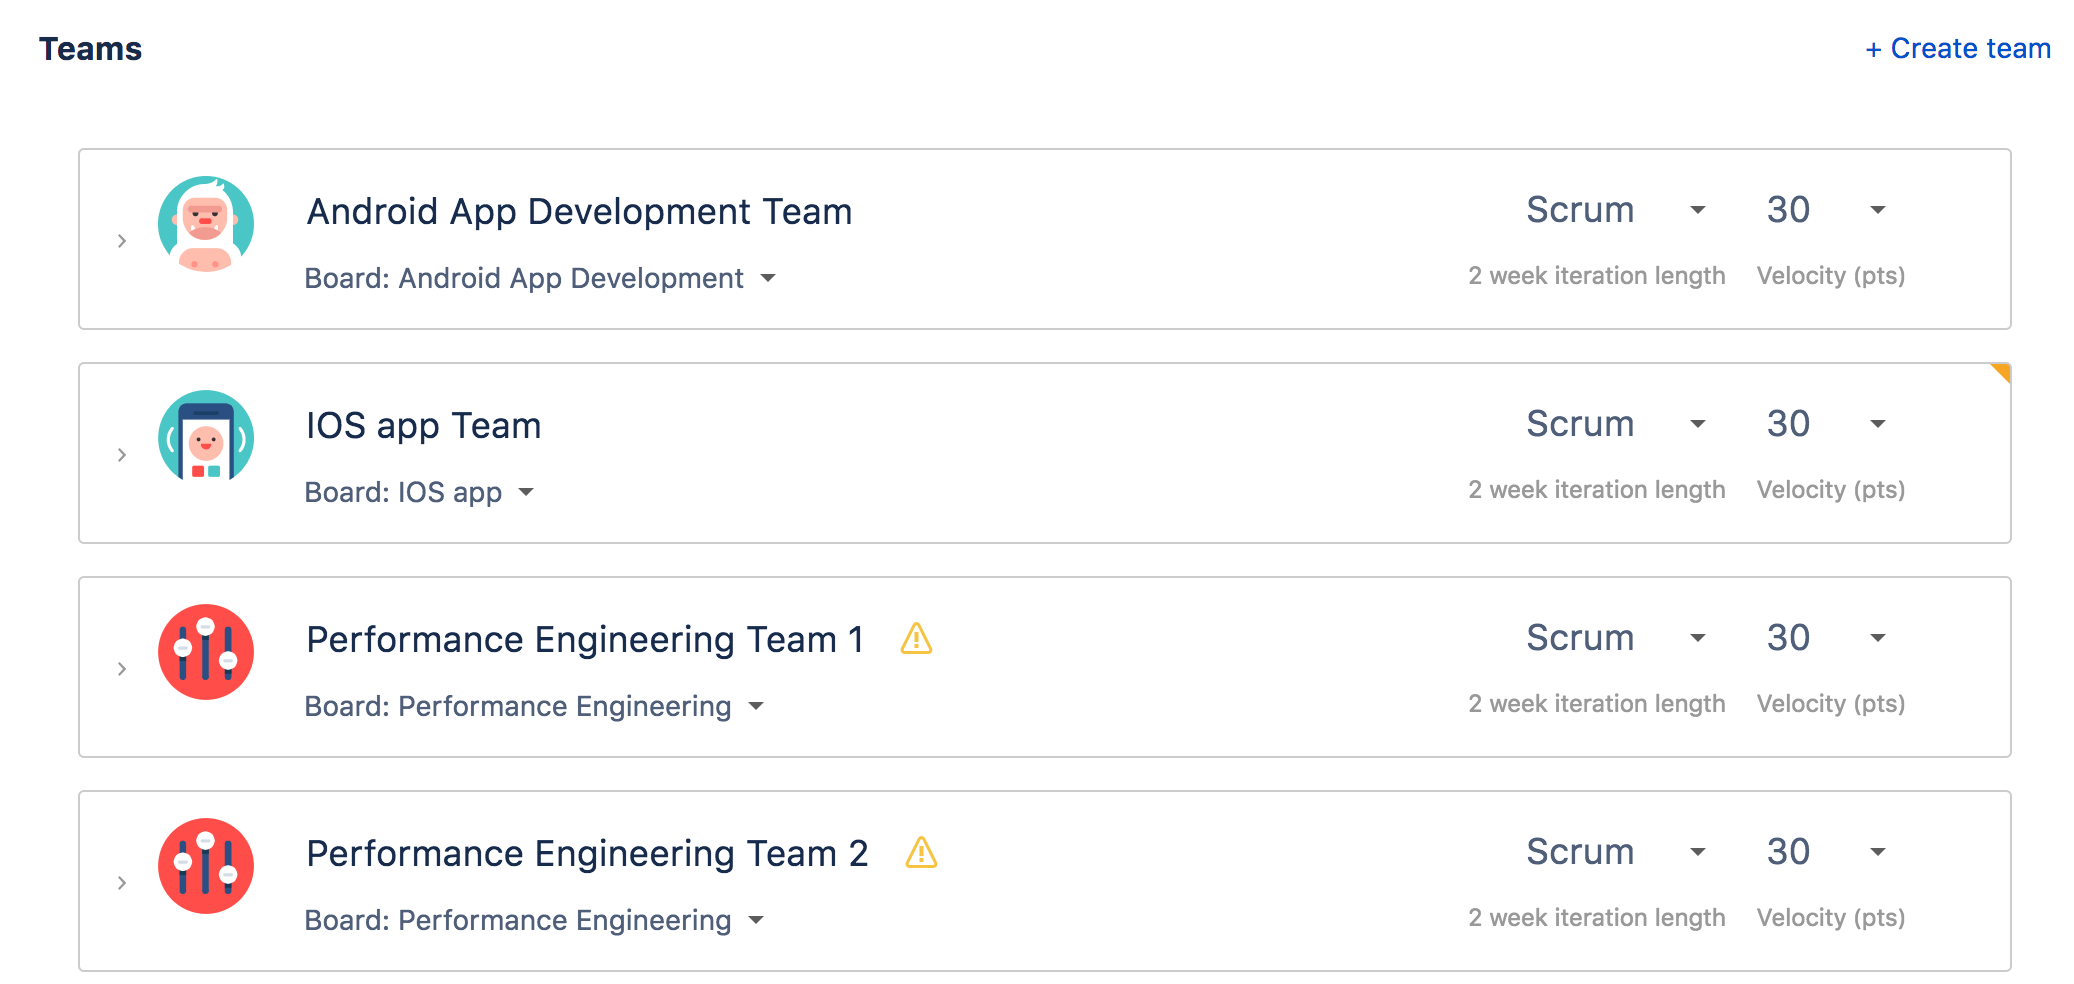
Once your team velocity is set, you have the option to add team members. You can choose to manage your people at either the team or individual level. Planning from an individual level lets you provide additional variables about availabilities and skills, so our algorithm can calculate a more accurate roadmap. Additionally, while the Capacity view is a great feature for development team leads to consider how much work is on the team’s plate, planning from an individual level allows you to dig much deeper into each individual’s capacity
Note
If you have a member on more than one team, then add that individual to all relevant teams and distribute their weekly hours to proportion their effort between teams. Also note that adding team members is not necessary since you can easily plan with team velocity.
To add team members simply click + Add person. You can also create virtual team members to account for variables such as potential new hires.

Note
Make your team a shared team, so you can use them in different plans and you only have to update team member skills once.
Add the Teams field to your issue screens to surface the assigned team on the issue.
Note
Consider using the Team field in other ways – as a quick filter on your epic level Scrum/Kanban board perhaps, to quickly show the workload across the business.
5. Manage your releases
Understanding how teams work in Portfolio for Jira is important to understanding how velocity is calculated for releases. After that is sorted out, the next step is to decide how you want releases to be mapped out and calculated in the roadmap view of the plan. The release settings will dictate how Portfolio for Jira schedules tasks in sequence and presents your roadmap as either on-track or overbooked.
If the release has a Fixed Release Date then that release is time-boxed. Overbooking, assigning too much work to a release, will result in a red timeline:
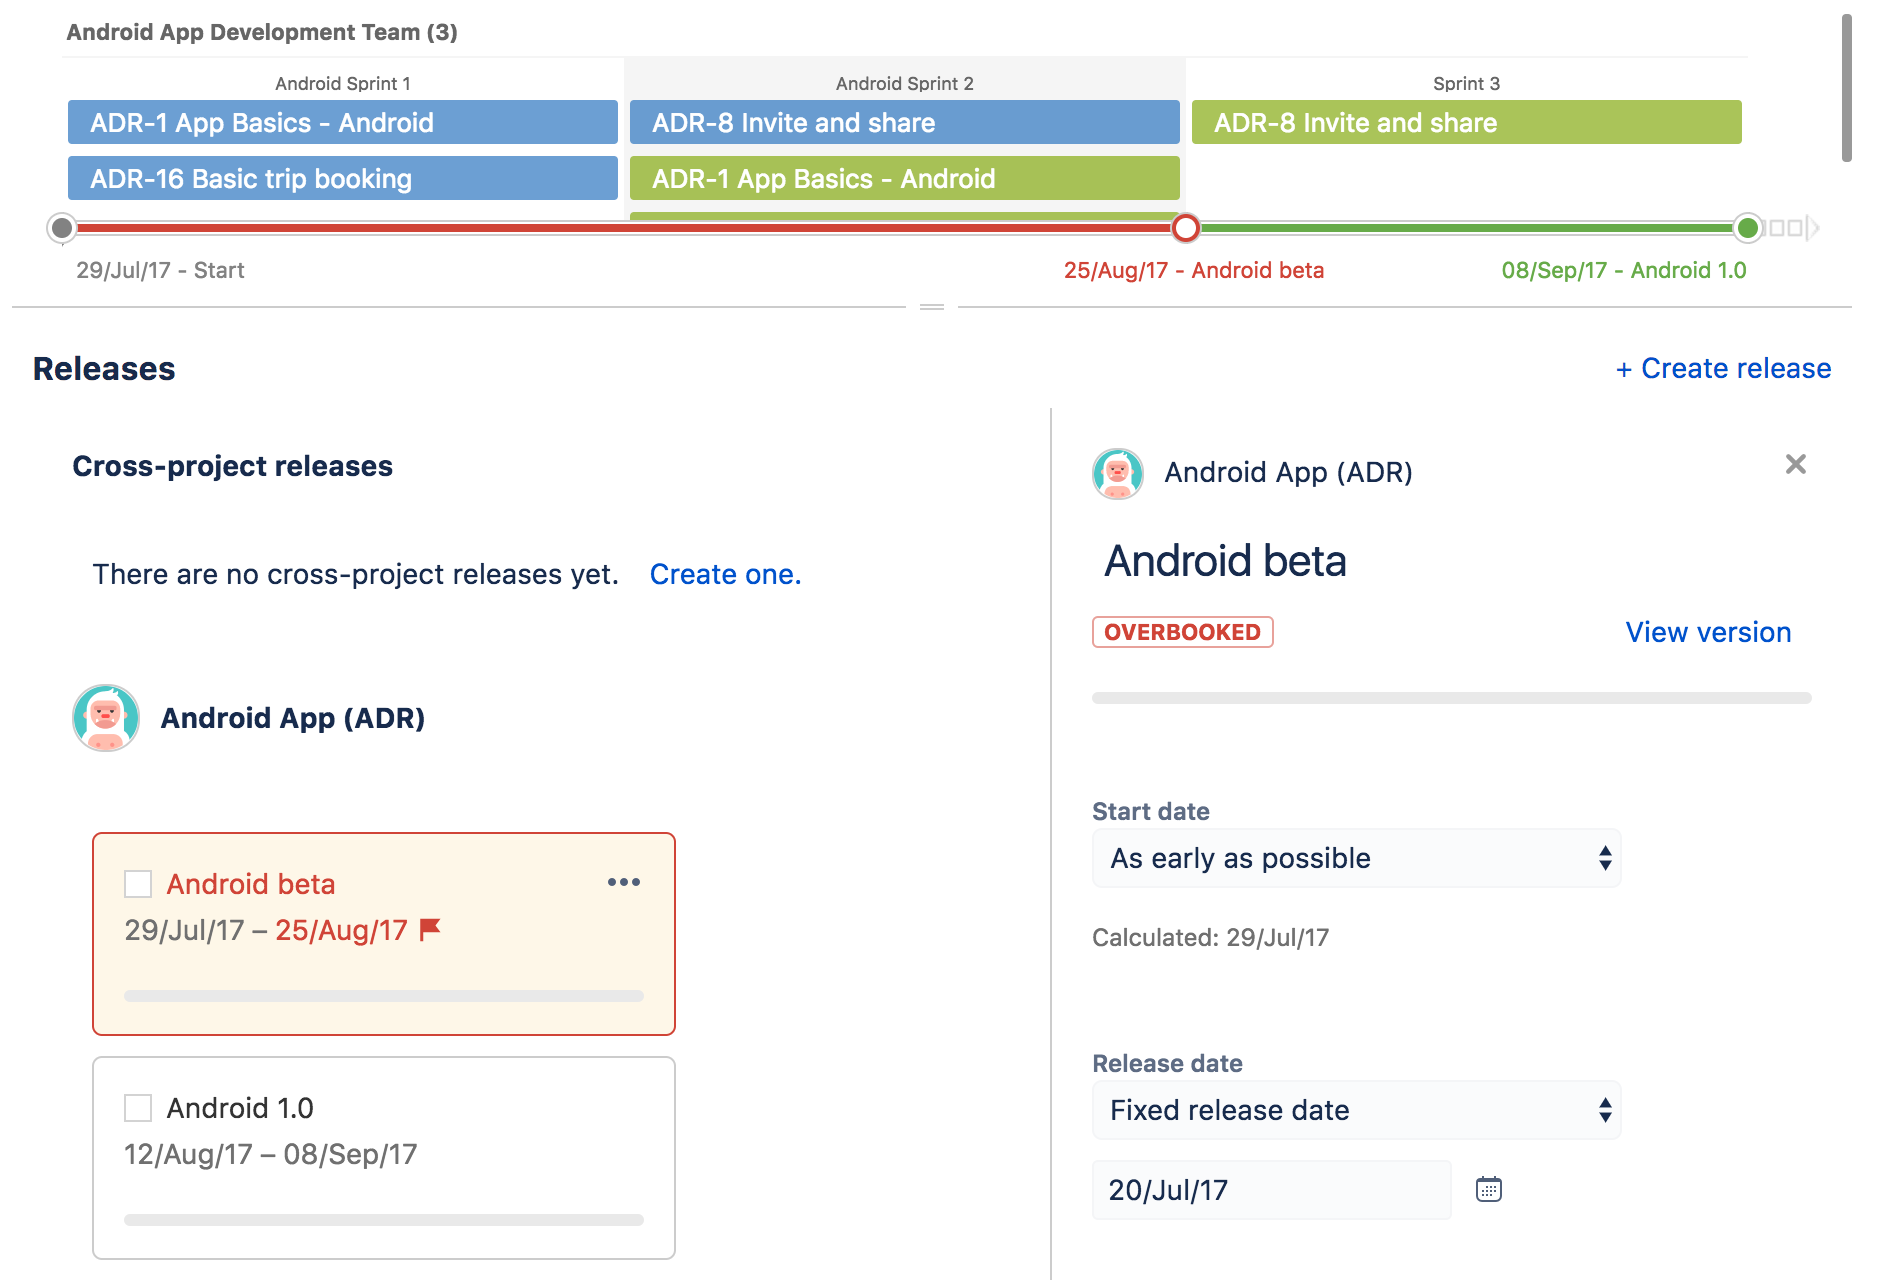
By deciding which method best applies to your process, you can plan upcoming goals and milestones with certainty that dates will be met.
If you are worried about several teams working on items for a shared release, then you can use a cross-project release option. This plan will include an individual release for each project, and keep them in sync. This reduces administration and makes for easier planning.
If the release has a Dynamic Release Date then that release is using scope-boxed. It is not possible to overbook that release – the timeline will just update depending on the scope and resources assigned to that release:
By deciding which method best applies to your process, you can plan upcoming goals and milestones with certainty that dates will be met.
If you are worried about several teams working on items for a shared release, then you can use a cross-project release option. This plan will include an individual release for each project, and keep them in sync. This reduces administration and makes for easier planning.

If you want to create a cross-project release, follow these steps:
- Click Create Release
- Select Multi Project
- Select relevant projects for the release
- Set Start and End dates
6. Keep things up to date
With your working plan you can manipulate data and instantly calculate the impact of change. Any changes made to issues in Jira Software will automatically update the data in your portfolio plan. But think of Portfolio for Jira as a sandbox where you can make changes and commit them back to Jira Software. If you are not happy with those changes, you can always revert.
Whenever you make a change like move an epic into a different release, an orange indicator will flag the change and the number count of your uncommitted changes – seen in the upper left-hand corner of the plan – will increase. Click on the uncommitted changes to open the commit/ revert dialog and once you are satisfied with all of your changes you can commit those changes into Jira Software.
What-if scenario planning
The commit/revert feature opens the door for those that want to try out different scenarios and pick the best one. For example, if you want to find out how changes to release scope or added team members would impact your release dates you can sandbox the changes and calculate your plan under different variables.
6. Work with your plan
And that is it – you now have a plan! The schedule view (top half of the page) has been calculated on the scope, release, and team information supplied during the plan’s creation.
At this stage, you will have a basic plan where you can manipulate data and view a roadmap. But it does not stop here; there are more advanced features to accommodate many use cases. This section will highlight a handful of features you might find useful like the different filtering options on the schedule view. You can isolate certain releases, or split the view by team, to help draw attention where needed during planning.
![]()
Setting up dependencies
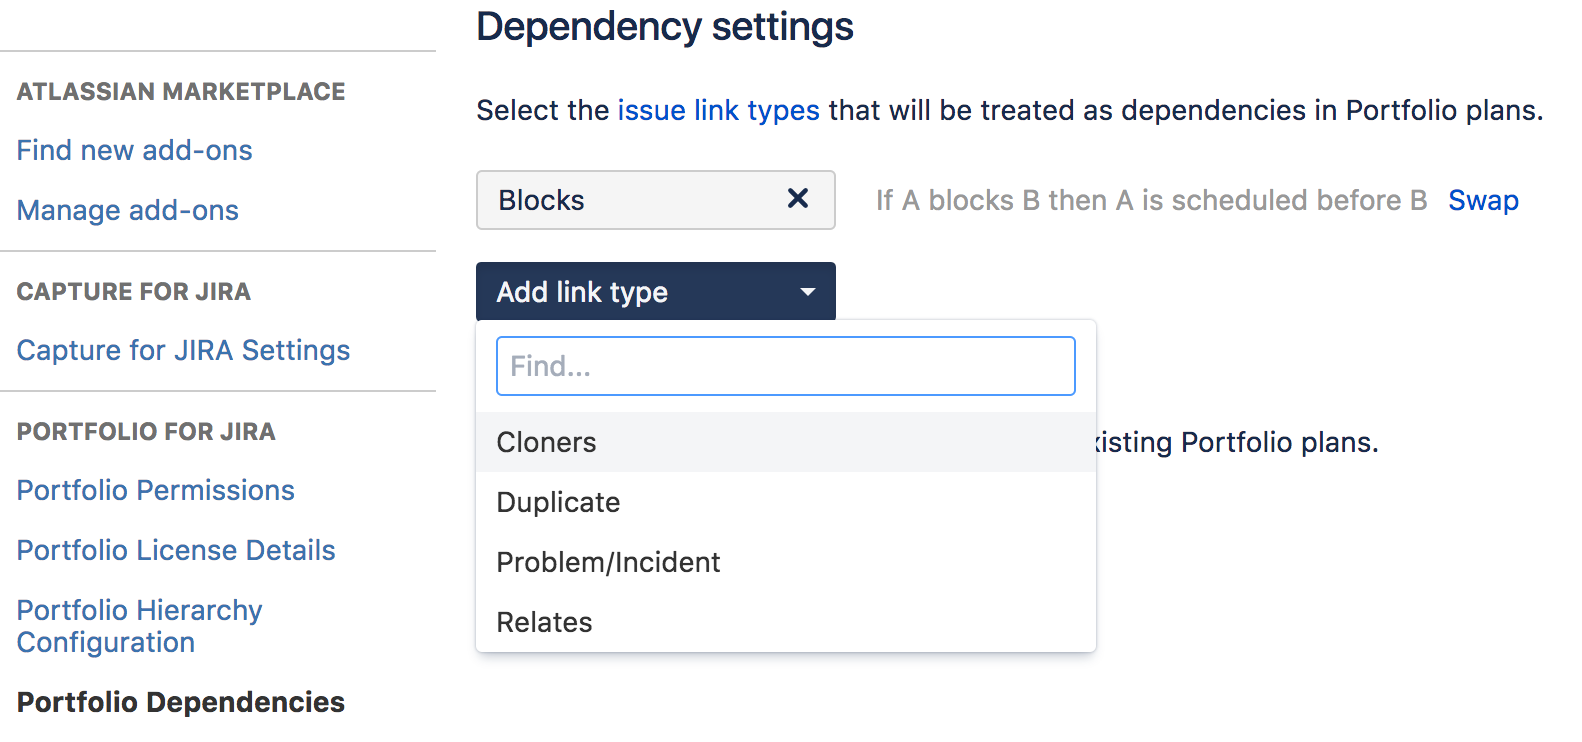
Dependencies can be created and visualised in Portfolio for Jira using issue links. By default, only ‘Blocks’ and ‘Blocked by’ issue links control dependencies. You can add more issue link types for Portfolio for Jira to consider dependencies through the Admin.
- Navigate to Administration > Add-ons > Portfolio Dependencies
- Add the link type you wish to include (check the order of blocking on the right).
Using plan configurations
To check out the scheduling options, go to Plan > Configuration. This is where you can tweak how Portfolio for Jira assigns work.
The main options to consider are:
Issue Assignee Import Level – To set the Jira ticket assignee to the team member assigned in your plan:
- Go to Commit of changes section under Configuration
- Enable Commit issue assignee.
- Assign the ticket to your team member
The assignee of the ticket will only be set for issues assigned to them.
- Dependent Story Constraint – If issues have dependencies, Portfolio for Jira will schedule them in different sprints (or on different days for Kanban) unless you say otherwise.
- Enforce Concurrent Work – If multiple team members are assigned to a single item, the scheduling algorithm ensures that all the work for that item is scheduled into a single sprint. Otherwise, individual team members’ work can be scheduled whenever there is free capacity allowing a work item to span multiple sprints.
Planning with sprints
If you are working with sprints, you can use a board as an issue source. Sprints that you create in your board backlog are dynamically connected with Portfolio for Jira and will be used to manage sprint assignments. You cannot create custom sprints from inside Portfolio for Jira, so make sure you create your upcoming sprints from inside Jira Software.
The rank of backlog sprints determines the order in which they will be scheduled. Sprint names, dates, and sprint assignment of issues are all surfaced in Portfolio for Jira.
In Portfolio for Jira, sprints start by default from the date you calculated the schedule. If your sprints start on a particular date then Portfolio for Jira will schedule your sprint from your specified date and all future sprint cadences will be projected immediately following your active sprint.
From Portfolio for Jira there are two ways to assign issues to a sprint depending on your usage.
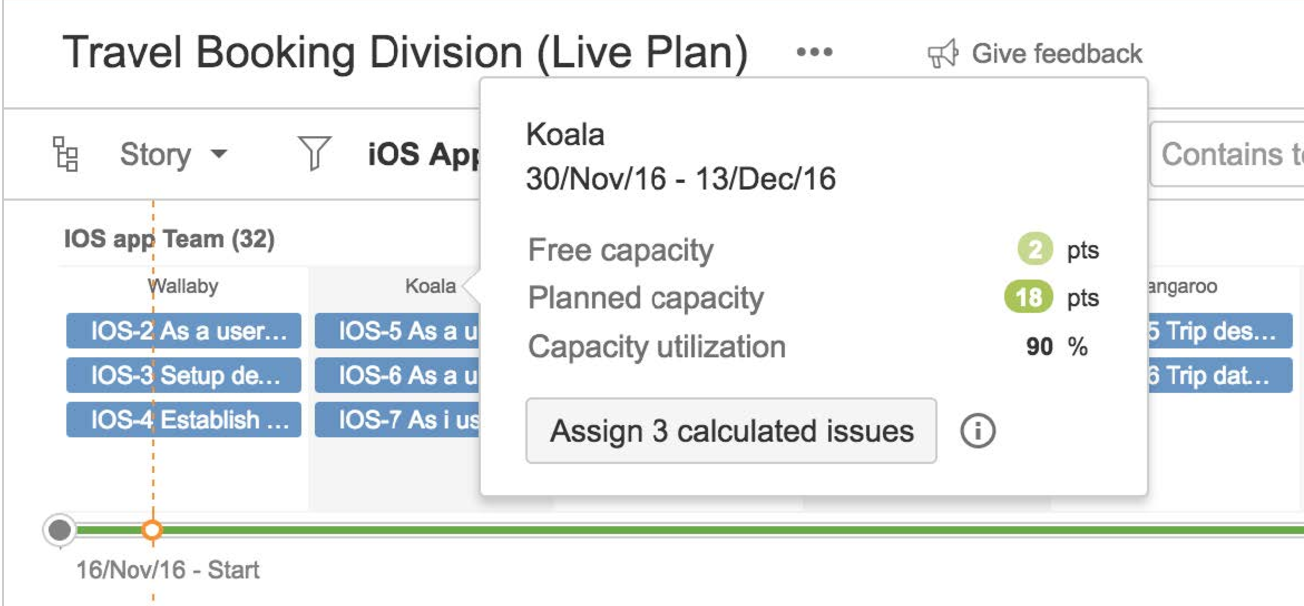
Statically assign sprint – The direct way to assign an issue to a sprint is using the sprint column. First, the team associated to the sprint must be assigned to the issue (either statically set or calculated). Then use the sprint column in the scope table to select the sprint.
Assign calculated sprint – Alternatively, you can bulk-assign one or multiple issues calculated to a sprint. When you calculate a schedule and you want the forecasted sprints to be reflected on the Jira board, simply click on the sprint name and select “assign X calculated issues and commit changes”.
Note
This will not work for issues that span multiple sprints or estimated epics that are exposed in the story-level view.
Plan with mixed estimates
If you have projects in your plan that follow different estimation methods there is a functionality to accommodate such a use case. Go to Plan > Configuration > Issue sources. You can set a conversion ratio for each issue source that uses a different estimation method from your plan. But how do you set a ratio? For a mixed estimate plan we recommend you keep your plan in time-based estimation and follow these steps to set your story-point to hours conversion ratio:
Story points to hours
- Determine the total weekly capacity of your team (e.g five team members with 40-hour capacity each per week = 200hr team capacity).
- Divide the team’s sprint velocity for 1 week by the weekly capacity (e.g one-week velocity = 30 so 200/30 = 6.667).
- Use this result as your conversion ratio.
This is not necessarily your final conversion ratio. As your team works over time, keep this ratio up to date to better represent your team performance. You can also convert hours to story points, but that may take some trial and error to determine the right velocity (and therefore conversion ratio) to use.
Reporting on your plan
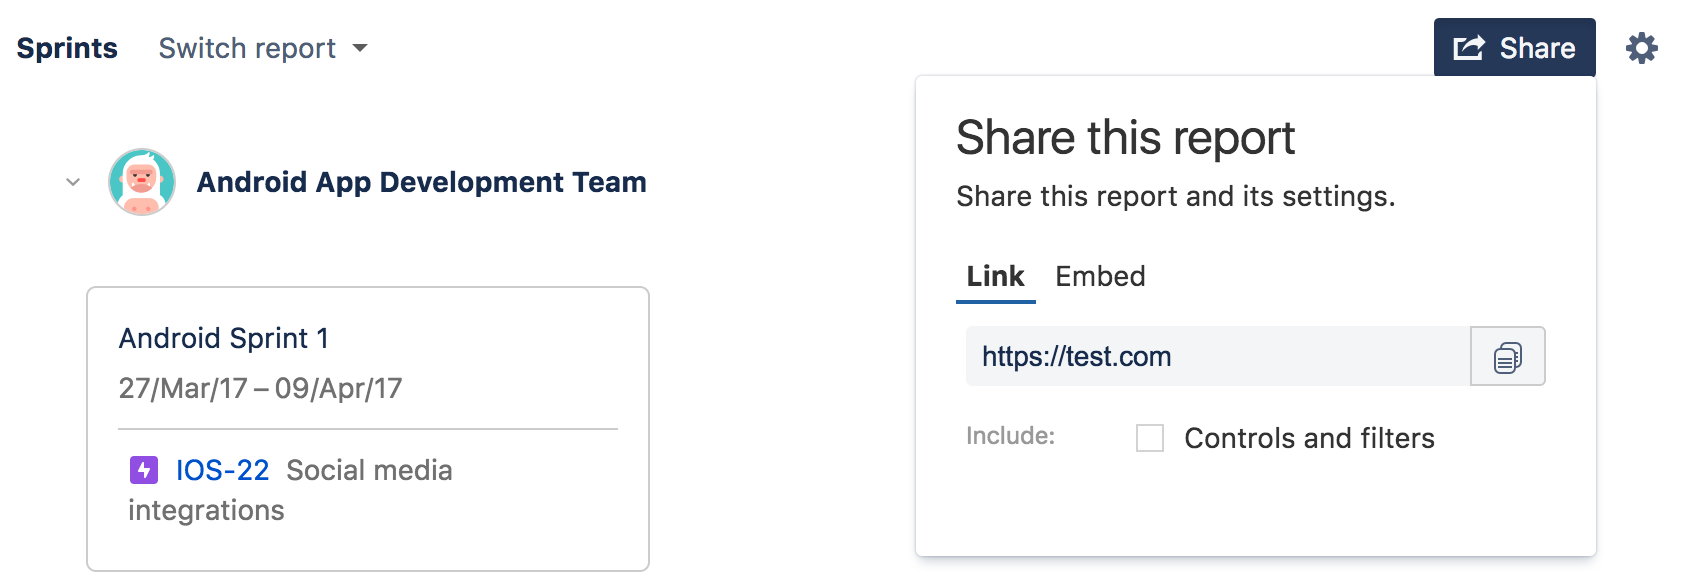
Click on the reporting tab to visualize and share your data with six different reports: themes, releases, schedule, capacity, sprints, and scope.
Reports are useful to dig deeper into your data through these dedicated views and share a persistent view of this data. For example, say you want to share the roadmap for just the iOS team with your manager for a specific date range. You can filter your plan to just see the relevant data, then generate a URL or embeddable iFrame to share.
If you need to report on how a your roadmap items relate back to an organization-wide focus area, then you might want to use Themes. These track how your work measures against your strategic objectives. Get real-time comparison between your target distribution of work against actual work that gets completed.
A non-perfect world
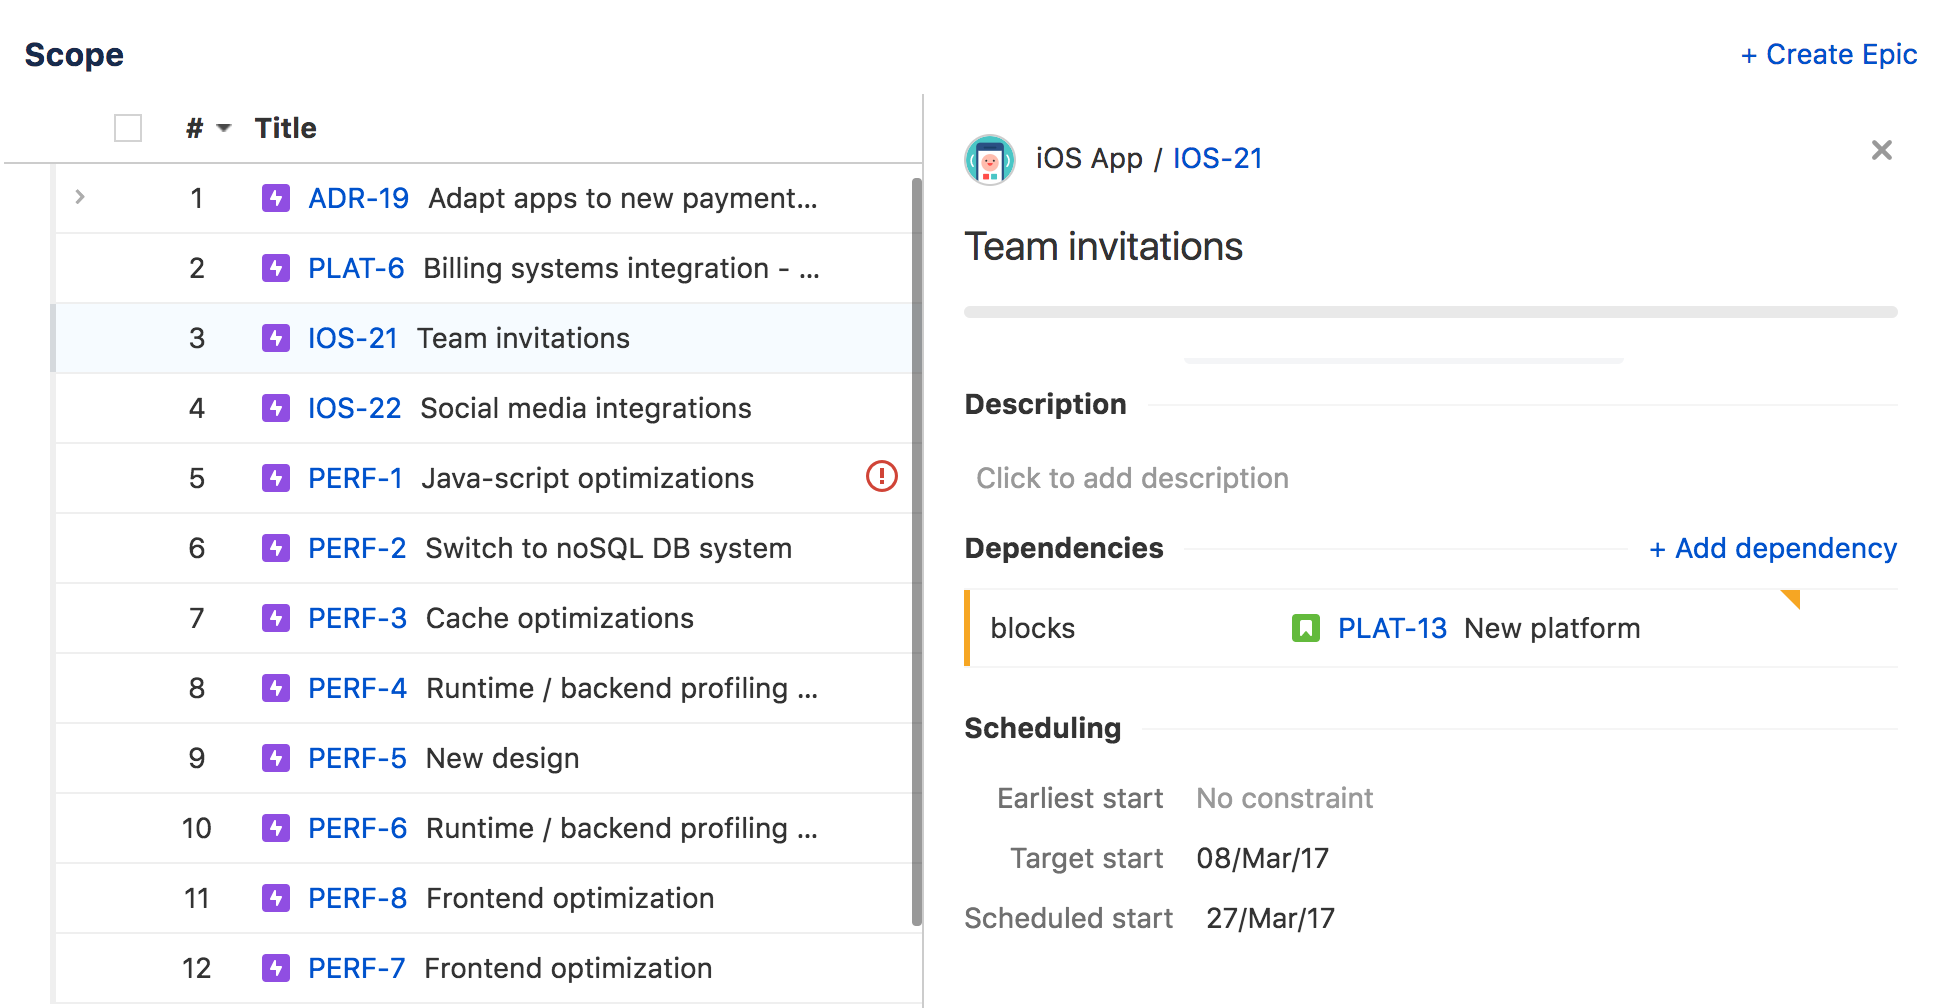
While all of this is great in theory, many teams have dependencies and factors that affect their roadmap that are external from Jira Software. It may be other planning tools, third-party vendors, or simply a part of the business that is not ready to change.
If you have a dependency or external milestone that you need to reflect in your plan, try using the earliest start date function. This will pin that task into the timeline, and Portfolio for Jira’s scheduling algorithm will work around it.
How does Portfolio for Jira calculate your schedule?
Our scheduling algorithm takes the data you provide to produce a realistic, data-driven roadmap. While a roadmap can simply be produced by only using estimates and team velocity, we let you get much more granular with the variables you provide.
So that you do not get lost in the details, here is a list of all the variables our algorithm considers and what they mean. Do not stress if you do not use all or even most of them. The level of detail you provide Portfolio for Jira depends on your team.
Estimate: The expected work effort measured in story points, hours, or days.
Team velocity: How much work effort or how many hours a team can complete in a regular cadence.
Priority: The rank of items in the scope table reflect the issue’s priority. Drag and drop items to re-prioritize them.
Release: Assignment of issues to releases and the start and end dates of releases.
Skills: Amount of a work item’s estimate that requires a particular skill. Skills can be associated with individual team members.
Work stages: Activities that can happen either in parallel or sequential activities.
Availability: Teams and team member availability.
Dependencies: Blocked or blocking items between backlog items.
Estimate conversion: A per-issue-source conversion rate when planning with mixed estimates.
Configurable constraints: For example, how many people can work in parallel on a story.
Pro Tip!

- Decide what you want – Spend time on how to configure your plan initially, and you will reap the rewards later.
- Plan and re-plan – Things change, your plan will too.
- Don’t worry too much about the distant future – start with next week and go from there.
- Communicate – This plan affects everyone. Share the love!
- Above all else, be agile: Start planning, look at how you did and improve.
Related content
- No related content found

