Preparing your planning environment
- Installing Advanced Roadmaps
- Preparing your planning environment
- Creating your plans
- Managing your teams
- Managing your releases
- Working with your plans
- Customizing your plans
- Sharing your plans
Before you begin
Depending on how your organization is structured, the content on this page is meant for Advanced Roadmapsadmins or plan owners, and the project admins of the Jira Software projects you want to include in your plans.
The guide discusses the typical end-to-end path that users and administrators may find themselves taking part in when using features of Advanced Roadmaps. You'll also find high-level content on concepts, as well as some recommendations and optional steps you can consider, as you flesh out your plans.
Preparing the planning environment
Setting up your planning environment helps ensure that you're efficiently planning work for your teams.
Here are some concepts that will come in handy:
Using issue sources
A plan provides an aggregated view of all the issues that your teams are handling in Jira Software. To capture the latest issue details that are relevant to planning work, you'll need to organize your work in Jira Software, into what we call issue sources:
- Boards: A board displays issues from one or more projects, giving you a flexible way of viewing, managing, and reporting on work in progress. There are two types of boards in you can use as issue sources:
- Scrum board — for teams that plan their work in sprints
- Kanban board — for teams that focus on managing and constraining their work-in-progress
- Projects: A project is a collection of issues that is defined according to your organization's requirements. For example, it can be a software development project, a marketing campaign, or a website enhancement request system.
- Filters: Your board's filter is a Jira issue filter (a JQL query) that specifies which issues are included on your board. For example, your board may include issues from multiple projects, or from only one project, or from a particular component of a project.
Note that only the administrator of a board or a user with the Advanced Roadmaps administrator global permission can configure a board's filter.
Creating issue types and hierarchy levels
By default, the issue types that are available in a newly created plan will be the issue types that have been defined for the Jira Software projects included in the plan. Over time, you can create more issue types in those projects, and these new issue types will also be available for use in your plan.
A plan comes with this default hierarchy level setup:
- Epic, which maps to the epic issue type.
- Story, which maps to all other standard issue types. With the default Jira Software issue types, this means that stories, bugs, and tasks map to the story hierarchy level.
- Sub-task, which maps to all sub-task issue types — essentially sub-tasks of the default Jira Software issue types.
When planning work across multiple projects and teams, you may need to create levels that are higher than the epic hierarchy level. A common example that's largely used in the industry is the initiative hierarchy level.
To get the initiative hierarchy level in your plan, you need to:
In Jira Software, create the initiative issue type, if it's not created yet.
To complete this step, you must be logged in as a user with the administrators global permission in Jira Software. Creating the initiative issue type in Jira Software
When the initiative issue type is already created, add the issue type to one of the projects that you're including in your plan.
To complete this step, you must be logged in as a user with the administrators global permission in Jira Software.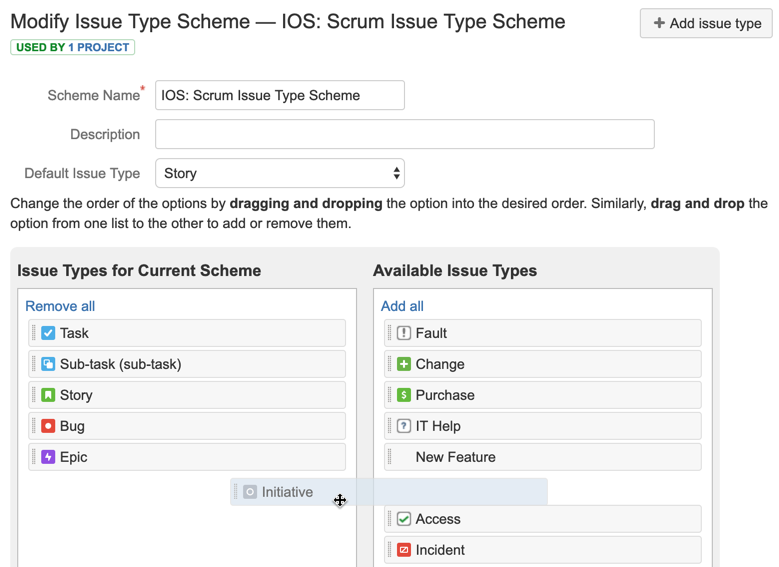 Adding the initiative issue type to a Jira Software project
 Alternatively, you can consider creating a dedicated project, and then create all the initiatives you need in that project. You can then link the epics across all your projects to the initiatives in that dedicated project for initiatives.
In Advanced Roadmaps administration, add the initiative hierarchy level. Make sure to map the initiative issue type to the hierarchy level.
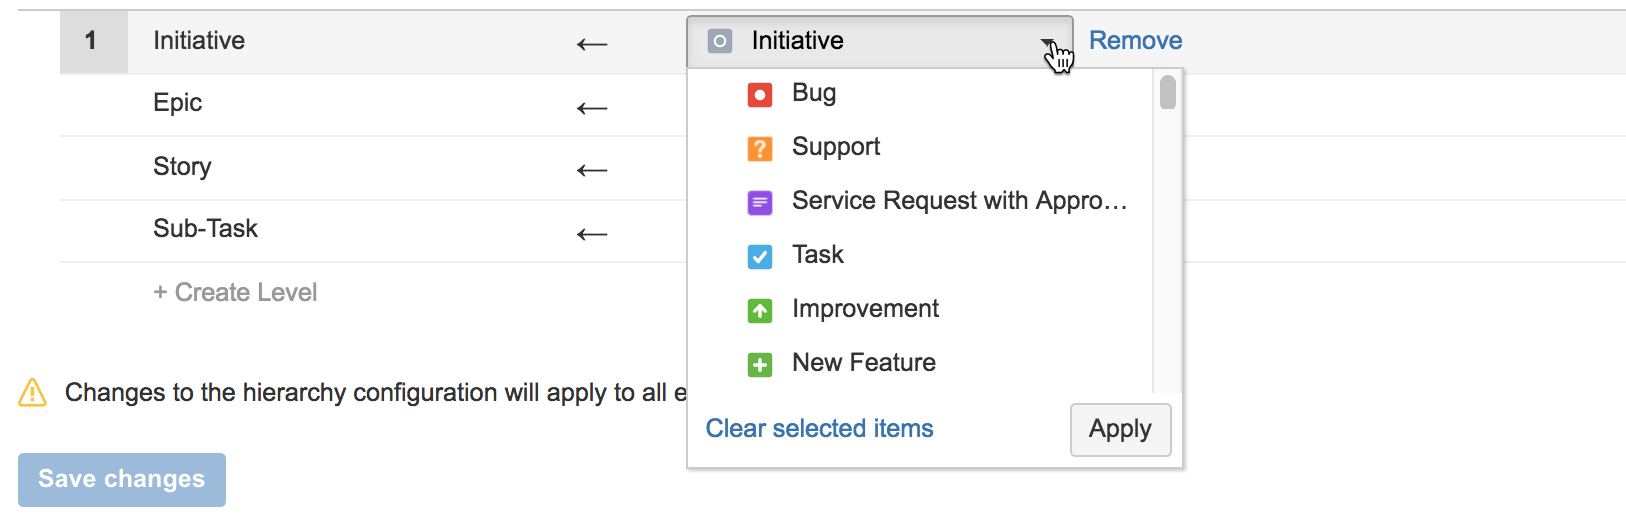
Adding the initiative hierarchy level, and mapping the initiative issue type to the hierarchy level
See Creating an issue type (Administering Jira Server applications) and Configuring initiatives and other hierarchy levels to learn more.
Defining dependencies
You can configure your plans to use the issue links that are set up in Jira Software, so that you can define scheduling dependencies. When adding issue links, you need to define the relationship between the issues to suit how your team works.
Note that any changes you make to issue dependencies will apply to all existing plans.
Check out Configuring issue dependencies to know how to define dependencies in your plan.
Migrating date fields to plans
#1 The issues may have been calculated using the scheduler in Advanced Roadmaps
If this is the case, the issues will still have scheduled dates, but no target dates. Since target dates are used in the improved interface by default, the issues will appear to not have dates in the timeline section.
However, you can choose to copy over the scheduled dates into the improved interface. To do this, you'll need to:
- Disable the interface for the plan. From the plan configuration page, click Planning interface > Disable improved interface.
- In the scope section of the previous plan layout, select the topmost checkbox at the upper left, to select all issues in the plan.
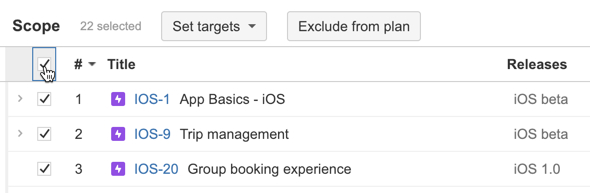
- From the 'Set targets' menu, select Set target dates from calculated.

- Enable the improved interface for the plan. From the plan configuration page, click Planning interface > Enable improved interface.
#2 The issues may not have been calculated or scheduled before the improved interface was enabled
If this is the case, see Scheduling work to start scheduling the issues in your plan.
#3 The issues may be scheduled, but are just hidden in the 'Issues without parent' section
If this is so, you'll need to expand this section to see the scheduled issues.
Surfacing important details across Advanced Roadmaps and Jira Software
Some Jira Software issue details are not displayed in plans by default. Likewise, there are also issue details from plans that are not readily displayed in Jira Software. Make sure to do the following, so that all the important issue details are readily available across both.
Making the teams field appear in Jira Software issues
- In Jira Software, click
 or
or  > Issues.
 - Click Custom fields.
- Find the Team field in the list of fields.
- Click
 for the team field > Screens.
 - Select the screens you want to add the team field to.
- Click Update.
Making fix versions appear in Jira Software issues
If the fix version field is hidden in your issues, then the releases you set in your plan will not display in the corresponding issues.
To display the fix version field in Jira Software:
- In Jira Software, click
 or
or  > Issues.
 - Click Field Configurations.
- Find the field configuration of interest and click the Configure link for it.
- Find the Fix Version/s field.
- In the Actions column, click Show.