Getting started for service project agents
On this page, we introduce you to your workspace and walk you through the process of responding to your customers' requests.
On this page
Navigate your workspace
Use the Jira Service Management sidebar to navigate your workspace:
- Queues: view issues that customers have submitted to your service desk.
- Customers: view your customers and requests, and invite new customers to the service project.
- Reports: view reports about your team's SLA goals, knowledge base and workload.
- Raise a request: raise a request on behalf of a customer.
- Knowledge base: search your team's knowledge base or create an article.
- Customer channels: view your service project's customer portal and email address.
- Invite team: invite an existing agent to work on your project.
Work on customer issues
When customers submit requests to your service project, the issues are grouped into queues on the Queues page.
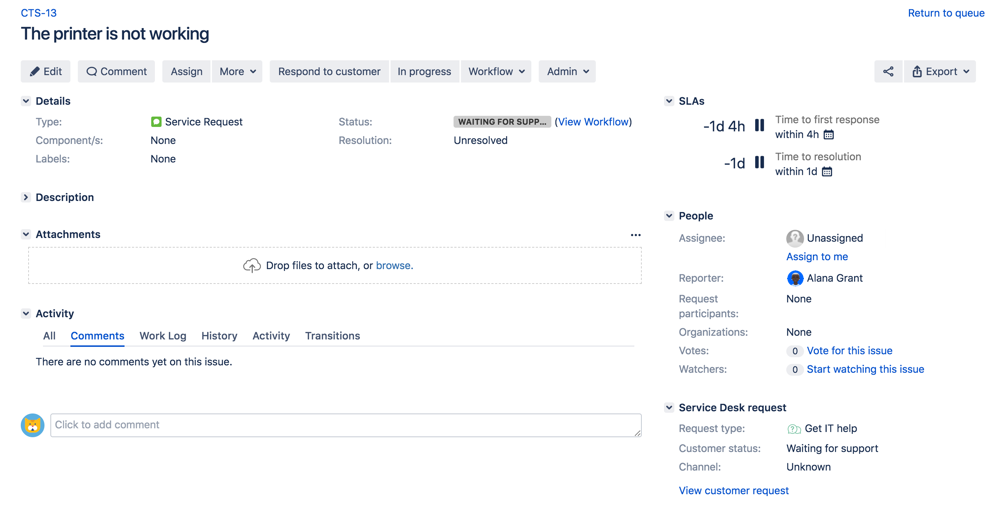
Select an issue's Summary or Key to view more information about an issue, or start working on an issue. The issue view looks like this:
From here, you can work with customers and your team to resolve requests. If your service project is linked to a knowledge base, you can also view, share, and create knowledge from the issue.
Comment on an issue
When you select Respond to customer, add an attachment, or comment on an issue, you can share your response with the customer, or comment internally.
- If you share with the customer, the customer is notified and can see the comment or attachment when they view the request in the customer portal.
- If you make an internal comment, the customer isn't notified and can't view the comment or attachment on the customer portal. People who are watching the issue are notified, and your team can see the comment when the view the issue in your service project.
React to a comment
You need a Data Center license to use comment reactions.
Add a comment reaction
You can use comment reactions in the issue view instead of replying to a comment.
To add a reaction to a comment:
Go to your issue’s comment section.
Select the add emoji icon .
Select the relevant reaction.
Enable or disable comment reactions
Your customers can react to comments with emojis, too. As the customer portal comment reactions are disabled by default, you first need to allow their use.
To enable comment reactions:
Go to Project settings > Portal settings.
Go to the Comment reactions section.
Select Allow comment reactions on the customer portal for this project.
You can fully disable comment reactions via the global system settings.
Collaborate on an issue
You might want to share the issue with other customers who have a similar problem, or with other people on your team who can help you resolve the issue. Here are some ways you can involve other people in the issue:
- Select Share to email a link to the issue to other people on your team.
- Use @ mentions (@username) to mention a team member in a comment.
- Add watchers to involve other users from your Jira site. Someone leaves an internal comment or transitions an issue.
- Add request participants to share the issue with other customers or organizations. Request participants receive the same notifications as the reporter.
View and create knowledge
If your service project has a linked knowledge base, you can use knowledge articles to solve issues faster:
For example, if you get a lot of requests about printing problems, you can write a step-by-step article that helps customers troubleshoot the problem themselves:
- When customers search for help from the customer portal, they can use articles to solve problems instead of raising requests.
- When you work on an issue, you can share the article with customers so they can try to troubleshoot on their own.
You can also write internal articles and reference them while you work on an issue. Articles that the reporter can't view are marked with a red padlock.
When you create a new article from an issue, you can choose a handy how-to or troubleshooting template to guide you. The issue summary and description become the article's title and body text.
Nice work! Want to learn more? Proceed to Working on service projects to learn more about what a service project agent can do.


