Managing service project notifications
How different roles receive notifications
A service project sends notifications based on two schemes:
- One for your customer, and
- One for your licensed users, who are most likely agents and admins
Customers
When a customer submits a request, they receive the same default email notifications as the issue reporter or participant. When customers share requests in an organization, customers in that organization receive notifications. They can opt in and opt out of notifications for other activity on the request.
When an approver needs to approve the request, they'll receive a notification. They can opt in to notifications for other activity on the request.
Other customers receive notifications on public activities for requests they're involved with. They can opt in and opt out of notifications in the customer portal or email. Reporters who decline are only notified when a team member resolves a request.
When a customer first contacts a service project that has incoming email and public sign-up enabled, an account is set up for them in the background. They'll receive an email that asks them to reset their password and verify their account details. Project administrators can disable these account verification emails.
Agents and admins
When agents and admins work on a request, they receive notifications as part of the project's notification scheme.
Agents don't receive notifications on their own changes when they act as a customer on issues with a set request type. Jira Service Management treats agents acting as a reporter, participant or approver on these issues as a customer. This occurs regardless of the notification scheme.
Agents who are part of an organization will only receive a customer notification when a request is shared with that organization. If the agent is the assignee of the issue, they won't receive any notifications from the project's Jira notification scheme.
Account verification emails
When a customer raises a request by email for the first time, the following events take place:
- An account is created for the customer in the backend.
- A notification is sent to the customer asking them to verify their email address and reset their password, so they can access the customer portal.
This is confusing for customers of organizations running email-based service projects because, most likely, only the agents and admins are using the customer portal. The good news is that you can disable account verification emails to avoid customer confusion—you need to be a project administrator to do this.
To disable account verification emails:
- Go to Project settings > Customer notifications.
- Navigate to the heading Account verification email.
- Enable the Do not send account verification emails toggle (displaying as green with a tick).
Opt in and out of customer notifications
Customers receive notifications when other customers share requests with them. They can opt in and opt out of these notifications in the customer portal, or in email.
To opt in and opt out of notifications in the customer portal:
- From your customer portal, select Requests > All requests.
- Select the request whose notifications you want to opt in or opt out of.
- Select either Get notifications or Don't notify me, besides the eye icon.
To opt out of notifications in email, select the link Turn off this request's notifications at the bottom of the email.
Disable the customer scheme for customer notifications
If you have an internal service project where all your help seekers have Jira licenses, you might prefer to disable the customer scheme. In this case, you can work from the licensed user scheme.
To disable the customer scheme:
- Go to Jira administration > Applications > Jira Service Management > Configuration:
- Under the heading Notifications, select Yes. This tells your project to stop blocking Jira notifications for customers.
- Disable the service desk notifications in Project settings > Customer notifications.
- For each rule, select Edit and deselect the Enable checkbox at the bottom.
- Go to your Jira notification scheme and customize the notifications for your customers, agents, and admins.
Edit customer notifications
To edit the recipients or message content of your service project notifications:
- From your service project, select Project settings > Customer notifications.
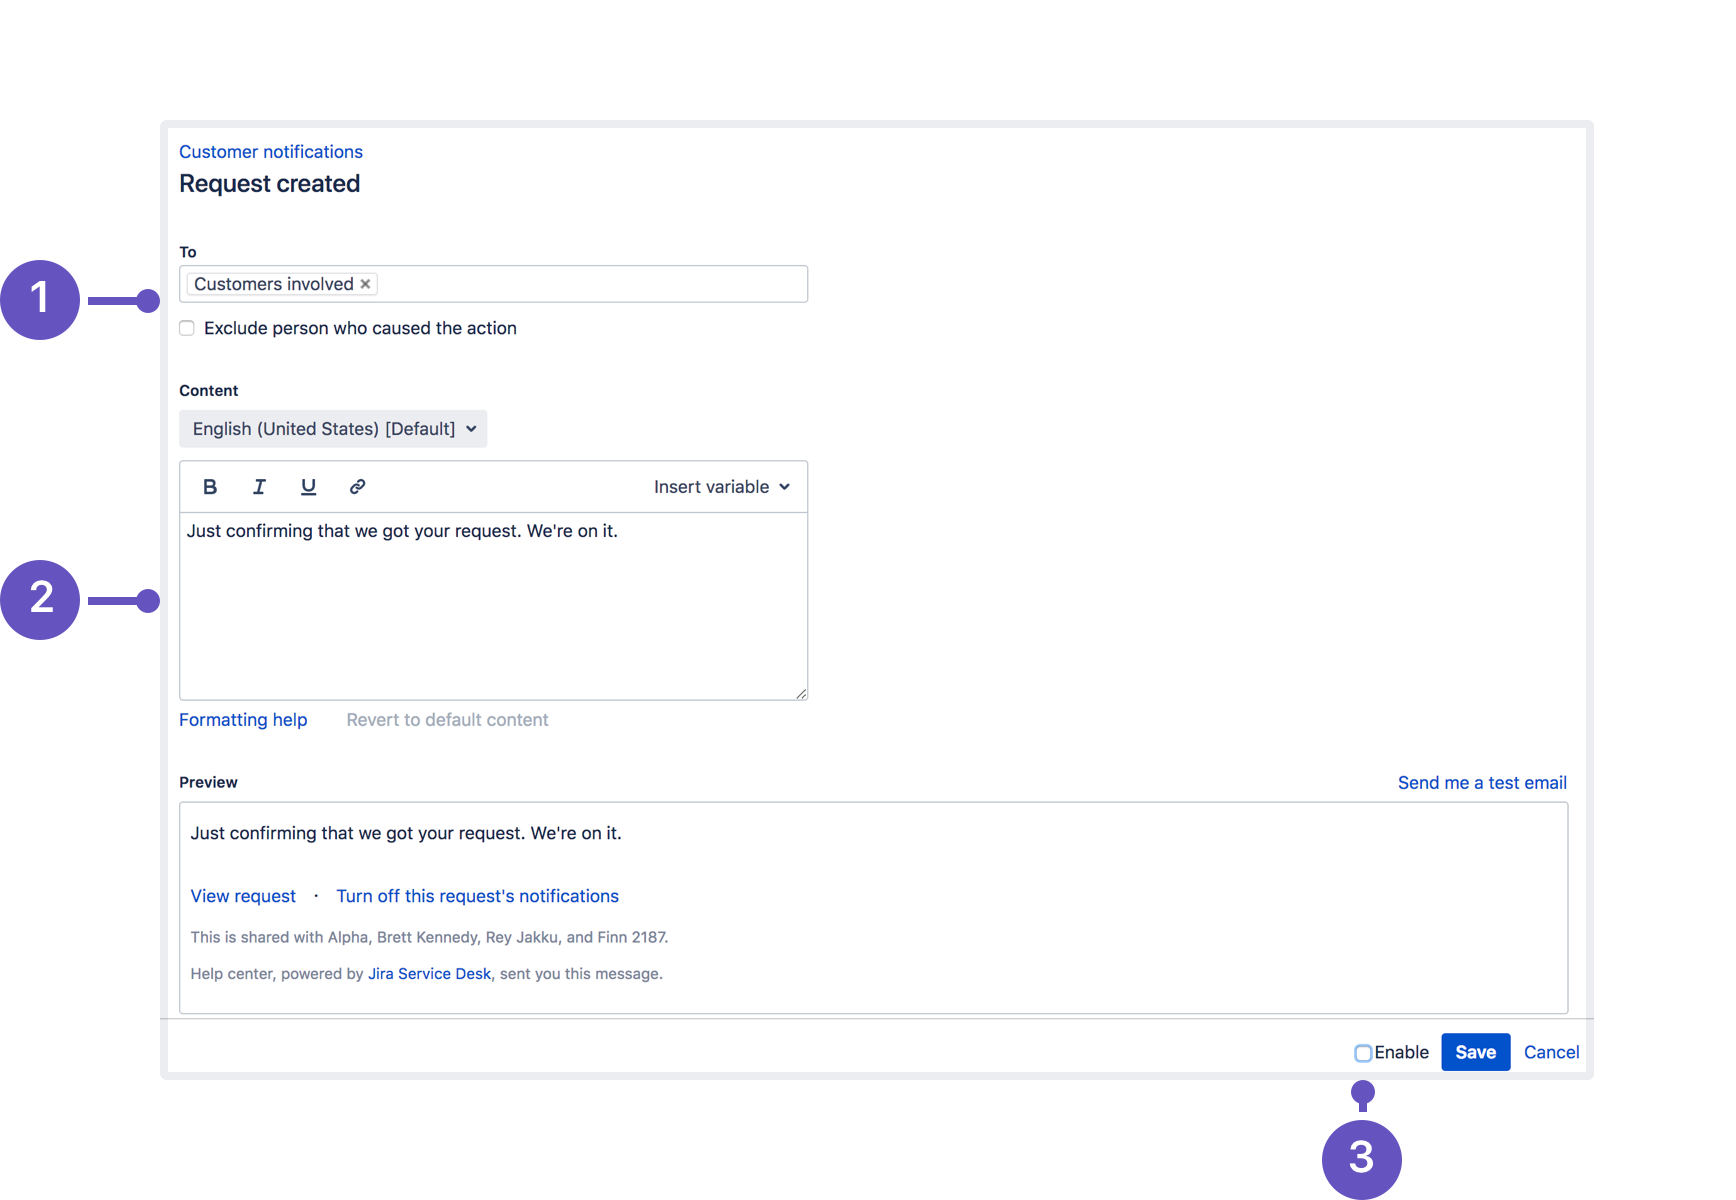
- Select the notification you want to edit, then select Edit under the Action column.
- Select recipients by selecting and editing the To field. You can delete recipients by selecting the X next to an added recipient.
- Under Content, edit the message. You can add variables using the Insert variable dropdown to pull blocks of information from issues.
- To disable a notification, untick the Enable checkbox.
- Select Save to confirm your changes.
Select recipients
When choosing recipients, add at least one of the following to the To field:
| Recipient options | Details |
|---|---|
| Reporter (customer) | The reporter of the request. This notification is sent even if the reporter has opted out of receiving notifications on the customer portal. |
| Customers involved | All customers involved in the request, including:
Notes:
|
| Added participants | The people who have been added as request participants. |
| Added organizations | The people in an organization that the request has been shared with. |
| Approvers | The people who need to approve or decline a request. |
| Exclude person who caused the action | Prevents the person who triggered the rule from receiving a notification. For example, if a customer adds a comment to a request, you can select to exclude them so they don't receive a notification about their own comment. |
Include issue variables
You can use variables to pull blocks of information from issues and insert them into your message. Select the Insert variable drop down menu to add valid variables for the notification you're customizing.
| Name | Format | Description |
|---|---|---|
| Recipient name | ${recipient.name} | The full name of the person receiving the email. |
| Name of person who caused the action | ${event.user.name} | The full name of the person who triggered the notification, for example by adding a comment. |
| Issue summary | ${issue.summary} | The summary of the issue, or blank if there's none. |
| Issue description | ${issue.description} | The description of the issue, or blank if there's none. |
| Issue key | ${issue.key} | The issue key (for example, IT-123). |
| Issue reporter | ${issue.reporter.name} | The full name of the user that reported the issue. |
| Issue resolution | ${issue.resolution} | The resolution of the issue, for example "done". |
| Request URL | ${request.url} | The URL of the request in the customer portal. |
| Comment | ${comment} | The comment added to the issue. This is only available using the "Comment added" or "Comment edited" WHEN trigger. |
| Request status | ${request.status} | The customer-visible status of the request, as shown on the customer portal. |
| Portal name | ${portal.name} | The portal name, which can be edited on the Portal settings page. |
| Request details | ${request.details} | The full details of a request. This includes the creation date, request type, summary, and the same fields configured as visible in the request type setting. This does not include fields created by third-party add-ons. |
| Approval buttons | ${approval.buttons} | The Approve and Decline buttons to action requests from within the email. |
Fast-track the time it takes approvers to action pending requests by inserting Request details and Approval buttons to your approval notifications template, if they aren't there already.
Automatically send emails as customer notifications
To create custom email triggers:
- From your service project, select Project settings > Automation.
- Select Add rule > Custom rule > Next.
- Edit the name and description as needed.
- Edit these fields to configure your rule:
- WHEN: select what triggers your rule
- IF: select the conditions of your rule
- THEN: send email
- Select Save to create your custom rule.
Translate customer notifications into different languages
Jira Service Management lets you provide translations and regional messages to your customers, and supports a large number of languages.
Read Translate service project notifications to learn how to do this.
Customize customer notifications
Your service project adds a default subject line that you can customize to better fit your brand.
To customize notifications:
- From your service project, select Project settings > Customer notifications.
- Under Templates, select Edit templates.
- Under Subject, edit your subject line. You need to keep the issue key somewhere in the subject line to send a request's notifications into a single email conversation.
- Under Styles, adjust the HTML, CSS, and plain text styles as you like. You can include more template variables by selecting the Insert variable drop down.
Include more information using template variables
You can use this set of variables to pull blocks of information and add it to your email template.
| Name | Format | Description |
|---|---|---|
| Message content | ${message.content} | The content of your notifications. We require this variable. This variable includes batched messages. |
| Request location | ${request.url} | The URL of the request. |
| Disable notifications location | ${request.disable.notifications.url} | The URL to turn off notifications for the request. As a best practice, we recommend always including this link. |
| List of request viewers | ${request.sharedwith} | The participants, approvers and customer organizations who can also view the request. |
| Help center name | ${helpcenter.name} | The name of your site's help center, an entry point to all customer portals on your site. |
| Jira Service Management homepage | ${atlassian.url} | The URL of Jira Service Management's homepage. |
Style more CSS classes
You can style more classes than appear in the default template.
| Name | Class | Description |
|---|---|---|
| Reply marker | .jsd-reply-marker | The style of the reply marker. This series of dashes and hyphens is used to process comments when a customer replies to a notification. |
| Batched item container | .jsd-activity-item-content | The style of a division used to wrap individual messages added to a batched notification. |
| Batched message separator | .jsd-activity-item-separator | The style of a separator inserted when batches of messages are sent as a single notification. |
Select HTML or plain text
If the default type is set to HTML, we send dual-encoded notifications. This means your customers can then select the HTML or plain text view in their mail client. If your customers use a plain text mail client, change your default setting and apply it to new and existing customers.
You must be a Jira administrator to set the default email type.
- Select Project administration > System.
- Under User Interface, select Default User Preferences.
- Select Edit default values.
- Change the Default outgoing email format to HTML or text and select Update. At this point, the email format you have selected will only be applied to new service project customers.
- If you also want to override the email format chosen by existing service project customers and agents, select Apply under Actions.
- Select Update to finish applying the email preference to all user accounts.