Use Slack and Jira Data Center applications together
On this page:
How do I install the Jira Data Center for Slack app in Jira?
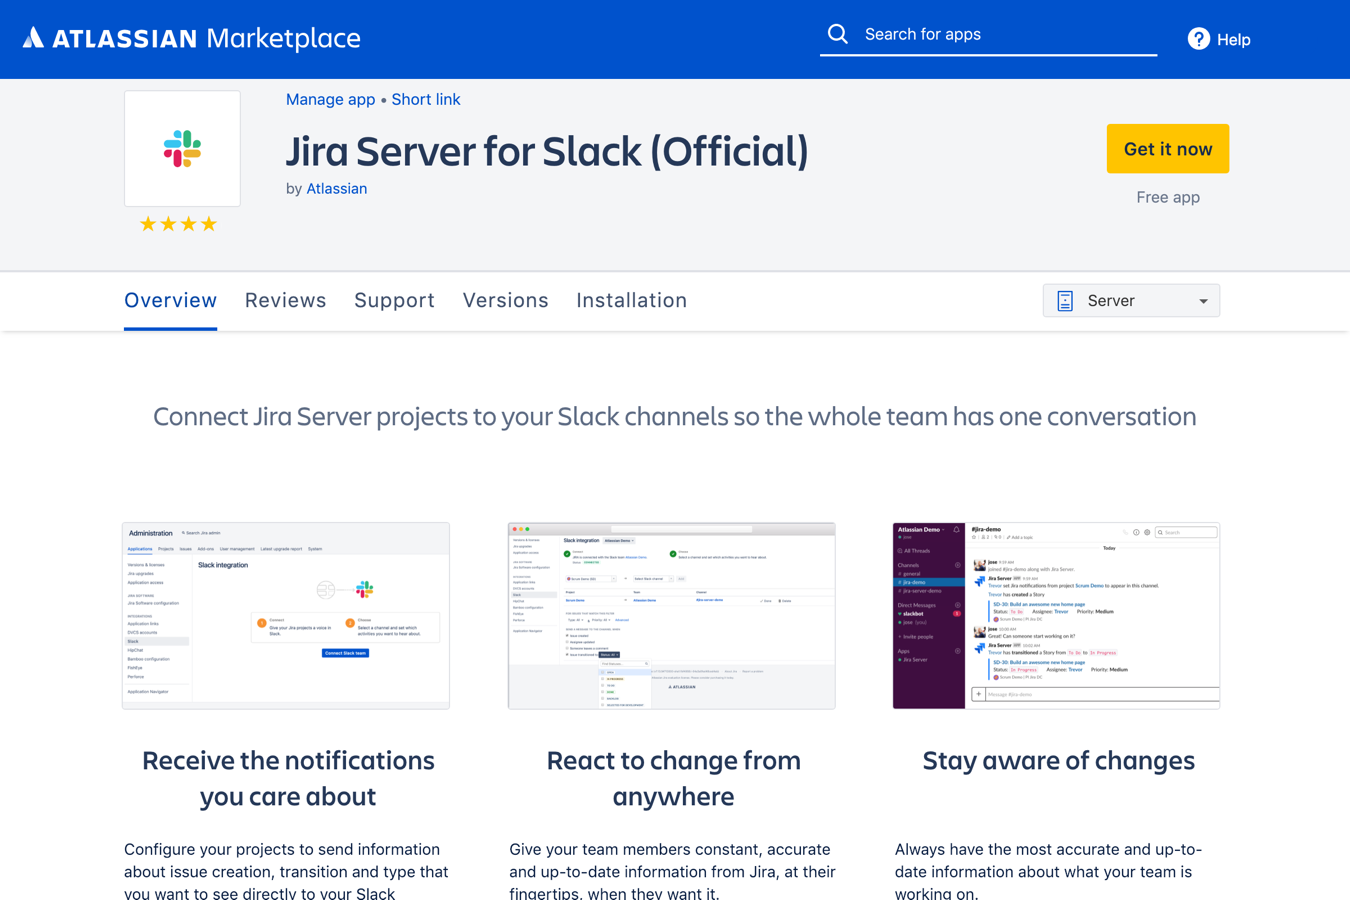
Head to the Atlassian Marketplace to download the Jira Data Center for Slack app.
How do I connect the Jira Data Center for Slack app to my Jira site?
Slack requires that the Jira instance is accessible through the internet via a secure connection (HTTPS). Therefore, you need to open up your secure port and make sure that the server has a valid certificate.
If that's not an option for you, you are still able to setup a limited connection with Slack by creating a custom Slack app that will give you notifications from Jira to Slack. See how to create an app below in this page.
As an administrator, you'll now have a "Slack" navigation item under "Administration → Applications"
From here, select "Set up integration"
Once you access the integration screen, click on "Go to Slack"
You'll then be taken to Slack's App Directory to install the Jira Data Center Slack app. Click the green "Add to Slack" button for the Slack App and complete Slack's OAuth Process:
Make sure that you are logged as Slack Admin on that workspace, otherwise the button "Add to Slack" will not work, and you will be redirected to Atlassian Marketplace Jira Data Center for Slack app instead.
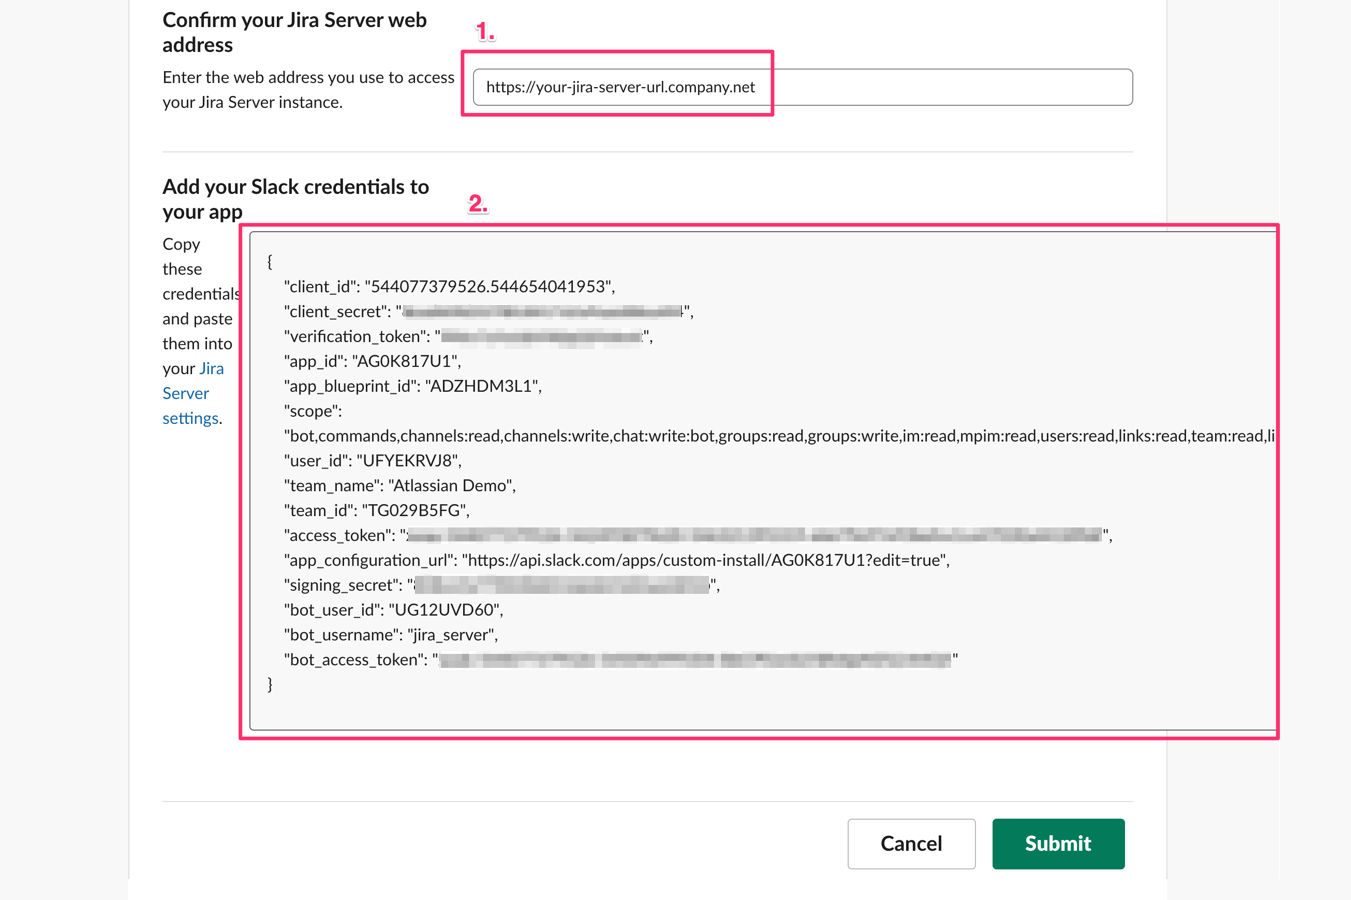
Once you complete the OAuth Process in Slack, you'll then see a new configuration page for your integration. Scroll to the bottom to see the two fields you need to complete. First, add your Jira Data Center web address. Please do not include a trailing / after your web address. Second, you'll want to copy the contents of box #2 back into your Jira setup.
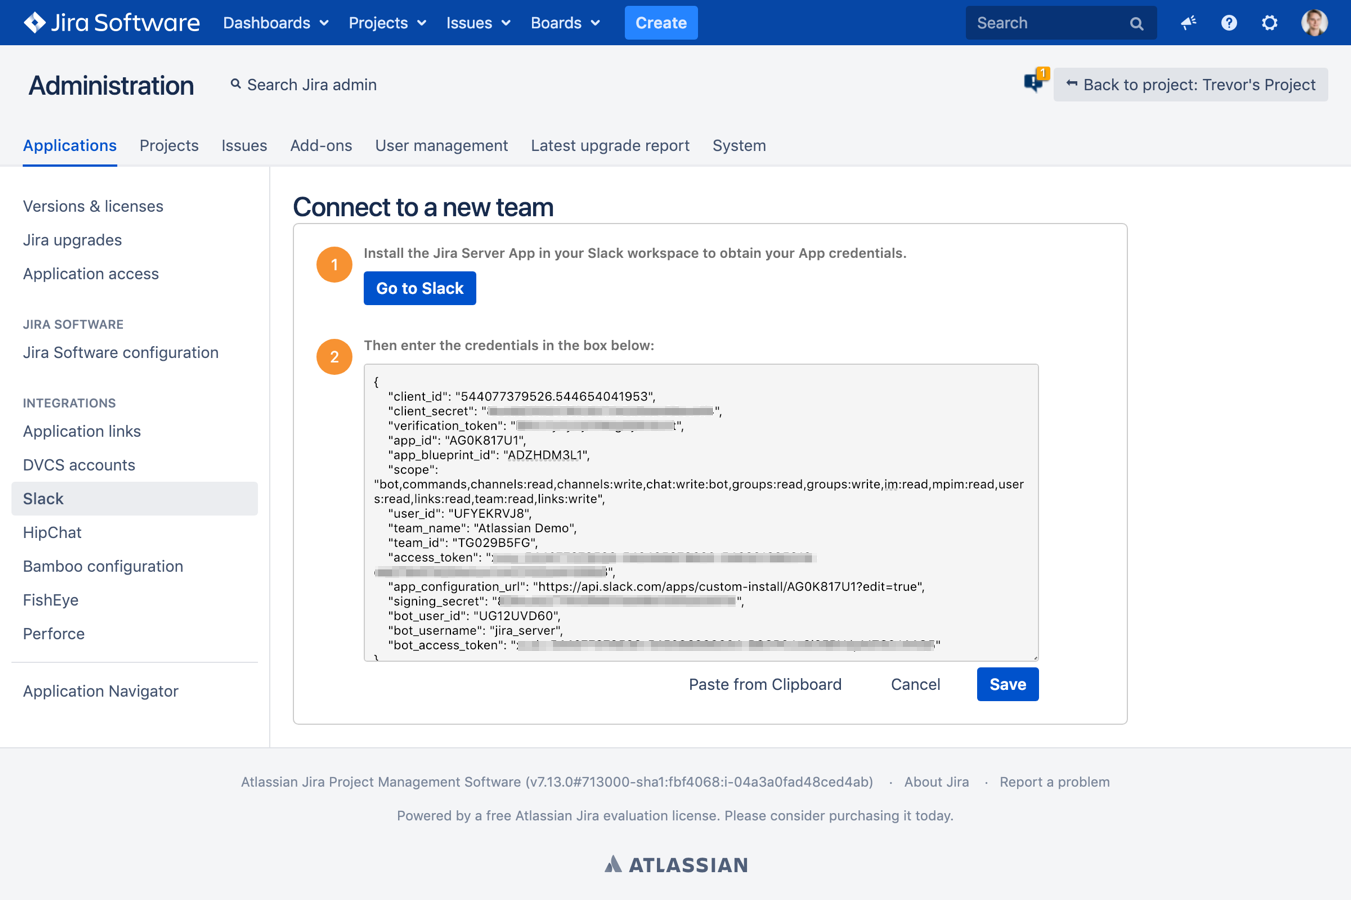
Paste the credentials into the Jira configuration on the Jira Data Center side. Click save here, and be sure to click "Submit" in your Slack window (screenshot above).
Once the connection has been setup, you'll receive a success notification from Jira Data Center in your direct message with Slackbot.
How do I set up a project to post notifications into Slack?
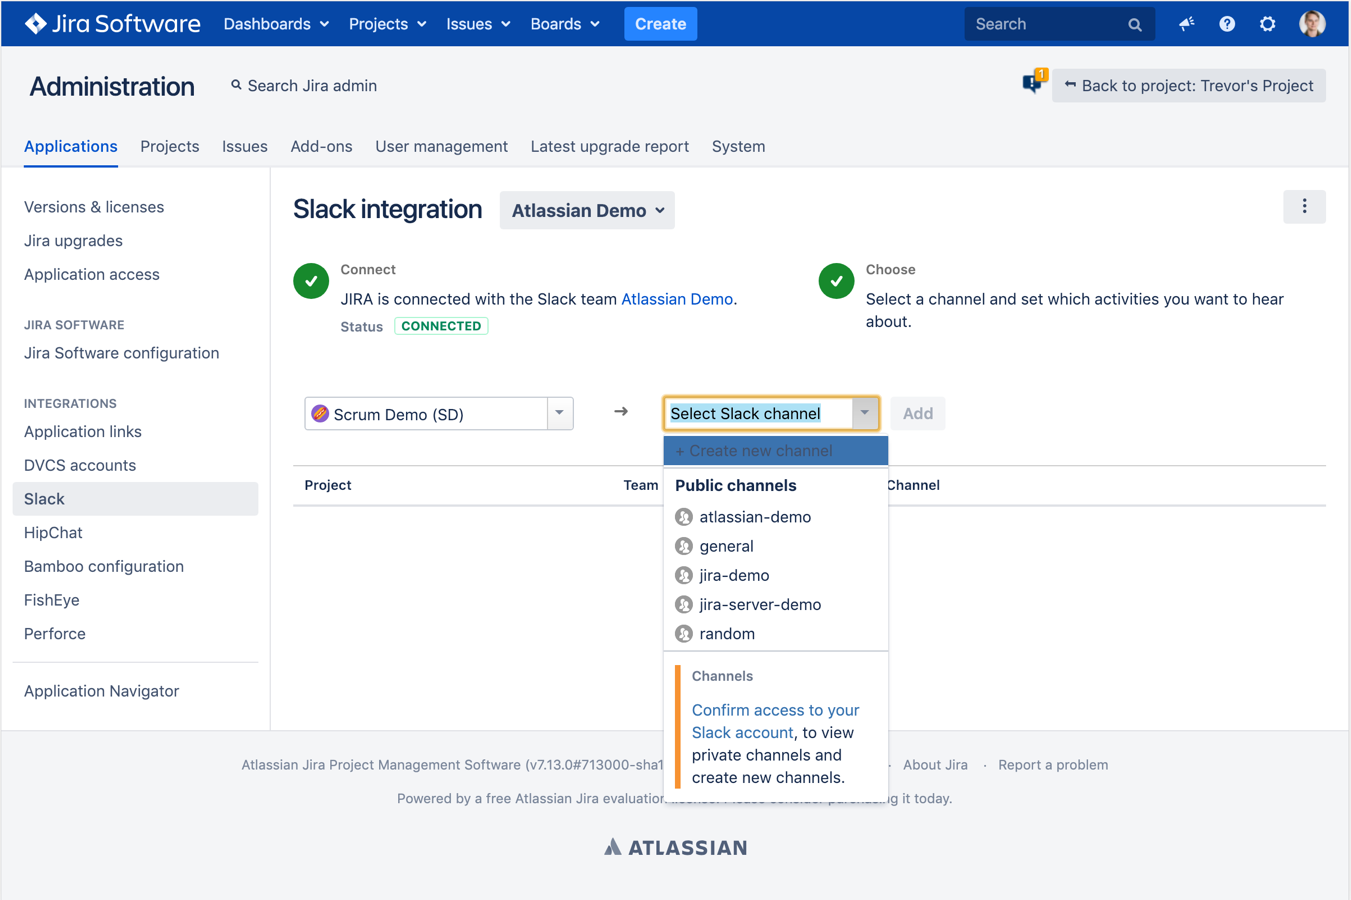
In order to connect to any Slack channels you must first confirm access to your Slack account. On the Slack integration screen in Jira (in both Project and Global Admin), you'll see a link to do this under "Connection status" if you haven't done it yet. Clicking this link will take you to a Slack auth link, which will give the app the ability to view your channels.
Once you've completed this step, you should now see "You're accessing Slack as [Your Name]", and should now be able to select private channels from the drop down. Each user who wants to connect their private channels to the Slack integration will need to do this step.
As a Jira Administrator
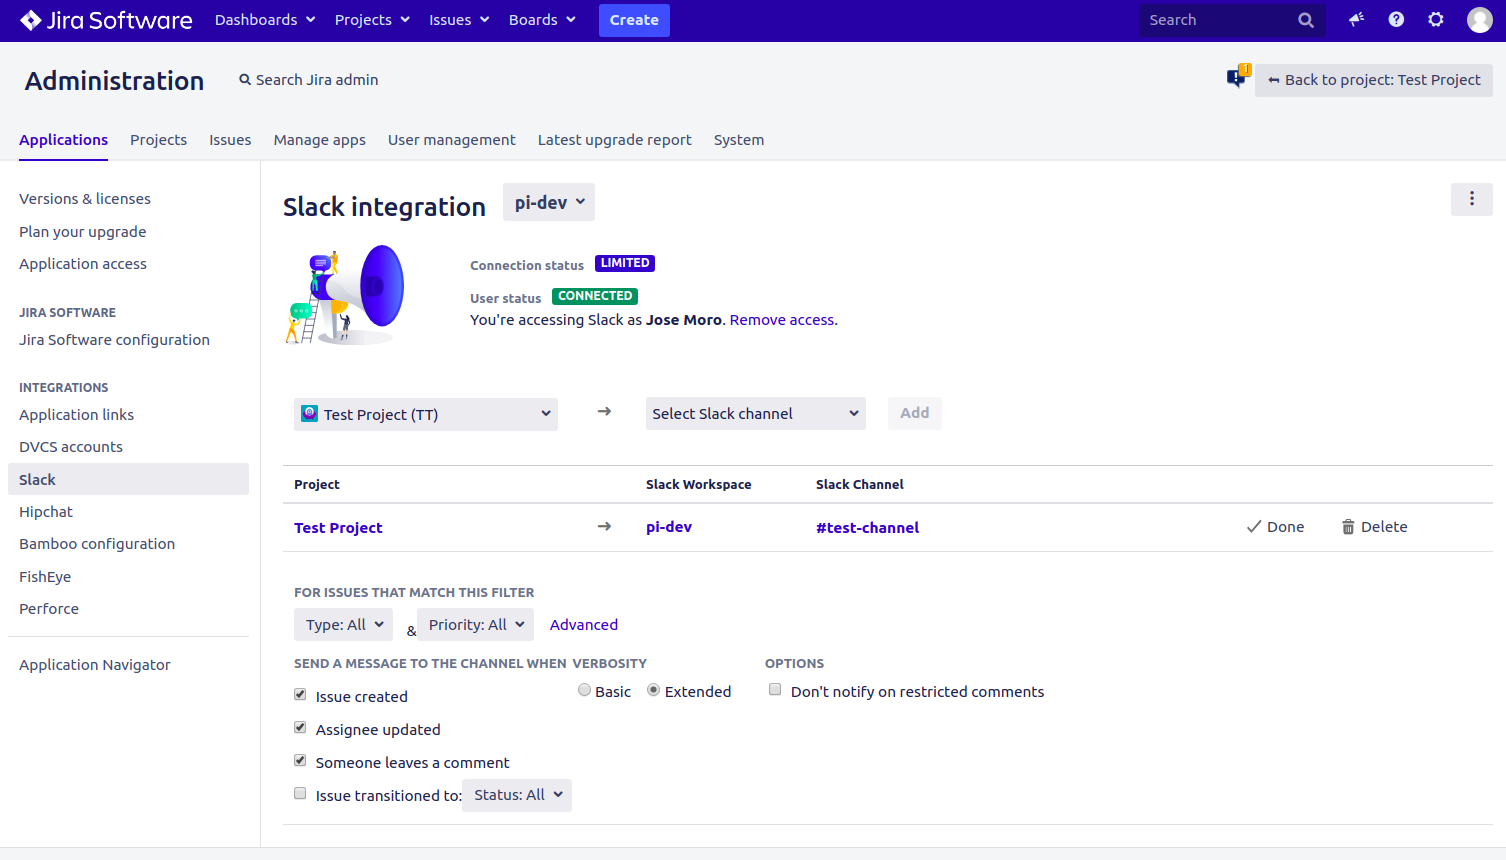
In the Applications section of Administration, you'll see "Slack" listed under Integrations. From here, you can connect Jira projects to different slack channels.
Once you've selected a channel, you'll now see the connection to Slack listed below. You will also receive a notification in Slack that Jira notifications have been set up to appear in the channel.
From the configuration menu in Jira, you can filter exactly what notifications you want sent to that room. If you're looking for a more fine tuned filtering style, "Advanced" will enable you to use custom JQL filtering. "Basic" verbosity makes notifications text one-liners, enabling "Extended" verbosity brings in an issue card with details like assignee, status and priority. You can also control restricted comments notifications here.
The plugin doesn't respect Issue Security levels applied to issues. Notifications for issues with Issue Security levels applied will be sent to connected Slack channels, that might expose a sensitive information.
As a Project Administrator
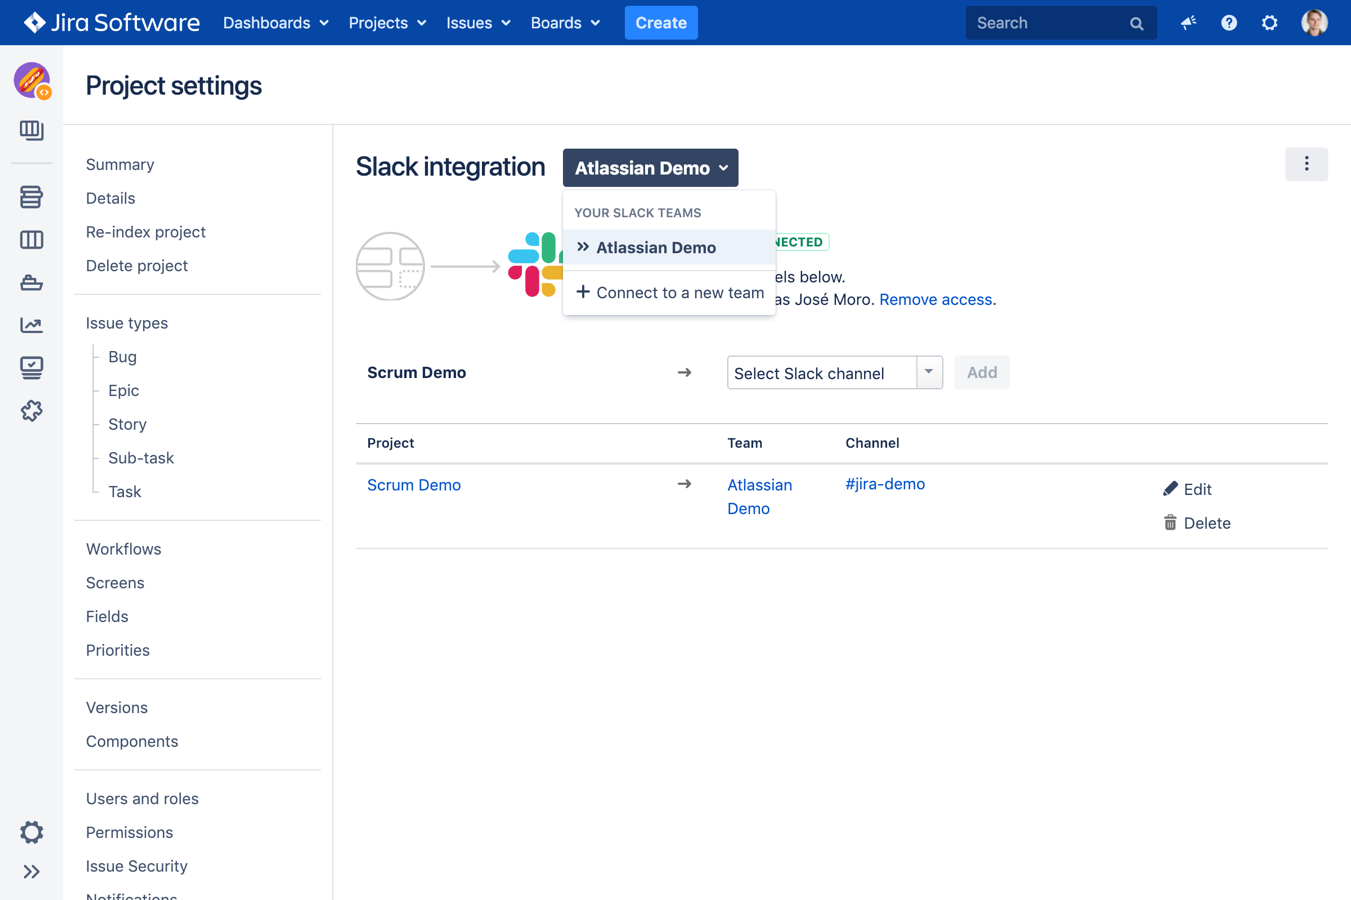
Project Administrators are able to set up and configure their Slack notifications. In Jira, under Project Settings, you should see a link for the Slack integration. From this page, project administrators can see current Slack channel connections for that project, as well as set up new ones.
How do I set up personal notifications?
The integration allows you to receive some specific personal notifications in Slack via a direct message from the bot.
- Go to your Jira user profile page.
- Click the Tools dropdown, on the top-right corner of the page.
- Click the item Slack notifications.
- In the next page, choose the options for when you want to be notified and the Slack workspace of your preference.
How do I set up Slack post function notifications?
Post functions are custom actions that are triggered when issues are transitioned to specific workflow statuses.
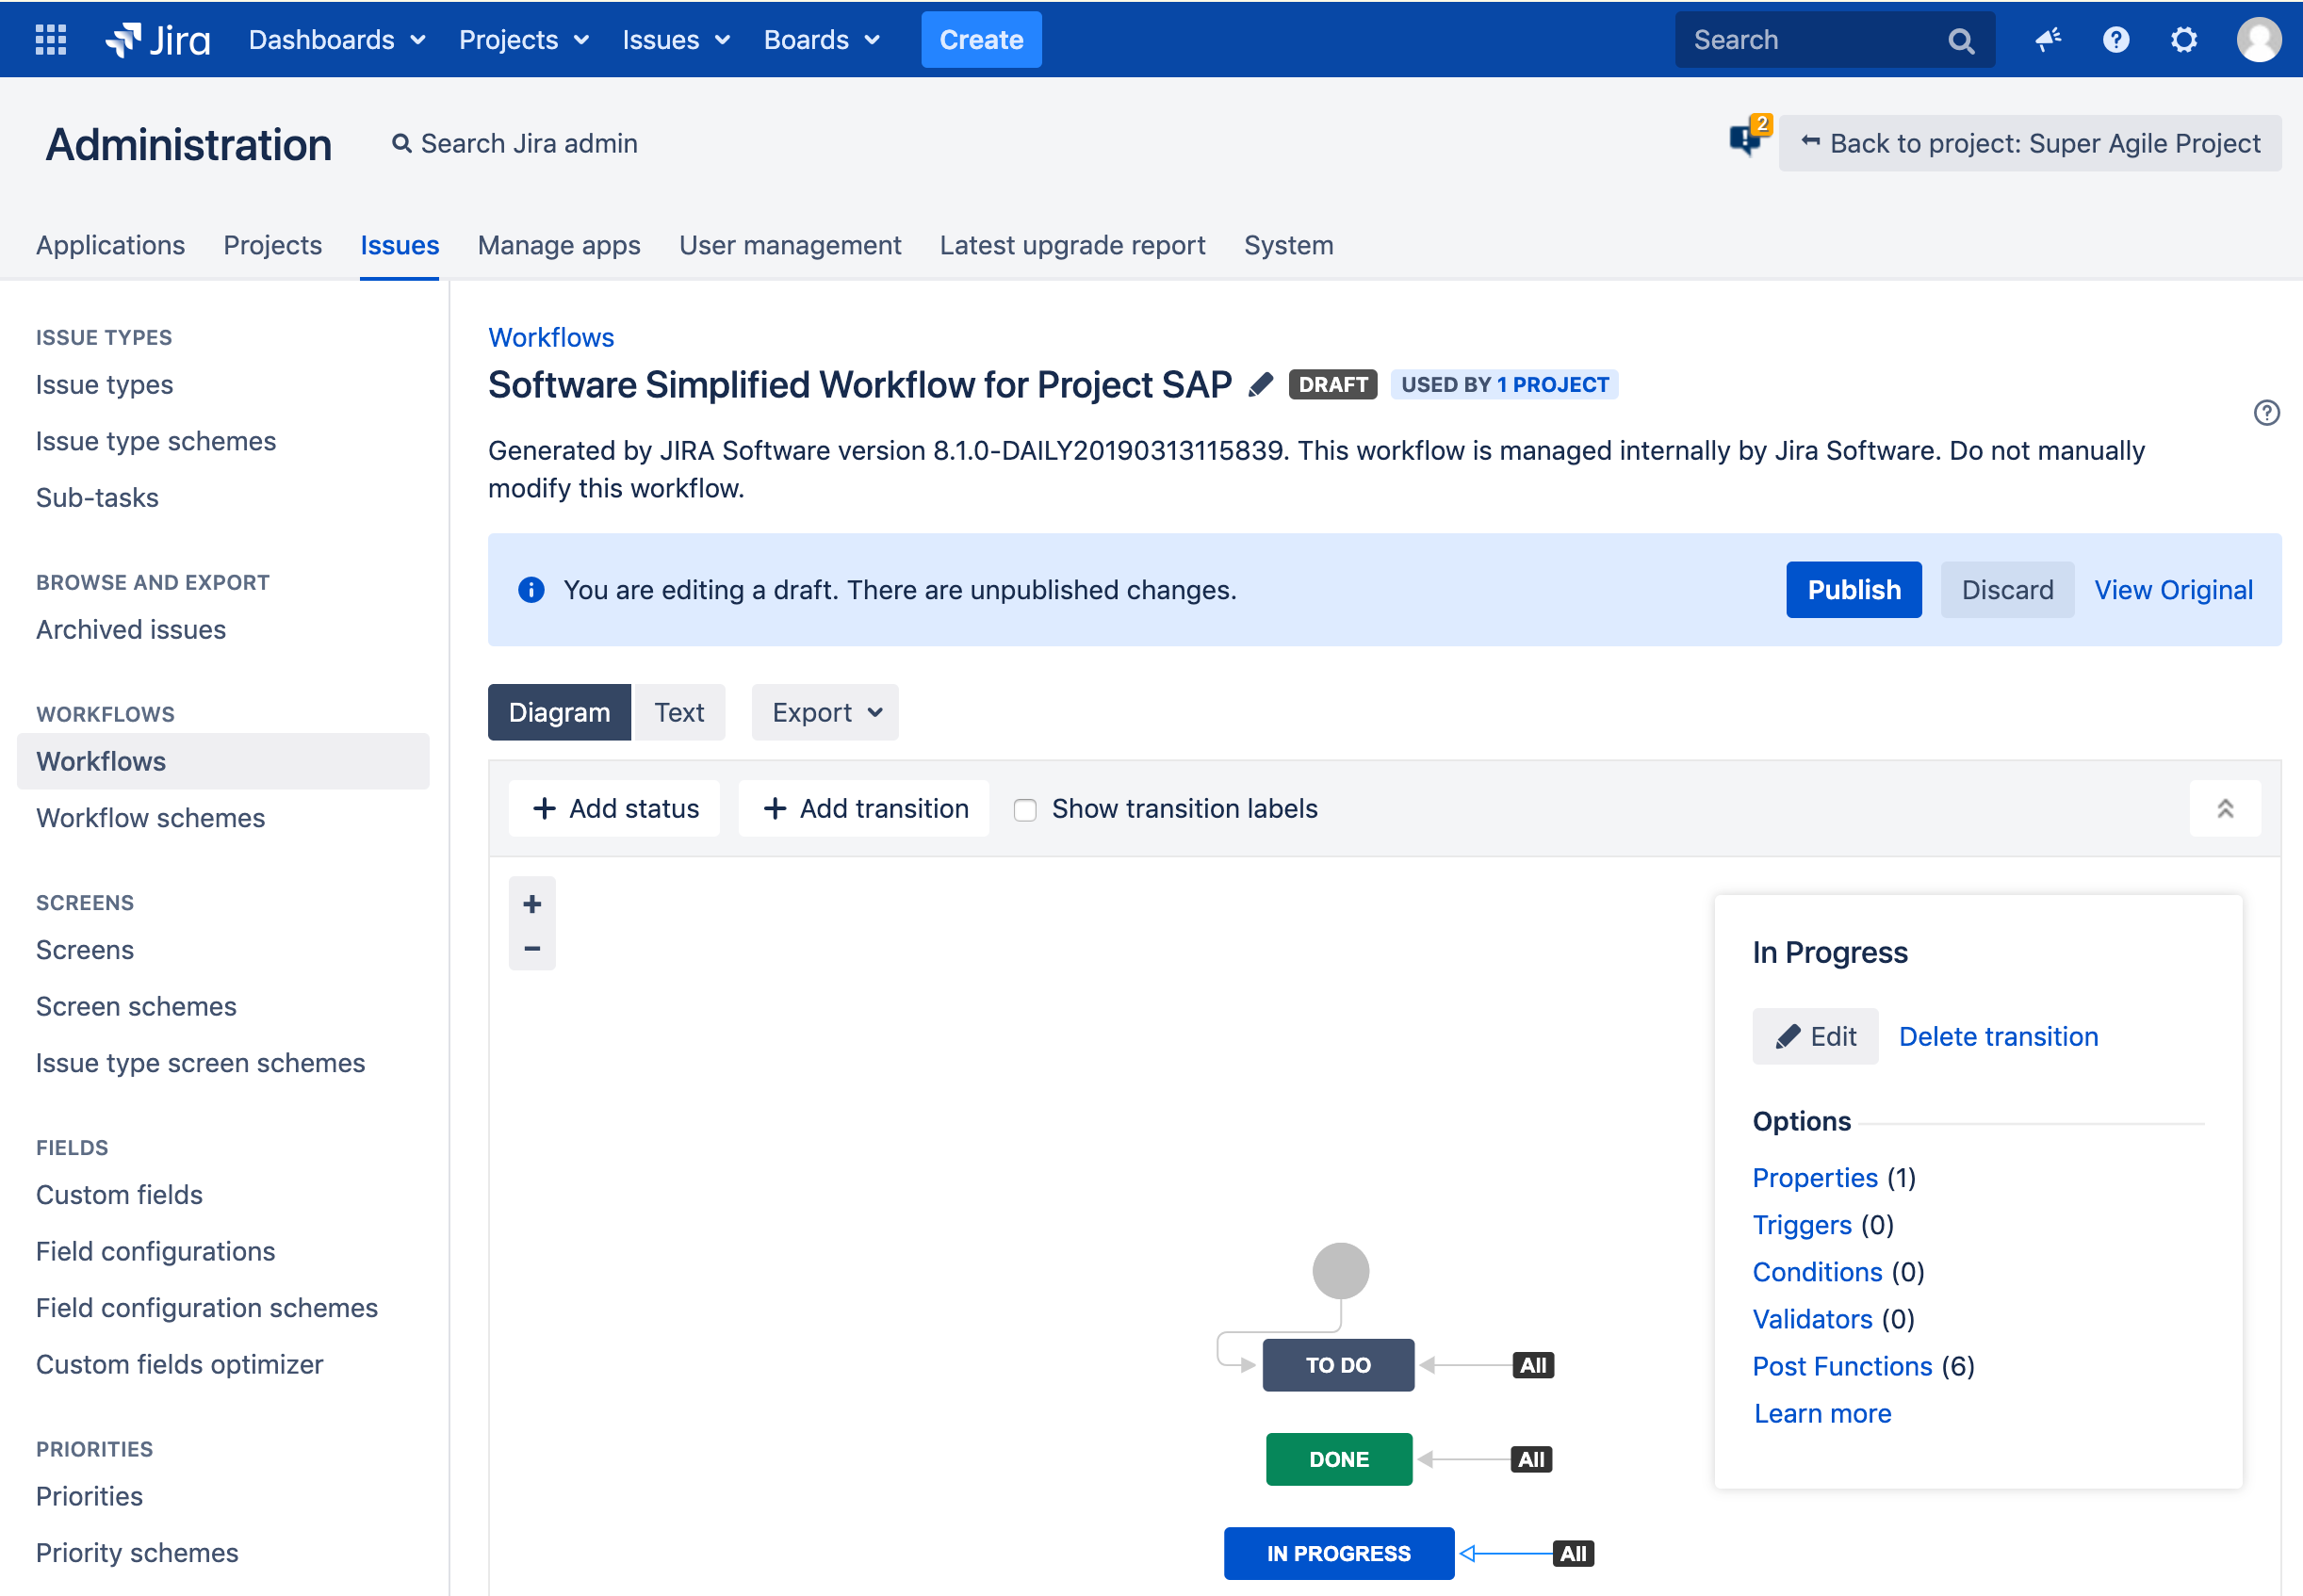
In order to add a post function to a give status, go to the project settings and click to edit the workflow.
In the new workflow draft, select a transition (gray line with an arrow) such as he one pointing to IN PROGRESS and click Post Functions.
A new tab will open in your browser. Then:
- Click Add post function link
- Select Notify Slack option
- Click Add button
- You now will see the configuration page where you can setup the notification you need.
- After editing what you need, click Add.
- Finally publish the workflow.
The configuration page for the Slack post function is demonstrated in the image below:
The available options are:
- JQL: filter which issues will generate a post function notification.
- Teams: select which workspace will populate the Channels field autocomplete. This does not influence directly the notification, just channel selection.
- Channels: list of channels where the notification will be sent to. You can notify channels in multiple workspaces by switching the Teams field and selecting your preferred channels.
- Message: customize the notification template message. It uses Velocity engine.
- Preview: renders a simplified version of the message that will be generated using dummy data.
The buttons in the message editor will give you a variety of examples on how you can setup your template. All the variables available in the scope of the template are:
| Field / description | Examples |
|---|---|
user User object of who triggered the transition | |
issue Issue object | |
project Project object | |
status New status object | |
priority Priority object | |
issueType Issue type object | |
creator User object of who created the issue | |
assignee User object of who is assigned to the issue | |
reporter User object of who is the reporter the issue | |
action Action name | |
firstStep Previous status name | |
endStep New status name | |
customFields Map of custom fields objects. This is a Java map instance, so custom field names and IDs can be used as keys. However, Jira prefixes all custom field IDs with customfield_ Field names sometimes might conflict with each other; in this case using IDs is advised. Field values depend on the type of the custom field. For instance, multivalued fields might return a Jira's Option instance, so you might need to call value twice. You can make use of the flexibility of the Velocity engine to deal with multivalued fields and whatever formatting you need. | |
How do I connect Jira Data Center to a direct message or multi party direct message?
Unfortunately, it's not possible to set up Jira Data Center notifications into Slack's direct messages or multi party direct messages.
Alternatively we suggest setting up a private channel and configuring notifications to route there.
How do I connect to a different Slack Workspace?
The Jira Data Center for Slack app supports the ability to connect to multiple Slack Workspaces, such as in a Slack Enterprise Grid. To do so, on any of the Slack integration pages in Jira, you should see a dropdown of workspaces at the top. To connect to a new workspace, click this and click "Connect to a new team." Please follow the steps from above (How do I connect the Jira Data Center app to my Jira site?) to connect your new workspace to this Jira Data Center instance.
I use multiple Jira Data Center instances or my instances are behind a firewall. How do I connect them to Slack?
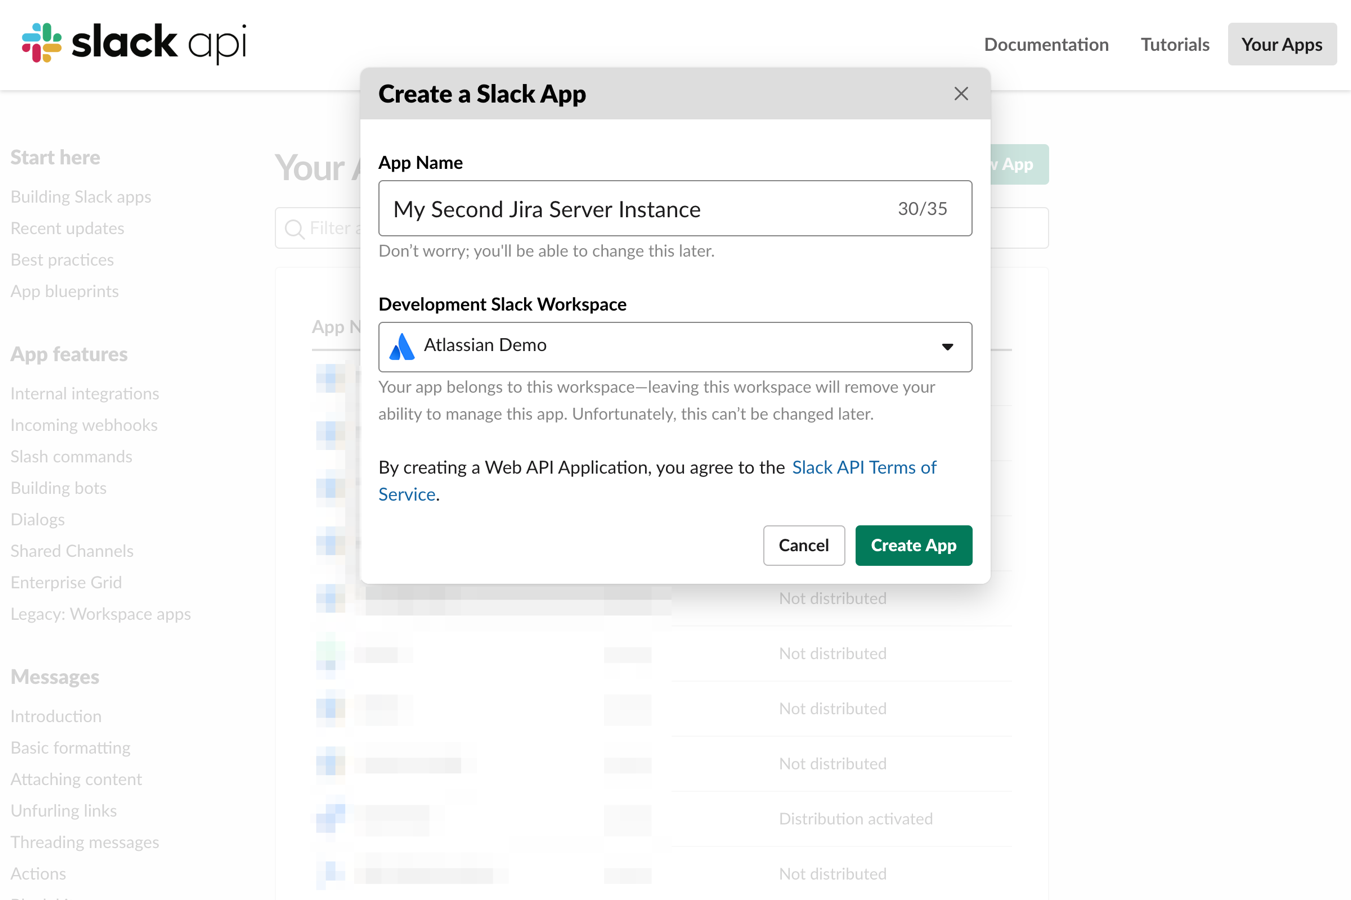
The process for setting up additional Jira Data Center instances with Slack takes some manual configuration to setup. Please ensure that you follow the below steps perfectly to ensure proper connectivity between your Jira Data Center instance and Slack. You can repeat this process multiple times for each additional Jira Data Center instance you have.
To get started, first visit https://api.slack.com/apps?new_classic_app=1. Make sure you create the App with classic scopes as Slack has released a new permission model that's not compatible with this App at this moment.
Slash Commands
You can skip this section if your Jira instance is behind a firewall so that Slack can't reach it.
Slash commands lets users trigger an interaction with your app directly from the message box in Slack.
In your app settings, go to Slash Commands.
Click Create New Command.
Copy the details of this command over, replacing {{url}} with your Jira Data Center's URL:
Command name:/jira_server
Request URL:https://{{url}}/slack/command
Usage hint:account, ISSUEKEY-123, helpMake sure the Command name is not taken by another Slack app in your workspace.
Once saved, your new slash command should show up in the list.
Now continue to OAuth & Permissions under Features.
OAuth & Permissions
First, we'll click Add New Redirect URL. Set this to http://{{url}}/slack/oauth. Again, replace {{url}} with your Jira Data Center's URL. Make sure to click Save URLs.
Next, scroll down to the Scopes section. Please add the following scopes:
|
|
|
|---|---|---|
|
|
|
|
|
|
Double check that you've added all scopes, and click Save.
Without all of these scopes, it's possible that the bot will not function correctly. If you're having issues with the bot working later, please reference that you've asked for all required permissions.
Bot Users
Click "Bot Users" in the Features navigation bar and click Add a Bot User.
You can set the Display name and default username to whatever you'd like (for instance, "Finance Jira"). Click the Add Bot User button at the bottom.
Event Subscriptions
You can skip this section if your Jira instance is behind a firewall so that Slack can't reach it.
Click on the Event Subscriptions navigation menu item and toggle Enable Events to the on position.
Add your Request URL https://{{url}}/slack/event and click Change. Please validate that it says "Verified" to ensure your connection between Slack and your Jira Data Center instance
Now you can subscribe to the following events under "Workspace Events"
channel_archive | channel_deleted | channel_unarchive | group_archive |
group_deleted | group_unarchive | link_shared |
Scroll down to Bot Events and add the following events here:
app_uninstalled |
|
|
|
message.im |
|
|
Scroll down to App Unfurl Domains and add your Jira Data Center domain.
Validate all of the events have been added and click "Save Changes"
Install the App
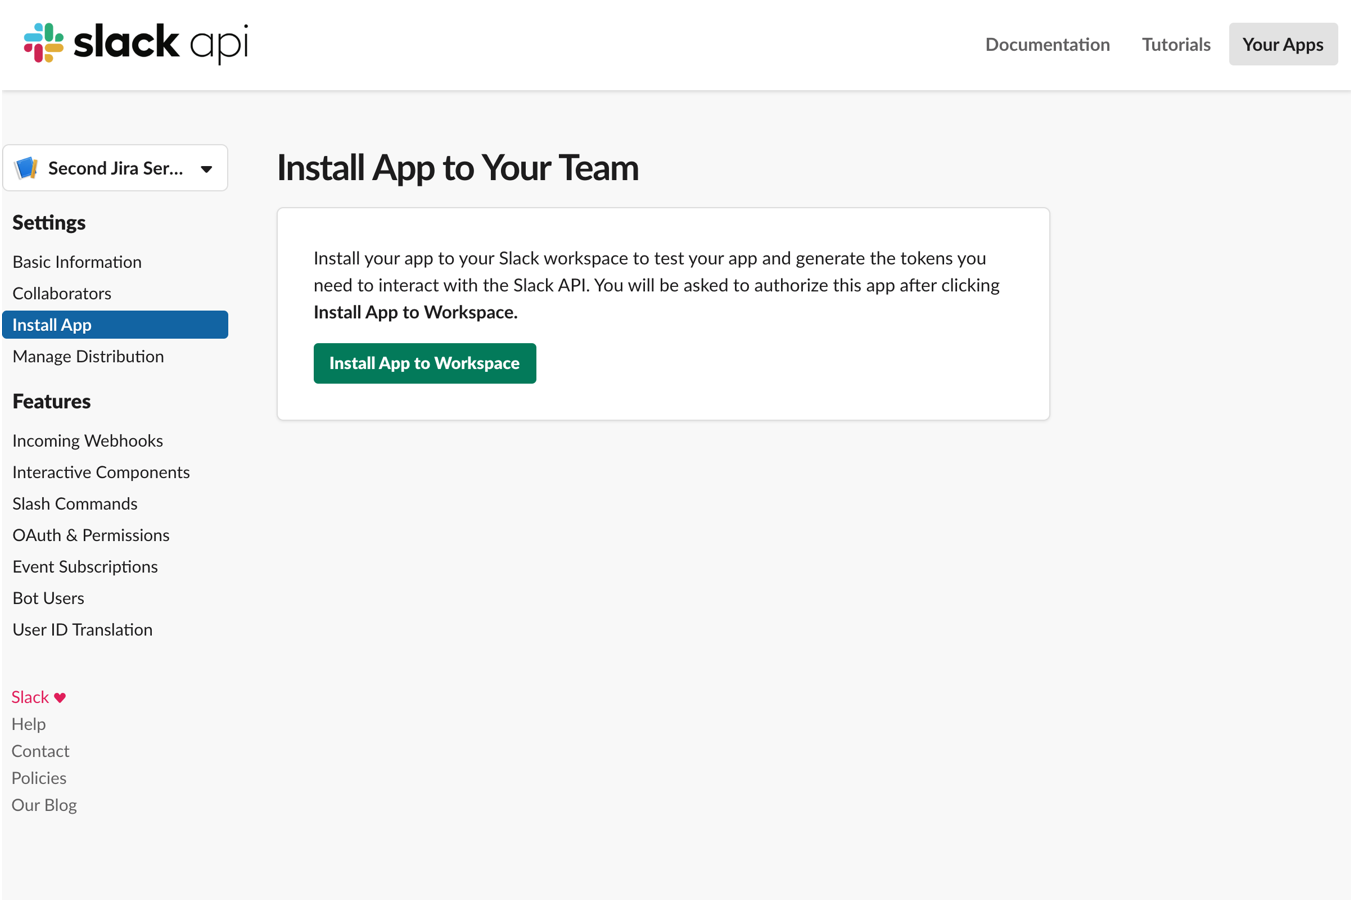
You can now install your app to your workspace by clicking "Install App" under settings and "Install App to Workspace"
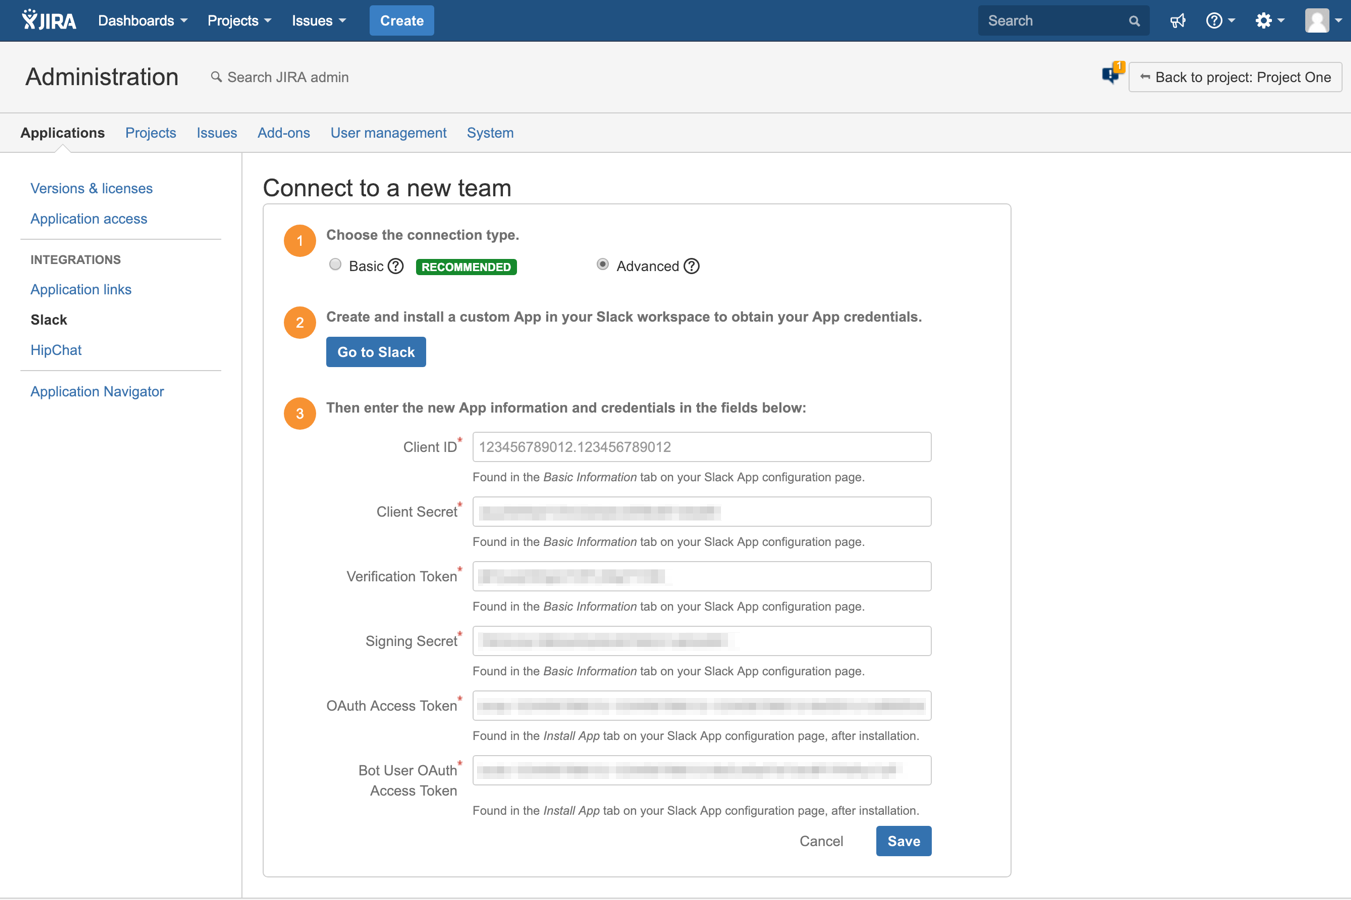
In the Jira config screen, click the "Connect to a new Team" menu item. Then click on "advanced" for connection type. You'll need to copy each of the settings from your Slack app configuration into this screen. Once completed, you'll be able to start using your Jira Data Center integration.
Can I distribute the Slack App I created to connect my Jira instance to multiple workspaces?
Yes, if you have followed the steps above to created a custom App.
First, your instance needs to have at least one connection with a workspace using the App credentials. This is required so the integration knows the App's client and secret.
Then, find the installation URL in Slack:
- Find your App in Slack API page.
- Go to the Manage Distribution under Settings.
- Activate distribution with other workspaces. You will need to meet Slack's requirements for that.
- Copy the Sharable URL.
- Navigate to the shareable URL in a browser. It will trigger an installation flow.
- Select the target workspace and proceed.
- At this point, if your App and the integration are correctly setup, you should be redirected to the integration configuration page in Jira, with the new connection already setup for you.
I'm using Data Center. Does this integration work for me?
Yes, this integration is fully compatible with Jira Data Center.
Which Slash commands does the Jira Data Center integration support?
There are the slash commands you can use while interacting the integration:
| Slash command | Action |
|---|---|
/jira_server HD-1 | Get information about a specific Jira Cloud issue. Note that this information will only be visible to the person who uses the command. |
/jira_server help | Show help information about slash commands. |
/jira_server account | Show your Jira account, if you have connected it to your Slack account. Connecting your accounts is required if you want to access issues in Slack or setup channels in Jira. |
Can the Jira Data Center bot provide my team a preview of Jira issues (aka unfurling)?
Of course! When someone writes a message with one or more Jira issue keys (in upper or lower case, so both DEV-36 or dev-36 will work) and the Jira Data Center bot is present in the conversation, the Jira Data Center bot will unfurl the message and show a preview of the issues.
It's also possible to unfurl via using a slash command by typing /jira_server TICKET-ID
How can I create a dedicated channel for an issue?
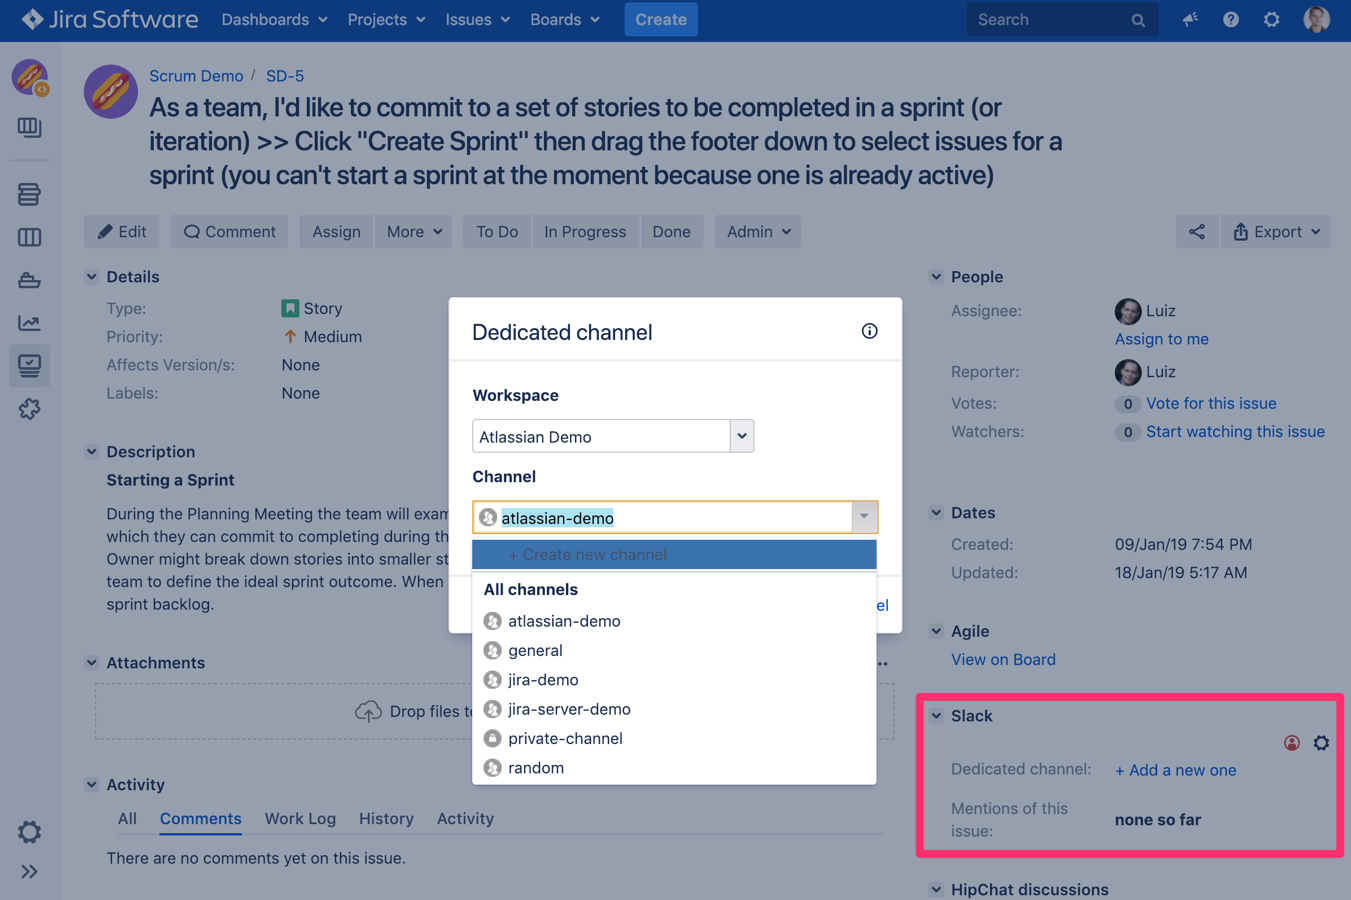
When looking at a ticket, you should now see a new label for Slack in the right side bar. From here, you can see if a dedicated channel has already been assigned, or assign a new one.
In the drop down, you can select a specific Workspace and then channel. You can also create a new channel directly from this screen. In Slack, you'll get a notification that the ticket was linked to the channel.
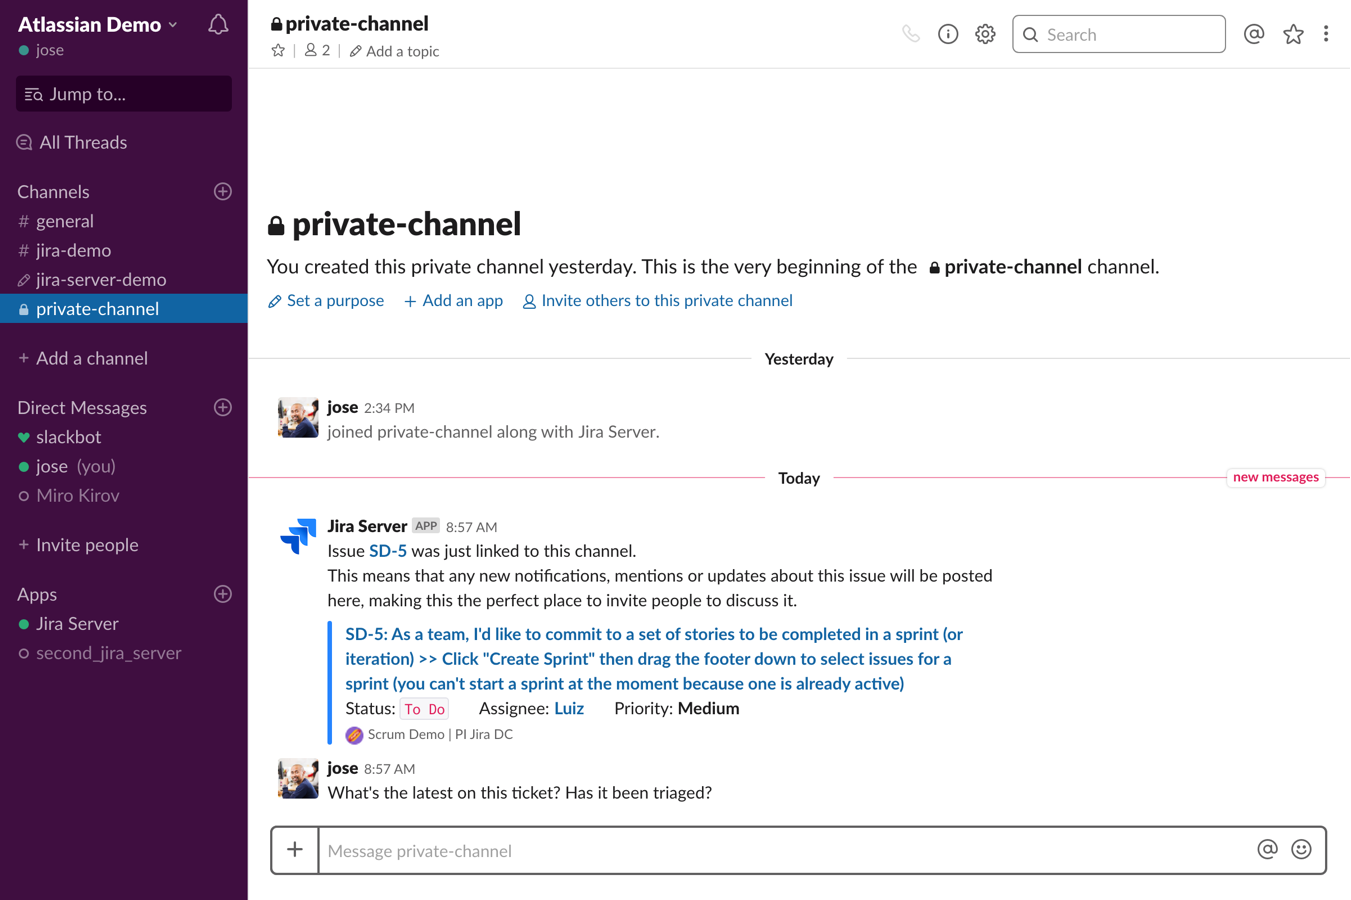
All status updates will now be posted to this channel. Any time a user mentions this ticket in a public or private channel that has Jira configured in, that mention will now show up on the Jira issue view.
How can I fine-tune the integration?
We can add Jira system properties to tune specific parts of the integration, as described in the table below:
| System property name | Description | Plugin default value |
|---|---|---|
slack.notification.include.images | Notifications setup with "extended" layout will include the project avatar (when the connectivity with Slack is bidirectional, not "limited"). However, in some circumstances, e.g. when Slack cannot reach the image in your server, notifications will take a long time to be processed by Slack (around 10 seconds) while it tries to load the image and it sometimes causes duplicate notifications. Disabling images will solve delays and duplicated notifications in this context. | true |
slack.client.max.channel.bulk.load | Maximum number of Slack channels that are fetched at once, used in the administration page. It can affect how Slack rate limits the integration. | 50 |
slack.client.list.all.conversations | If enabled, channel selector dropdown in configuration page will list all Slack channels for the selected workspace, rather than the user channels.
| false |
slack.client.pagination.limit | Maximum number of channels to load if
Slack system with many archived channels and conversations may need to increase this value to larger than 2 to get all user conversations. Jira calls Slack API user.conversations with the parameter exclude_archived = true. For example, when an API call for a user fetches 1000 conversations, with 250 of them are archived. JIra returns only 750. An active Slack user who has been in the system for a while and has many archived conversations will be required to fetch more pages to get all user's conversations. | 2 |
slack.client.retry.on.connection.failure | OkHttp3 boolean flag to retry if failed to establish a connection. Documentation. | true |
slack.client.connect.timeout | OkHttp3 timeout in ms when establishing new connections. Documentation. | 3000 |
slack.client.read.timeout | OkHttp3 timeout in ms while waiting for data in a connection. Documentation. | 15000 (15s) |
slack.client.write.timeout | OkHttp3 timeout in ms while sending data to the server. Documentation. | 120000 (120s) |
slack.client.retry.count | Number of times the Slack client retries in case it gets a 5xx response. Backoff delays in seconds are 1, 3, 5, 8, 13, and 30 seconds, respectively. | 3 |
slack.client.rate.limit.retry.count | Number of times the Slack client retries in case if gets a 429 HTTP response from Slack. Documentation. By default, Slack will return a Retry-After header with a time interval the client will use to delay the next attempt | 3 |
slack.client.ping.interval | OkHttp3's interval between HTTP/2 and web socket pings initiated by the client. Use this to automatically send ping frames until either the connection fails or it is closed. This keeps the connection alive and may detect connectivity failures. Documentation. | 0 (disabled) |
slack.client.force.http1 | Forces OkHttp3 to use HTTP/1.1 when calling Slack. Use this option in case your firewall or proxy is having issues supporting HTTP/2. Documentation. | false |
slack.client.thread.pool.size | Affects how many threads will process Slack notifications but also affects other asynchronous operations in the integration, such as the ability of handling incoming requests from Slack. | 5 |
slack.client.queue.size | Limits the memory consumed by the integration. For instance, if a big spike in events trigger a large number of notifications at once, if the queue maximum size is reached, new attempts to schedule notifications will fail and those notifications will be dropped. Note that, with a default value of 1000, it would require 1001 or more events happening at basically the same, without giving a change to the queue to be processed. A big bulk edit could reach such limit if the Slack notifications are enabled in that context. | 1000 |
slack.client.cache.expire.seconds | Time in seconds to expire cached values from Slack requests (channels and user names, for instance). Note that values are cached according to the Slack token, so they are all restricted to the respective Slack user. | 900 (15mi) |
slack.skip.private.mention | Do not record issue mentions for private channels. | false |
Some of the system properties and the upper limits they represent, when in a clustered environment, will affect nodes individually. So limits such as queue size will scale according to the number of nodes available in the cluster.
How can I troubleshoot the integration?
Debug logging
You can enable DEBUG level logging though Logging and profiling configuration, using the following packages:
com.atlassian.plugins.slackcom.atlassian.jira.plugins.slack
Connectivity from Slack
If you're having connectivity issues between your instance and Slack, double-check the following:
- Slack can reach your instance through a HTTPS-secured URL.
- You have properly saved your base URL without a trailing slash in the Slack App configuration.
Make sure the paths
<baseUrl>/slack/*and<baseUrl>/rest/slack/latest/*are whitelisted in your firewall and security filters in place.- Make sure those paths allows "anonymous" requests, since incoming requests from Slack use a different authentication mechanism.
- If you're unable to expose your instance, you can still use the integration in notification-only mode, by creating a custom app as described in this page.
You can check the integration is available by making a request to the verification event endpoint. In a bash terminal it can be done with the following command:
curl -X POST \
  https://<jira-base-url>/slack/event \
  -H 'Content-Type: application/json' \
  -H "X-Slack-Request-Timestamp: $(date +%s)" \
  -H 'X-Slack-Signature: any-value' \
  -d '{"challenge": "boo","type": "url_verification"}'
Failure to submit instance URL in Slack
The "Oops" error when submitting your instance URL is known to happen sometimes just after the App has been removed from a workspace, because Slack tries to reach out to the instance before completing the uninstallation.
This issue tends to fix itself within 15 minutes or so as Slack finishes the processing.
Advanced configurations
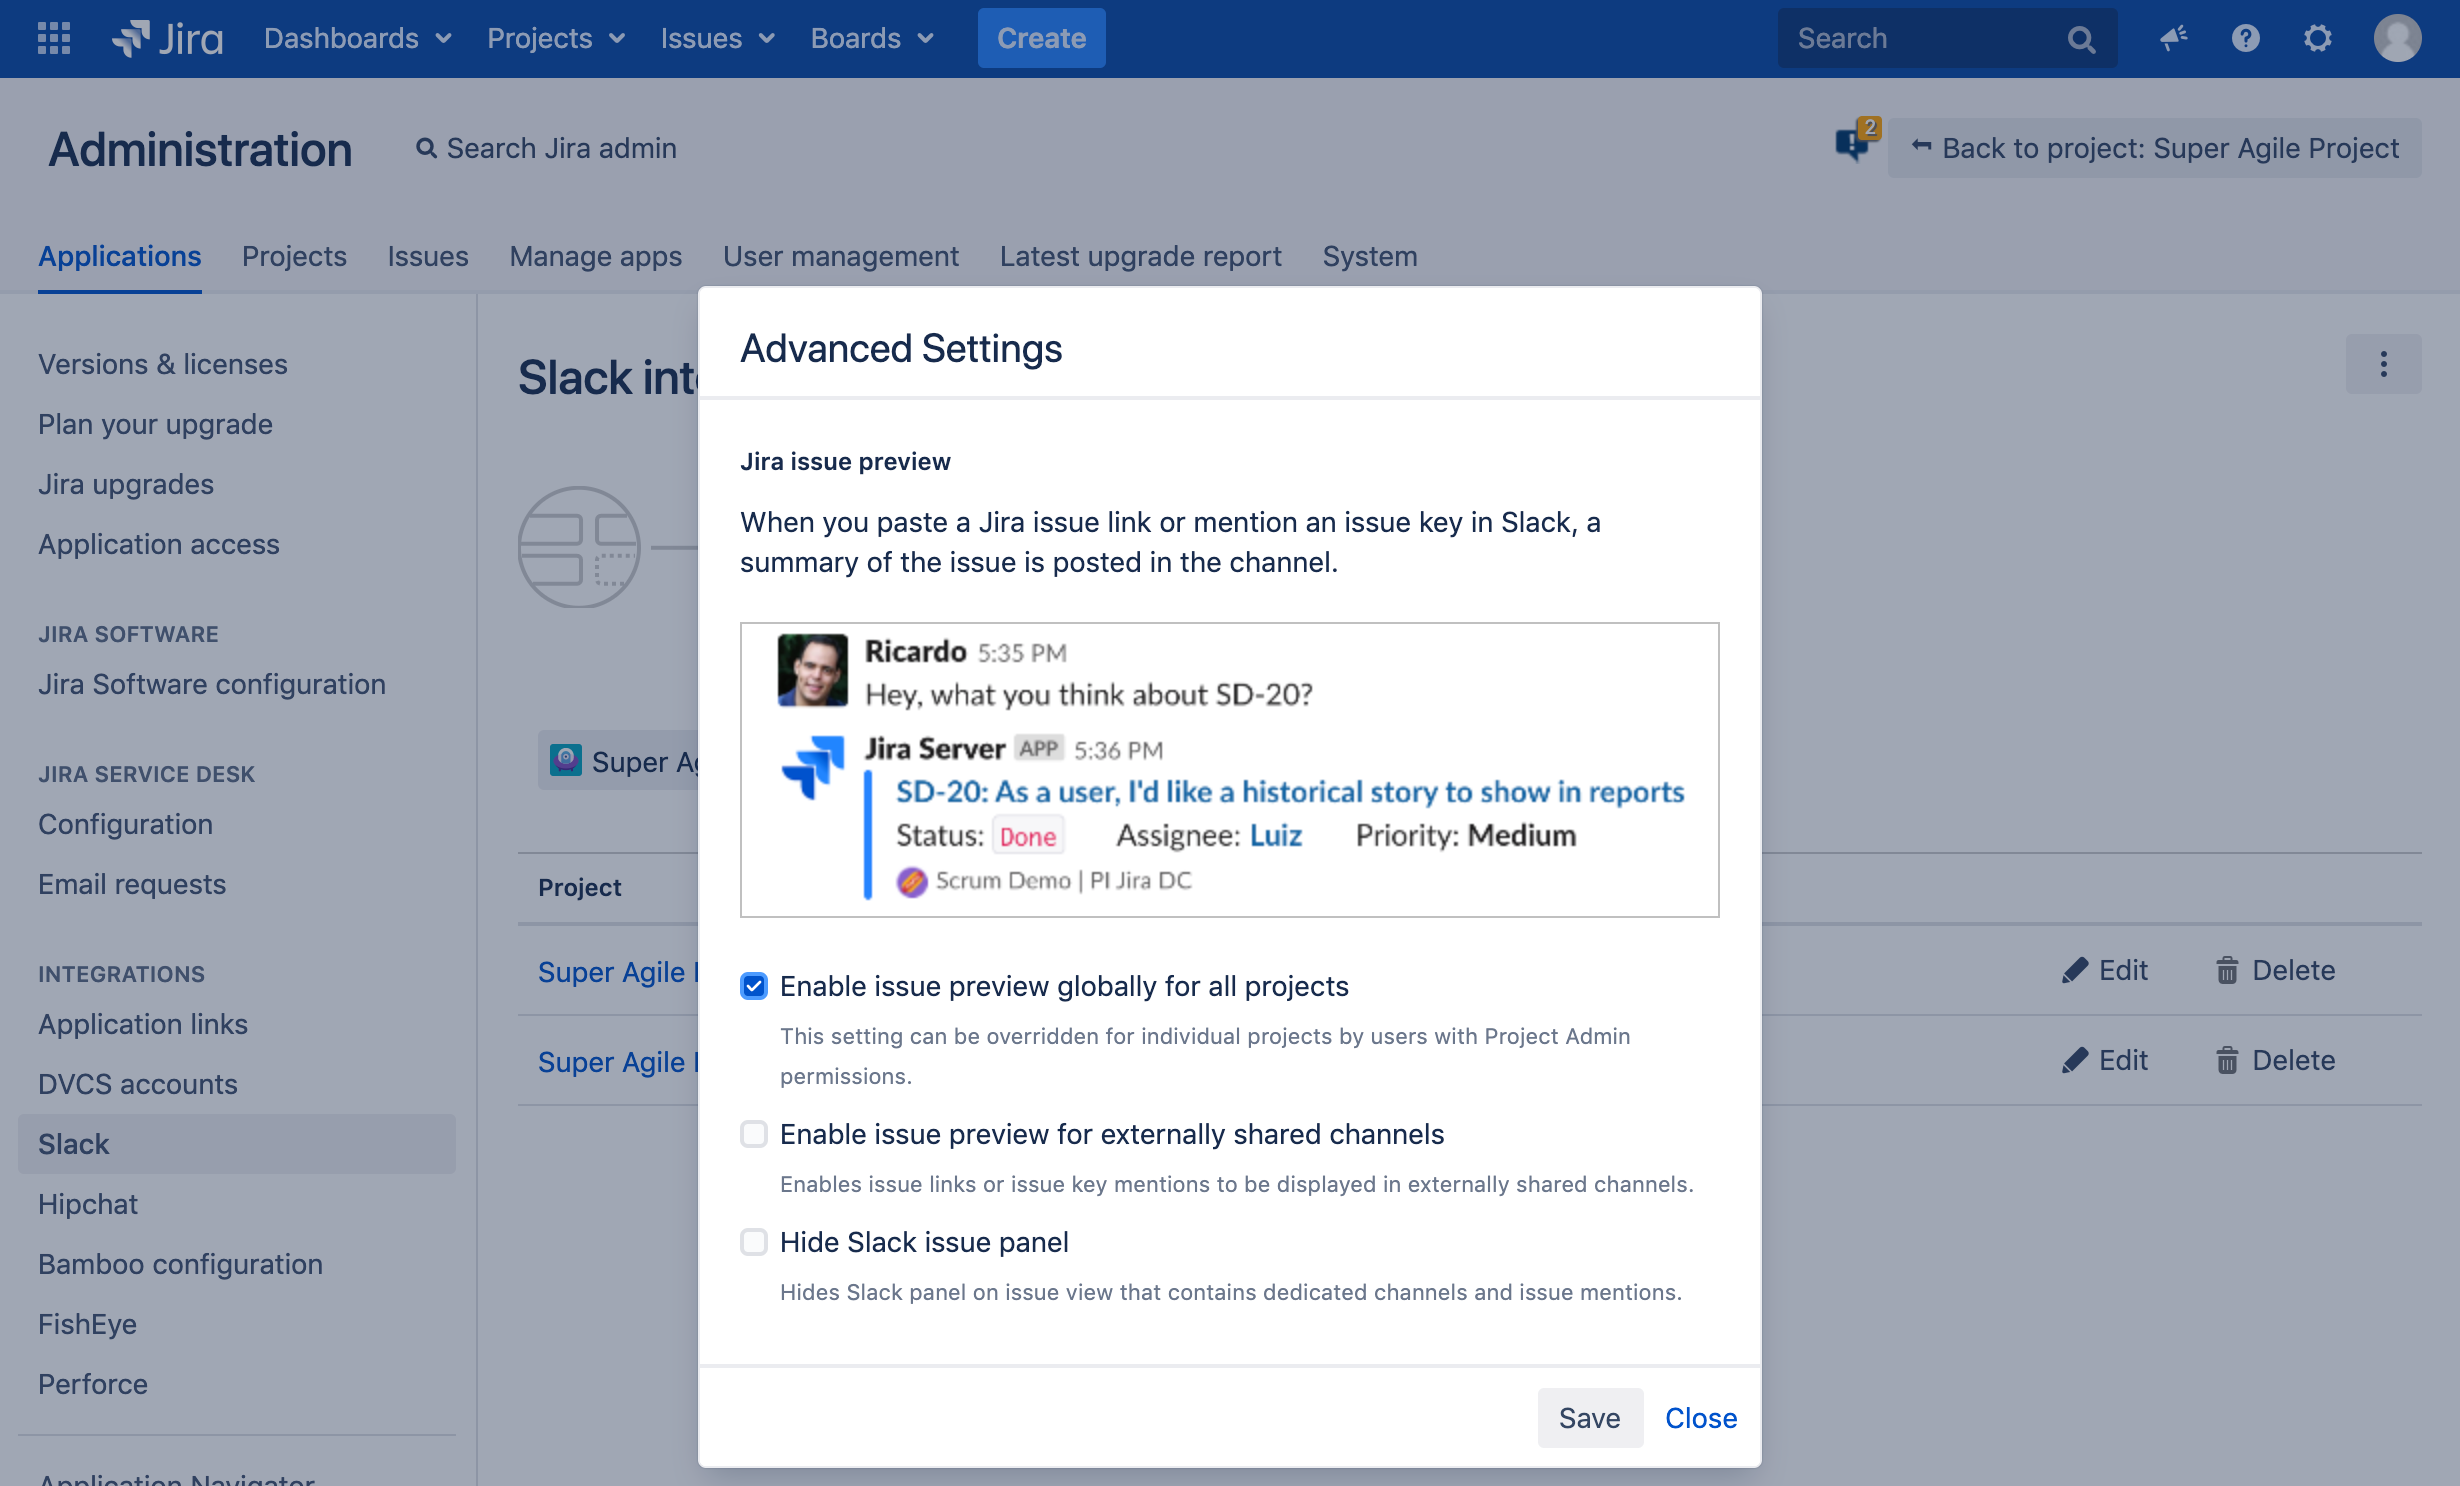
In order to access the advanced configuration dialog:
- Go to the Slack configuration in Jira Administration > Applications > Slack or Project Settings > Slack integration.
- Open on the
...menu. - Click Advanced Settings.
In the dialog you can configure:
- Issue preview (unfurling): enable or disable unfurling globally or on a per-project basis.
- Issue preview for externally shared channels: enable or disable unfurling if a channel is shared with another organization. Only available at the global level.
- Hide Slack issue panel: hide the issue panel globally or on a per-project basis. Useful if you have projects open to external users, for instance.
- Restricted comments notifications in dedicated channels: enable sending restricted comments notifications to dedicated channels. Only available at the project level. Useful if you want to override comment restrictions for a specific project e.g. support agents' dedicated channel for a support request they are working on.
Is this supported by Atlassian?
Yes, absolutely. This integration is built and maintained by Atlassian. If you need support, visit support.atlassian.com.

