Resolving SSL Self-Signed Certificate Errors
If you're using a self-signed certificate on your repository server, you may receive SSL certificate errors when you try to perform certain actions. This page will help you resolve this errors.
Purpose
You may receive an error like this when you have added a hosted project which has a self-signed certificate, such as a company Stash server:
In order to resolve this, see the solution below.
Solution
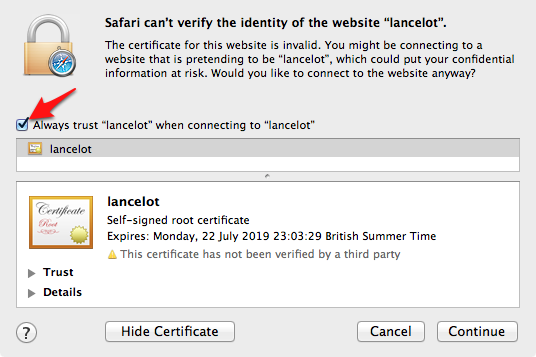
To trust a self-signed certificate, you need to add it to your Keychain. The easiest way to do that is to open the site in question in Safari, upon which you should get this dialog box:
Click 'Show Certificate' to reveal the full details:
If the certificate looks good to you, check the 'Always trust <name> when connecting to <server name> and click 'Continue'. You will be asked to provide your password to authorise the addition of this certificate to your keychain, after which both Safari and the Hosted Projects window will accept the SSL certificate as valid.
SSL certificates and Mercurial
Self-signed certificate problems in Mercurial look like this:
SSL3_GET_SERVER_CERTIFICATE:certificate verify failed
However, these are warnings at the time of writing and will therefore not prevent you from using the server. It is advisable however to add the self-signed certificate to your keychain anyway, see 'Trust a self-signed certificate' above.
SSL certificates and Git
Self-signed certificate errors in Git include the following text:
SSL3_GET_SERVER_CERTIFICATE:certificate verify failed
Git doesn't use the Mac OS X keychain to resolve this, so you need to trust the certificate explicitly.
- If you haven't done so already, follow the steps in 'Trust a self-signed certificate', above
- Open Applications > Keychain Access and select 'Certificates' in the lower-left pane
- Type the website into the Search field in the top-right
- Select the certificate entry for the website, then in the menu click File > Export Items
- In the Save dialog, change 'File Format' to 'Privacy Enhanced Mail (.pem)' and save the file somewhere on your drive
Edit your ~/.gitconfig and set this:
[http]
sslCAInfo=/path/to/your/certificate/file.pem
Note: if you have more than one self-signed certificate that you need to trust, you can multiple-select them in item 4 and export them all as one .pem file.
Windows
Windows works in a very similar way, except that you need to have the certificate as a .pem file already from your server admin. It's possible to export the certificate from Certificate Manager or from your browser, but the Windows certificate export tool can't directly export to .pem so you have to run the result through an openssl tool to convert it to .pem, which is awkward (although allegedly Firefox can export as pem). If you want to know how to make this conversion, please see http://stackoverflow.com/questions/9072376/configure-git-to-accept-a-particular-self-signed-server-certificate-for-a-partic
Once you have the .pem you configure git the exact same way as you do on the Mac, by setting the http.sslCAInfo option.


