Running Jira applications as a Windows service
Installing as a service with the installer
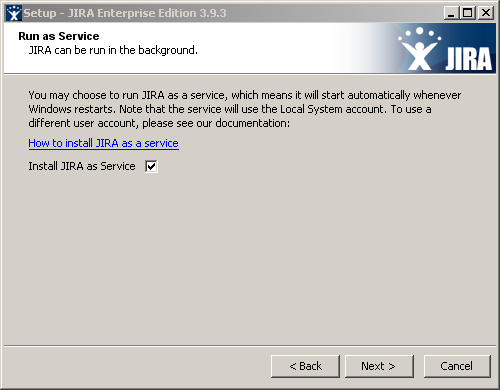
The easiest way to get Jira installed as a Windows service is by clicking the 'Install Jira as Service' checkbox when running the Windows Installer:
You will need full Administrator rights on your Windows operating system for this installation process to complete successfully.
Manually setting up Jira to run as a service
You can still set up Jira to run as a service, if any of the following situations apply to you:
- You did not use the Windows Installer.
- You used the Windows Installer, but did not initially install Jira as a service.
Please note:
- On any Windows operating system with User Account Control (), such as Windows Vista or Windows 7, you must either disable or run 'cmd.exe' as an administrator (e.g. by right-clicking on 'cmd.exe' and selecting "Run as administrator") in order to execute the script in the procedure below. If is enabled, simply logging in to Windows with an Administrator account will not be sufficient.
To set up Jira to run as a service:
- Open a Command Prompt.
- Change directory ('cd') to the Jira application installation directory and then into this directory's '
bin' subdirectory.If a directory in the path has spaces (e.g. '
C:\Program Files\..'), please convert it to its eight-character equivalent (e.g. 'C:\Progra~1\..'). - Ensure the JAVA_HOME variable is set to the root of your Java platform's installation directory.
To find out the current value of the JAVA_HOME variable, enter
echo %JAVA_HOME%at the command prompt. To ensure that Jira won’t fail to start due to a bad parameter, add the
XX:+IgnoreUnrecognizedVMOptionsparameter at Jira startup. This parameter allows to bypass any bad arguments being passed to Java.- Run the following command:
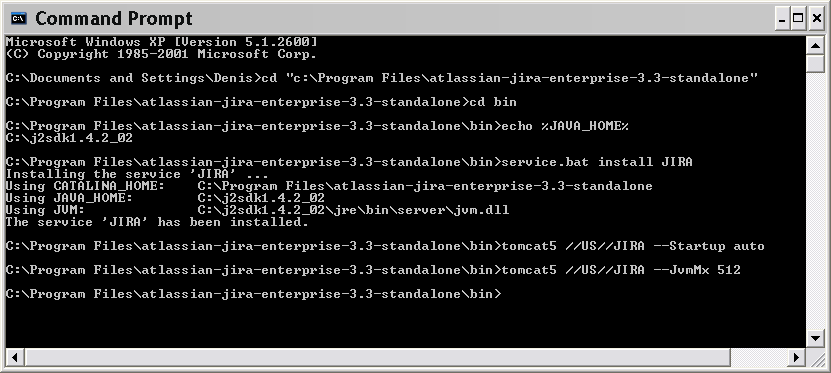
service.bat install JiraHere is a screenshot of the process:
Jira should now be set up to run as a service.In addition, to have the Jira service start automatically when the operating system starts, run:
tomcat8 //US//JIRA --Startup autoThe Jira service will automatically start up the next time the operating system reboots. The Jira service can be manually started with the command 'net start JIRA' and stopped with 'net stop JIRA'.
To see what parameters the JIRA Core service is starting with, go to Start -> Run and run '
regedt32.exe' and then:
* For Windows 32 bit edition navigate to HKEY_LOCAL_MACHINE -> SOFTWARE -> Apache Software Foundation -> Procrun 2.0 -> JIRA<time stamp>
* For Windows 64 bit edition navigate to HKEY_LOCAL_MACHINE -> SOFTWARE -> Wow6432Node -> Apache Software Foundation -> Procrun 2.0 -> JIRA<time stamp>Additional Jira setup options (optional):
To increase the maximum memory Jira can use (the default will already be 256MB), run:
tomcat8 //US//service_name --JvmMx 512where service_name is the name of your Jira service, e.g. JIRA123487934298.
If you are running Jira and Confluence in the same JVM, increase the MaxPermSize size to 128 MB:
tomcat8 //US//service_name ++JvmOptions="-XX:MaxPermSize=128m"where service_name is the name of your Jira service, e.g. JIRA123487934298.
Occasionally, it may be useful to view Jira's Garbage Collection information. This is especially true when investigating memory issues.To turn on the Verbose (garbage collection) logging, execute the following command in the command prompt:
tomcat8 //US//service_name ++JvmOptions="-Xloggc:path\to\logs\atlassian-gc.log"where service_name is the name of your Jira service, e.g. JIRA123487934298.
The path (denoted by \path\to) refers to the directory in which Jira is currently installed. For example:tomcat8 //US//service_name ++JvmOptions="-Xloggc:c:\jira\logs\atlassian-gc.log"where service_name is the name of your Jira service, e.g. JIRA123487934298.
See the Tomcat documentation for further service options.
Removing the Jira service
If Jira was installed through the Windows installer, go to the 'Control Panel' in Windows, click 'Add or Remove Programs' and remove Jira. This will remove the service too.
If you installed the service manually (see above) it can be uninstalled with:
service.bat remove JIRAAlternatively, if the above does not work, use tomcat8 //DS//JIRA.
Changing the Windows user that the Jira service uses
If you are using mapped network drives for Jira's backup directory, attachments directory, index directory or the %CATALINA_HOME%\* directory, you need to ensure that Jira can write to these drives. That is, these directories all need to be writeable by the user which the Jira service is running as. This may mean that you need to change the Windows user that the Jira server uses.
Note that you must also specify these network drives by UNC and not letter mappings, e.g. \\backupserver\jira not z:\jira
To change the Windows user that the Jira service uses, navigate to the service in Windows, i.e. 'Control Panel' -> 'Administrative Tools' -> 'Services'. Locate the 'Atlassian Jira' service, right-click and view the 'Preferences'.
Go to the 'Log On' tab and change the user as desired.
Specifying the startup order of multiple services
If you have services that depend on each other, it is important that they are started in the correct order. Common examples include:
- If you are running both JIRA and Crowd, it is important to start Crowd first, so that Crowd is running before people try to login to Jira.
- If the database Jira connects to is hosted on the same server as Jira, and is started via a Windows service, the Jira service will only start successfully if the database service has already started first.
To set up start up dependency rules, open a command prompt and enter the following command:C:\Documents and Settings\Developer>sc config [JIRA service] depend=[database service]
Please note the space character after 'depend='.
- [JIRA service] is the name of the Jira service you are running, e.g. JIRA051007111904.
- [database service] is the name of the database service you are running, e.g. MSSQLSERVER.
If you wish, you can also set up dependency rules by editing the system registry. Please see http://support.microsoft.com/kb/193888 for details on how to do this.
Locating the name of a service
If you do not know the exact name of your Jira service or your database service, you can find out what they are by following the steps below:
- Navigate to 'Control Panel' > 'Administrative Tools' > 'Services'.
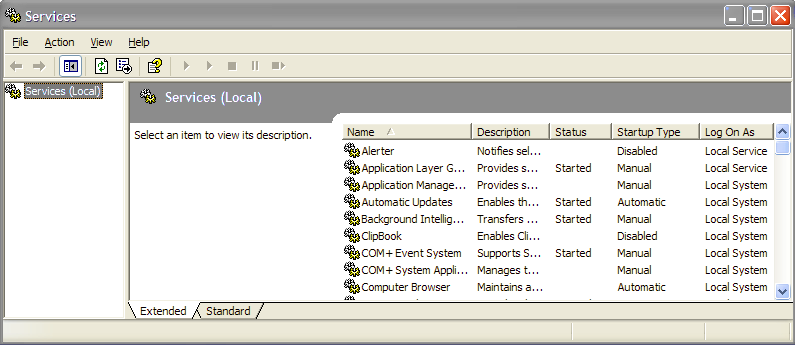
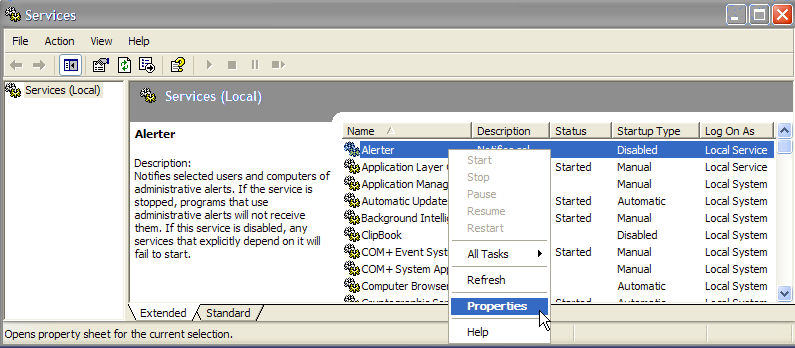
- The 'Services' window should appear:
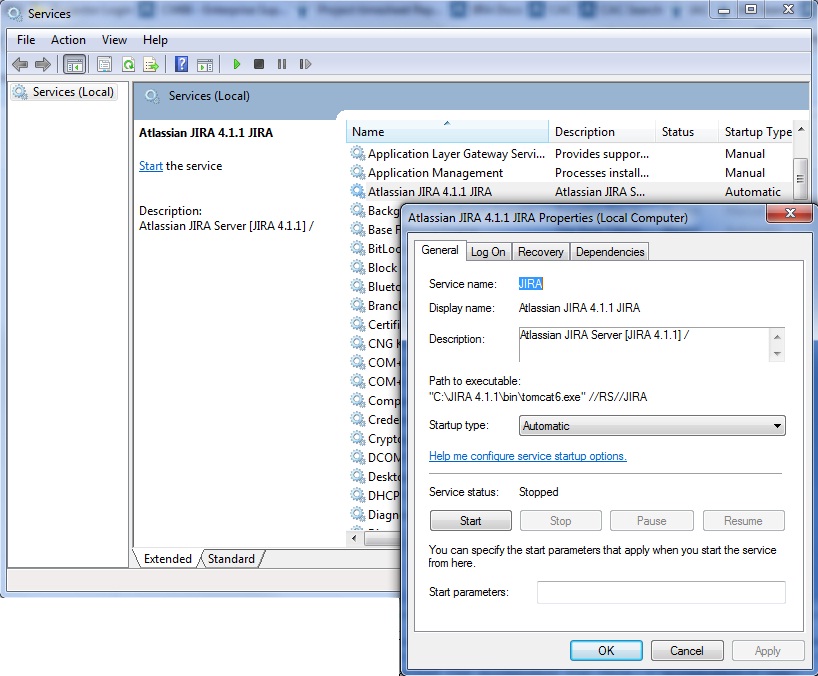
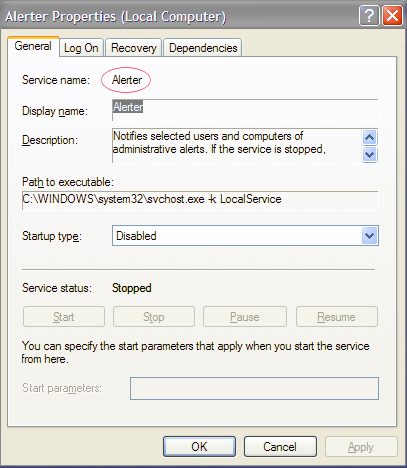
- Right-click on the service you wish to find out the name of, and select 'Properties' from the popup menu:
- The 'Service name' should appear in the 'General' tab:
Troubleshooting
- Java 6 is not supported by Jira 6.0 and later. Problems may occur when trying to setup Jira to run as a Windows service with JDK 1.6. The problem is due to failure to locate "MSVCR71.DLL", which can be found in
%JAVA_HOME%/bin. There are two options to resolve this problem:- Add %JAVA_HOME/bin to PATH, then restart the Jira server.
- Copy MSVCR71.DLL to system path, C:\WINDOWS\SYSTEM32 or C:\WINNT\SYSTEM32
- Take note of the username that the service is running as, and be sure to modify the
/tempand/workdirectories in your install directory so that this user has read and write permissions.

