Increasing Jira application memory
System administration
- Finding your Server ID
- Increasing Jira application memory
- Using the database integrity checker
- Precompiling JSP pages
- Logging and profiling
- Backing up data
- Restoring data
- Search indexing
- Using robots.txt to hide from search engines
- Control anonymous user access
- Moderating user group activity with Safeguards
- Licensing your Jira applications
- Viewing your system information
- Monitor application performance
- Monitoring database connection usage
- Monitor your instance with Jira diagnostics plugin
- Viewing Jira application instrumentation statistics
- Generating a thread dump
- Finding your Jira application Support Entitlement Number (SEN)
- Auditing in Jira
- Monitor security threats
- Data pipeline
- Important directories and files
- Integrating Jira applications with a Web server
- Securing Jira applications with Apache HTTP Server
- Changing Jira application TCP ports
- Connecting to SSL services
- Running Jira applications over SSL or HTTPS
- Configuring security in the external environment
- Data collection policy
- Jira Admin Helper
- Raising support requests as an administrator
- Start and Stop Jira applications
- Managing LexoRank
- Jira cluster monitoring
- Scheduler administration
On this page
Related content
- No related content found
Java applications like Jira Software and Confluence run in a "Java virtual machine" (JVM), instead of directly within an operating system. When started, the Java virtual machine is allocated a certain amount of memory, which it makes available to Jira applications. By default, Java virtual machines are allocated 64 MB of memory, no matter how many gigabytes of memory your server may actually have available. 64 MB is inadequate for medium to large Jira application installations, and so this needs to be increased. Seeing OutOfMemoryErrors in the logs is symptomatic of this.
Note:
- This page addresses how to increase Heap Space memory. Confirm that you're not receiving Perm Gen or GC Overhead errors.
- Make sure you do not to exceed 1024 MB as a base configuration when installing Jira in Windows 32 bit.
- For all of the following procedures, you must be logged in as a user with the Jira Administrators global permission.
On this page:
Step 1: Diagnosis
Assess root cause
Often, there is a root cause for OutOfMemory Errors that may be better to address than just increasing memory. See Jira Crashes Due to 'OutOfMemoryError Java heap space' for a discussion.
Determine Jira application usage patterns
From the top navigation bar select Administration ![]() > System. Select System support > System Info to open the System Info page. Then, scroll down the page to view the Java VM Memory Statistics section, and look at the memory graph during times of peak usage:
> System. Select System support > System Info to open the System Info page. Then, scroll down the page to view the Java VM Memory Statistics section, and look at the memory graph during times of peak usage:
This server has been allocated a maximum of 768 MB and a minimum of 256 MB (typically defined in the
setenv script which is executed by running the start-jira script). If you are trying to see whether your settings are being picked up by Jira applications, this is where to look. Here, you can see that Jira applications have reserved 742 MB, or which 190 MB is actually in use. If this Jira application instance were running out of memory, it would have reserved the maximum available (768 MB), and would be using an amount close to this.
Determine available system memory
On Windows
From the Close Programs Dialog (Press ctrl-alt-delete), select the Performance tab:
The amount marked Available is the amount in kilobytes you have free to allocate to Jira applications. On this server, we should allocate at most 214 MB.
On Linux
Run cat /proc/meminfo to view the memory usage.
Setting the -Xmx above the available amount on the server runs the risk of OutOfMemoryErrors due to lack of physical memory. If that occurs the system will use swap space, which greatly decreases performance.
Guidance
As a rule of thumb, if you have fewer than 5000 issues, Jira applications should run well with the default 768 MB. Granting Jira applications too much memory can impact performance negatively, so it is best to start with 768 MB, and make modest increases as necessary. As another data point, 40,000 works well with 768 MB to 1 GB.
Step 2: Increase available memory
Linux
To increase heap space memory in Linux installations:
- In your
<Jira application installation directory>/bin(or<Tomcat Installation Directory>/binfor Jira WAR installations), open thesetenv.shfile. - Find the sections JVM_MINIMUM_MEMORY= and JVM_MAXIMUM_MEMORY=
- See Diagnosis above and enter the appropriate values.
Windows (starting from .bat file)
To configure system properties in Windows installations when starting from the .bat file:
- In your
<Jira application installation directory>/bin(or<Tomcat Installation Directory>/binfor Jira WAR installations), open thesetenv.batfile. - Find the section set JVM_MINIMUM_MEMORY= and set JVM_MAXIMUM_MEMORY=
- See Diagnosis above and enter the appropriate values.
Windows service
There are two ways to configure system properties when starting Running Jira applications as a Windows service, either via command line or in the Windows registry.
Setting properties for Windows services via command line
To set properties for Windows services via command line
- Identify the name of the service that Jira applications are installed as in Windows (
Control Panel > Administrative Tools > Services):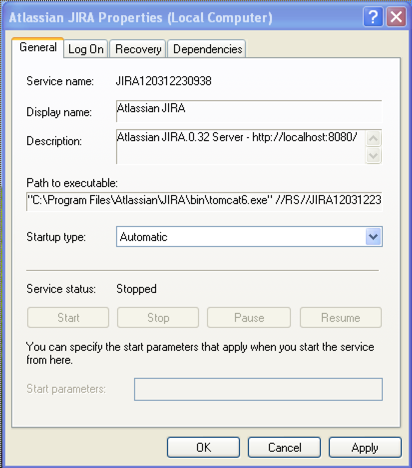
In the above example, the SERVICENAME is:
JIRA120312230938 - Open the command window from
Start > Run > type in 'cmd' > press 'Enter' cdto thebinsubdirectory of your Jira application installation directory (or thebinsubdirectory of your Tomcat installation directory if your are running the Jira WAR distribution).
For Example:cd C:\Program Files\Atlassian\JIRA\binRun the following command:
For Jira 8:
tomcat8w //ES//%SERVICENAME%.For Jira 9:
tomcat9w //ES//%SERVICENAME%.
For example: t
omcat8w //ES//JIRA120312230938- Click on the
Javatab to see the list of current start-up options: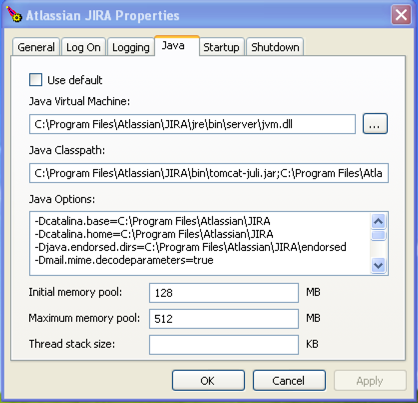
- Set the maximum memory allocation here
Setting properties for Windows services via the Windows registry
In some versions of Windows, there is no option to add Java variables to the service. In these cases, you must add the properties by viewing the option list in the registry.
To set properties for Windows services via the Windows registry
- Go to
Start > Run, and run "regedit32.exe".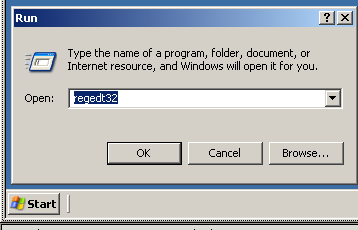
- Find the Services entry:
32-bit:HKEY_LOCAL_MACHINE > SOFTWARE > Apache Software Foundation > Procrun 2.0 > JIRA
64-bit:HKEY_LOCAL_MACHINE > SOFTWARE > Wow6432Node > Apache Software Foundation > Procrun 2.0 > JIRA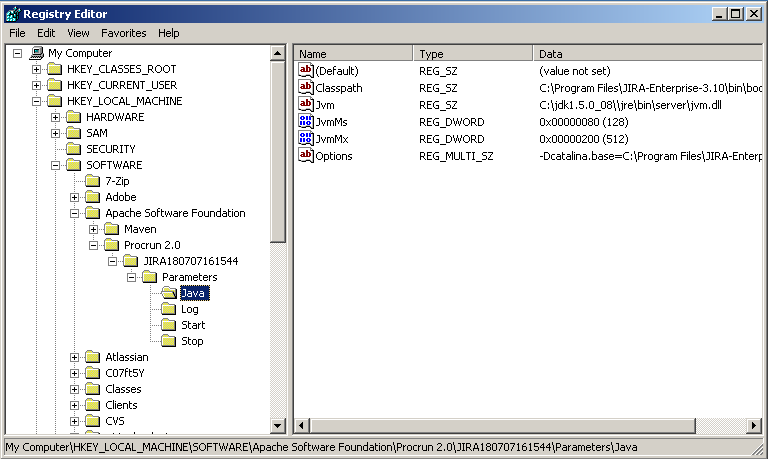
- To change existing properties, especially increasing Xmx memory, double-click the appropriate value.

- To change additional properties, double-click options.
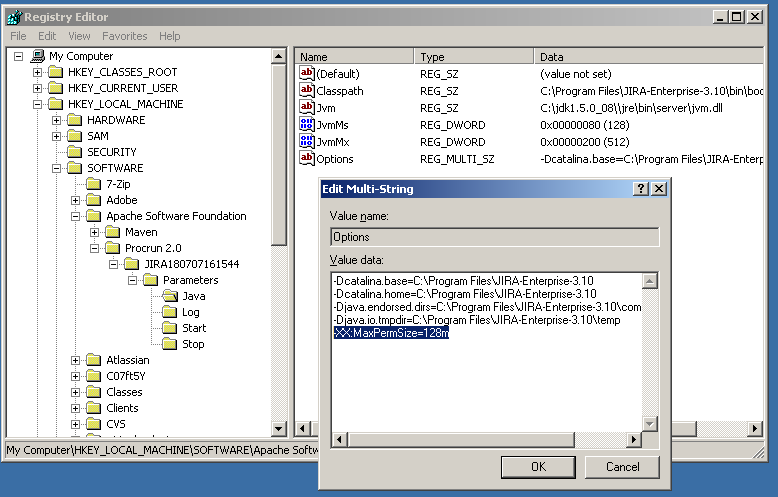
- Modify the memory allocations here.
Step 3: Verify your settings
To verify what settings are in place, check the <Jira application home directory>/logs/atlassian-jira.log or catalina.out file. A section in the startup appears like this:
JVM Input Arguments : -Djava.util.logging.config.file=/usr/local/jira/conf/logging.properties -XX:MaxPermSize=256m -Xms256m -Xmx384m -Djava.awt.headless=true -Datlassian.standalone=JIRA -Dorg.apache.jasper.runtime.BodyContentImpl.LIMIT_BUFFER=true -Dmail.mime.decodeparameters=true -Djava.util.logging.manager=org.apache.juli.ClassLoaderLogManager -Djava.endorsed.dirs=/usr/local/jira/endorsed -Dcatalina.base=/usr/local/jira -Dcatalina.home=/usr/local/jira -Djava.io.tmpdir=/usr/local/jira/temp
Look for Xmx (maximum) and Xms (minimum) settings.
This display is also available by viewing your system information.
Related content
- No related content found