Use SSH keys in Bitbucket Pipelines
You'll want to set up an SSH key in Bitbucket Pipelines if:
- your build needs to authenticate with Bitbucket or other hosting services to fetch private dependencies.
- your deployment needs to authenticate with a remote host or service before uploading artifacts.
- you want builds to use tools such as SSH, SFTP or SCP.
An SSH public and private key pair must be added to the Bitbucket Cloud repository and the public key must be added to the remote service or machine.
When you set an SSH key on a Bitbucket repository, all users with write access to the repo will have access to the remote host.
You should be able to push and pull to your Bitbucket Cloud repo with no problems. But, if you need to use SSH, for example, to use a bot account, or when branch permissions are enabled, see Set up an SSH key.
For SSH with Bitbucket repos see:
Not all available Docker images have SSH installed by default. If you are using the default pipelines image you'll be fine, but if you need to specify your own image, make sure SSH is either already installed, or install it with your script.
For example, depending on your image, including in your script:
apt-get update -y
apt-get install -y ssh
Step 1: Add an SSH key in Bitbucket
We recommend that you generate a new SSH key pair, but you can use an existing key pair if your key requirements differ from the Bitbucket 2048-bit RSA keys. Whichever way you add an SSH key, the private key is automatically added to the build pipeline (as an additional SSH key), and doesn't need to be specified in the bitbucket-pipelines.yml file.
If your Docker image already has an SSH key your build pipeline can use that key, and you don't need to add an SSH key in this step – go to Step 2!
Any SSH key you use in Pipelines should not have a passphrase.
Note that Bitbucket Pipelines supports one SSH key per repository. If you need to use more than one key, you can add them as secured Bitbucket Pipelines environment variables, and reference them in the bitbucket-pipelines.yml file. See the Use multiple SSH keys section below.
To generate a new SSH key pair (recommended):
- In the repository Settings, go to SSH keys under 'Pipelines'.
- Click Generate keys to create a new SSH key pair.
Now go to Step 2 below.
To add an existing key pair:
You can use an existing key pair if your key requirements differ from the Bitbucket 2048-bit RSA keys.
For security reasons, you should never add your own personal SSH key – you should use an existing bot key instead.
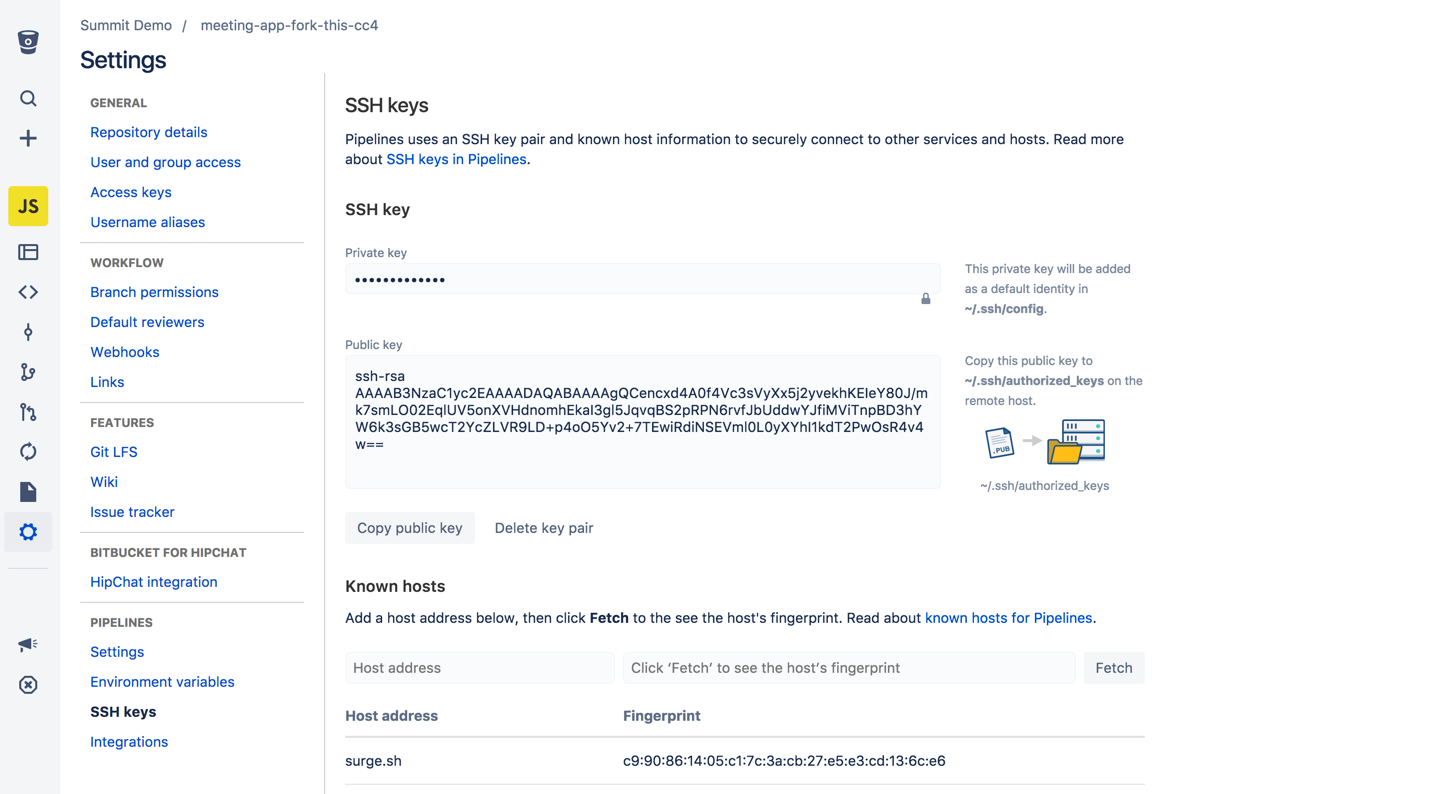
- In the repository Settings, go to SSH keys.
- Paste the private and public keys into the provided fields, then click Save key pair:

Step 2: Update the known hosts
Pipelines provides a way for you to store, and inspect, the fingerprint of a remote host, along with the host address. This allows you to visually verify that the public key presented by a remote host actually matches the identity of that host, to help you detect spoofing and man-in-the-middle attacks. It also means that future communications with that host can be automatically verified.
In the repository Settings, go to SSH keys, and add the address for the known host. Click Fetch to see the host's fingerprint:

Note that Bitbucket Pipelines automatically adds the fingerprint for the Bitbucket and GitHub sites to all pipelines (but doesn't display that in the UI shown above).
Step 3: Add the public key to a remote host
You must install the public key on the remote host before Pipelines can authenticate with that host. If you want your Pipelines builds to be able to access other Bitbucket repos, you need to add the public key to that repo.
Remote hosts
If you have SSH access to the server, you can use the ssh-copy-id command. Typically, the command appends the key to the ~/.ssh/authorized_keys file on the remote host:
$ ssh-copy-id -i my_ssh_key user@hostTest the SSH access to the server:
ssh -i ~/.ssh/my_ssh_key user@hostIf you are creating, rather than modifying the .ssh files you may need to change their permissions
- chmod 700 ~/.ssh
- chmod 600 ~/.ssh/authorized_keys
Other Bitbucket Cloud repositories
If you want your Pipelines builds to be able to access a different Bitbucket repository (other than the repo where the builds run):
- Add an SSH key to the settings for the repo where the build will run, as described in Step 1 above (you can create a new key in Bitbucket Pipelines or use an existing key).
- Add the public key from that SSH key pair directly to settings for the other Bitbucket repo (i.e. the repo that your builds need to have access to).
See Access keys for details on how to add a public key to a Bitbucket repo.
Use multiple SSH keys in your pipeline
Bitbucket Pipelines supports one SSH key per repository. However, you can use multiple keys with a pipeline by adding them as secured variables, and referencing them in the bitbucket-pipelines.yml file.
1: Generate an SSH key (if necessary)
Generate an RSA key pair without a passphrase. On Linux or OS X, you can run the following in a terminal:
$ ssh-keygen -t rsa -b 4096 -N '' -f my_ssh_key2: Encode the private key
Pipelines does not currently support line breaks in environment variables, so base-64 encode the private key by running:
$ base64 -w 0 < my_ssh_key$ base64 < my_ssh_key3: Add the key as a secure variable
There are security risks associated with passing private SSH keys as repository variables:
- Repository variables get copied to child processes that your pipelines build may spawn.
- Secured variables can be retrieved by all users with write access to a repository.
We recommend that you never pass your own personal SSH key as an repository variable, but instead generate a new SSH key-pair for Pipelines that easily be disabled if it is compromised. It may also be worth using deployment variables, which you can combine with deployment permissions to control access.
Copy the encoded key from the terminal and add it as a secured Bitbucket Pipelines environment variable for the repository:
- In the Bitbucket repository, choose Settings, then Repository variables.
- Copy the base64-encoded private key from the terminal.
- Paste the encoded key as the value for an environment variable. Make sure to check Secured.

See Variables in pipelines in Bitbucket Pipelines for more information.
4: Install the public key on a remote host
Add the public key to the remote host as described in Step 3 above.
5: Create the my_known_hosts file and add it to your repo
The known_hosts file contains the DSA host keys of SSH servers accessed by the user. It's important to verify that you're connecting to the correct remote host. Note that Bitbucket Pipelines automatically adds the fingerprint for the Bitbucket and GitHub sites to all pipelines.
Create the
my_known_hostsfile that includes the public SSH key of the remote host. You can do this by executing the following command:$ ssh-keyscan -t rsa server.example.com > my_known_hosts- Commit the
my_known_hostsfile to your repository from where your pipeline can access it.
Alternatively, you can copy an existing known_hosts file from the ~/.ssh directory of a user who has previously accessed the remote host via SSH. You can remove all unrelated lines.
6: Tie everything together in the bitbucket-pipelines.yml file
Pipelines spins up a new Docker container environment for every build. You can use the SSH key by referencing it in the bitbucket-pipelines.yml file.
To reference the SSH key for Docker containers that run your pipelines:
image: node:6    # specify your Docker image here
pipelines:
  default:
    - step:
        script:
           - mkdir -p ~/.ssh
           - cat my_known_hosts >> ~/.ssh/known_hosts
           - (umask  077 ; echo $MY_SSH_KEY | base64 --decode > ~/.ssh/id_rsa)
- ssh <user>@<host> 'echo "connected to `host` as $USER"'Note that the ssh command in the final line will use your default SSH identity. To specify a different key, use the -i option like this:
ssh -i ~/.ssh/my_other_ssh_key <user>@<host>You can also modify the last line to use scp to transfer files or git to clone files from a remote server via SSH.