Install Bitbucket Data Center
These instructions are applicable for installing Bitbucket Data Center on your own hardware.
This guide covers installing for the first time, with no existing data, or migrating your Bitbucket Server to a Data Center instance.
![]()
Other ways to install Bitbucket Data Center:
- Kubernetes - installation on a Kubernetes cluster using our Helm charts.
AWS - hassle-free deployment in AWS using our Quick Start
Azure - reference templates for Microsoft Azure deployment
Install Bitbucket Data Center on a single node
If your organization doesn't need high availability or disaster recovery capabilities right now, you can install Bitbucket Data Center without setting up a cluster.
To install Bitbucket Data Center, without setting up a cluster, follow the instructions for Bitbucket Server:
The process is almost identical to an ordinary Jira Server installation, just be sure to enter your Data Center license.
Install Bitbucket Data Center in a cluster
If your organization requires continuous uptime, scalability, and performance under heavy load, you'll want to run Bitbucket Data Center in a cluster.
See Clustering with Bitbucket for a complete overview of hardware and infrastructure considerations.
Before you begin
Install Bitbucket Data Center on the first application node
First, you'll need to install Bitbucket Data Center one node:
Download the latest installer - www.atlassian.com/software/bitbucket/download.
Make the installer executable.
Run the installer – we recommend using
sudoto run the installer as this will create a dedicated account to run Bitbucket and allow you to run Bitbucket as a service.- Follow the prompts to install Bitbucket. You'll be asked for the following info:
- Type of Bitbucket instance - the type of installation, for these instructions select Data Center.
- Installation directory - where Bitbucket will be installed.
- Home directory - where Bitbucket application data will be stored.
- TCP ports - the HTTP connector port and control port Bitbucket will run on.
Provision the shared database, filesystem, and search server
Once you've installed the first Bitbucket application node, you now need to provision the share database, shared filesystem and shared search server to use with Bitbucket Data Center.
Step 1. Provision your shared database
Set up your shared database server.
Ensure your database is configured to allow enough concurrent connections. Bitbucket Server by default uses up to 80 connections per cluster node, which can exceed the default connection limit of some databases. For example, in PostgreSQL the default limit is usually 100 connections. If you use PostgreSQL, you may need to edit your postgresql.conf file, to increase the value of max_connections, and restart Postgres.
See Connect Bitbucket to an external database for more information, and note that clustered databases are not supported.
Step 2. Provision your shared file system
A properly resourced and configured NFS server can perform well even under very heavy load. We’ve created some recommendations for setting up and configuring your file server for optimal performance.
Step 3. Migrating from an existing Bitbucket Server instance (optional)
The shared subdirectory of the Bitbucket Server home directory contains all the GIT repositories, configuration data, and other important files. When migrating from an existing Bitbucket Server instance, back up shared and restore it on the new Bitbucket Data Center’s NFS file system.
The remaining subdirectories (bin, caches, export, lib, log, plugins, and tmp) contain only caches and temporary files. You don’t need to restore them.
Step 4. Provision your search server
To set up your search server, you will
- Install the search server on a remote machine.
- Configure the search server to work with Bitbucket Data Center.
- Secure the search server with a username and password that Bitbucket will use to access the search server, with a minimum of HTTP restricted access.
- Connect the search server to Bitbucket.
There are detailed instructions on the Install and configure a remote OpenSearch server page to help you provision your remote search server.
Provision application cluster nodes
Provision cluster node infrastructure. You can automate this using a configuration management tool such as Chef, Puppet, or Vagrant, and/or by spinning up identical virtual machine snapshots.
Step 1. Configure file share mounts
NFSv3 is supported. If you’re using Bitbucket Mesh and have migrated all Git repositories to it, you can use NFSv4 for the shared home directory.
On each cluster node, mount the shared home directory as ${BITBUCKET_HOME}/shared. Note that only the ${BITBUCKET_HOME}/shared directory should be shared between cluster nodes. All other directories, including ${BITBUCKET_HOME}, should be node-local (that is, private to each node).
Example
For example, suppose your Bitbucket home directory is /var/atlassian/application-data/bitbucket , and your shared home directory is available as an NFS export called bitbucket-san:/bitbucket-shared. To configure the mount on each cluster node:
Add the following line to
/etc/fstabon each cluster node.
/etc/fstabbitbucket-san:/bitbucket-shared /var/atlassian/application-data/bitbucket/shared nfs rw,nfsvers=3,lookupcache=pos,noatime,intr,rsize=32768,wsize=32768,_netdev 0 0Mount the share on each node:
mkdir -p /var/atlassian/application-data/bitbucket/shared
sudo mount -a
Step 2. Synchronize system clocks
Ensure all your cluster nodes have synchronized clocks and identical timezone configuration. Here are some examples for how to do this:
Step 3. Install Bitbucket Data Center on each node
On each cluster node, perform the same steps from Install Bitbucket Data Center on the first application node section.
Step 4. Start the first cluster node
Edit the file ${BITBUCKET_HOME}/shared/bitbucket.properties and add the following lines:
# Use multicast to discover cluster nodes (recommended).
hazelcast.network.multicast=true

# If your network does not support multicast, you may uncomment the following lines and substitute
# the IP addresses of some or all of your cluster nodes. (Not all of the cluster nodes have to be
# listed here but at least one of them has to be active when a new node joins.)
#hazelcast.network.tcpip=true
#hazelcast.network.tcpip.members=192.168.0.1:5701,192.168.0.2:5701,192.168.0.3:5701

# The following should uniquely identify your cluster on the LAN.
hazelcast.group.name=your-bitbucket-cluster
hazelcast.group.password=your-bitbucket-clusterUsing multicast to discover cluster nodes (hazelcast.network.multicast=true) is recommended, but requires all your cluster nodes to be accessible to each other via a multicast-enabled network. If your network does not support multicast then you can set hazelcast.network.multicast=false, hazelcast.network.tcpip=true, and hazelcast.network.tcpip.members to a comma-separated list of cluster nodes instead. Only enable one of hazelcast.network.tcpip or hazelcast.network.multicast, not both.
Choose a name for hazelcast.group.name and hazelcast.group.password that uniquely identifies the cluster on your LAN. If you have more than one cluster on the same LAN (for example, other Bitbucket Data Center instances or other products based on similar technology such as Confluence Data Center) then you must assign each cluster a distinct name, to prevent them from attempting to join together into a "super cluster".
Then start Bitbucket Server. See Starting and stopping Bitbucket Server.
Then go to http://<bitbucket>:7990/admin/license, and install your Bitbucket Data Center license. Restart Bitbucket Server for the change to take effect. If you need a Bitbucket Data Center license, you can purchase one that fits your needs, or, get an evaluation license.
Install and configure your load balancer
Step 1. Configure protocols and health checks on your load balancer
Your load balancer must proxy three protocols:
| Protocol | Typical port on the load balancer | Typical port on the Bitbucket cluster nodes | Notes |
|---|---|---|---|
| HTTP | 80 | 7990 | HTTP mode. Session affinity ("sticky sessions") should be enabled using the 52-character BITBUCKETSESSIONID cookie. |
| HTTPS | 443 | 7990 | HTTP mode. Terminating SSL at the load balancer and running plain HTTP to the Bitbucket cluster nodes is highly recommended. |
| SSH | 7999 | 7999 | TCP mode. |
Your load balancer must support session affinity ("sticky sessions") using the BITBUCKETSESSIONID cookie. Bitbucket Data Center assumes that your load balancer always directs each user's requests to the same cluster node. If it does not, users may be unexpectedly logged out or lose other information that may be stored in their HTTP session.
When choosing a load balancer, it must support the HTTP, HTTPS, and TCP protocols. Note that:
- Apache does not support TCP mode load balancing.
- HAProxy versions older than 1.5.0 do not support HTTPS.
If your load balancer supports health checks of the cluster nodes, configure it to perform a periodic HTTP GET of http:// <bitbucket>:7990/status, where <bitbucket> is the cluster node's name or IP address. This returns one of two HTTP status codes:
- 200 OK
- 500 Internal Server Error
If a cluster node does not return 200 OK within a reasonable amount of time, the load balancer should not direct any traffic to it.
You should then be able to navigate to http://<load-balancer>/, where <load-balancer> is your load balancer's name or IP address. This should take you to your Bitbucket Server front page.
Example: HAProxy load balancer
If you don't have a particular preference or policy for load balancers, you can use HAProxy which is a popular Open Source software load balancer.
If you choose HAProxy, you must use a minimum version of 1.5.0. Earlier versions of HAProxy do not support HTTPS.
To check which version of HAProxy you use, run the following command:
haproxy --version
Here is an example haproxy.cfg configuration file (typically found in the location /etc/haproxy/haproxy.cfg). This assumes:
- Your Bitbucket cluster node is at address 192.168.0.1, listening on the default ports 7990 (HTTP) and 7999 (SSH).
- You have a valid SSL certificate at
/etc/cert.pem.
global
    pidfile     /var/run/haproxy.pid
    maxconn     4000
    user        haproxy
    group       haproxy
    daemon
    tune.ssl.default-dh-param 1024
defaults
    log                     global
    option                  dontlognull
    option                  redispatch
    retries                 3
    timeout http-request    10s
    timeout queue           1m
    timeout connect         10s
    timeout client          1m
    timeout server          1m
    timeout http-keep-alive 10s
    timeout check           10s
    maxconn                 3000
    errorfile               408 /dev/null	# Workaround for Chrome 35-36 bug.  See http://blog.haproxy.com/2014/05/26/haproxy-and-http-errors-408-in-chrome/

frontend bitbucket_http_frontend
    bind *:80
    bind *:443 ssl crt /etc/cert.pem ciphers RC4-SHA:AES128-SHA:AES256-SHA
    default_backend bitbucket_http_backend

backend bitbucket_http_backend
    mode http
    option httplog
    option httpchk GET /status
    option forwardfor
    option http-server-close
	#Uncomment the following line for HAProxy 1.5.
    #appsession BITBUCKETSESSIONID len 52 timeout 1h
    balance roundrobin
    cookie BITBUCKETSESSIONID prefix
	# The following 3 lines are for HAProxy 1.6+. If you're on 1.5, uncomment them.
    stick-table type string len 52 size 5M expire 30m
    stick store-response set-cookie(BITBUCKETSESSIONID)
    stick on cookie(BITBUCKETSESSIONID)
    server bitbucket01 192.168.0.1:7990 check inter 10000 rise 2 fall 5
    #server bitbucket02 192.168.0.2:7990 check inter 10000 rise 2 fall 5
    # The following "backup" servers are just here to show the startup page when all nodes are starting up
    server backup01 192.168.0.1:7990 backup
    #server backup02 192.168.0.2:7990 backup

frontend bitbucket_ssh_frontend
    bind *:7999
    default_backend bitbucket_ssh_backend
    timeout client 15m
    maxconn 50

backend bitbucket_ssh_backend
    mode tcp
    balance roundrobin
    server bitbucket01 192.168.0.1:7999 check port 7999
    #server bitbucket02 192.168.0.2:7999 check port 7999
    timeout server 15m

listen admin
    mode http
    bind *:8090
    stats enable
    stats uri /
Review the contents of the haproxy.cfg file carefully, and customize it for your environment. See http://www.haproxy.org/ for more information about installing and configuring haproxy.
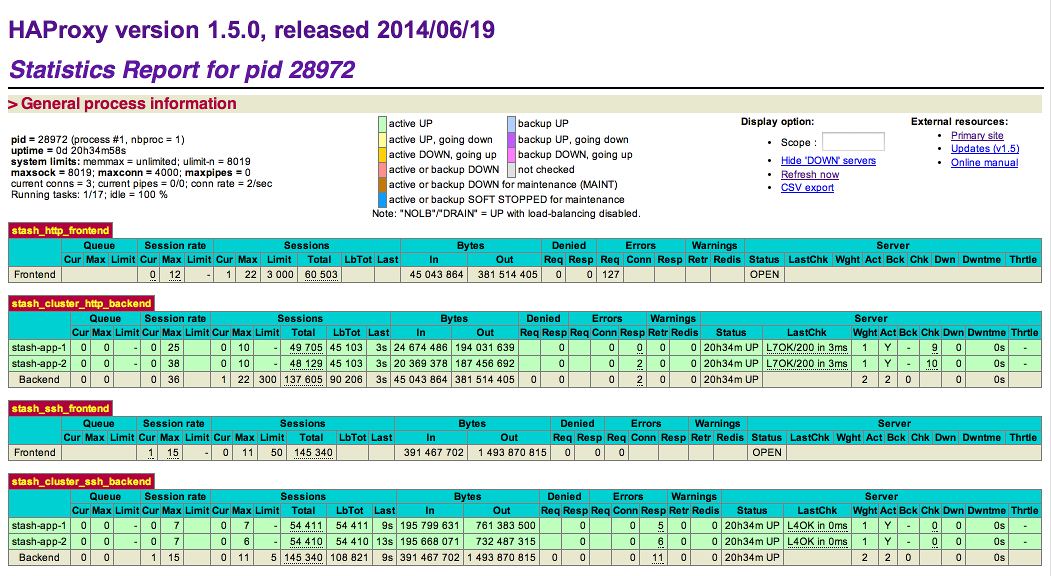
Once you have configured the haproxy.cfg file, start the haproxy service.
sudo service haproxy startYou can also monitor the health of your cluster by navigating to HAProxy's statistics page at http://<load-balancer>:8090/. You should see a page similar to this:
Step 2. Configure Bitbucket for your load balancer
If you're using HAProxy, Bitbucket needs to be configured to work with it. For example:
server.proxy-name=bitbucket.company.com
server.proxy-port=443
server.secure=true
server.require-ssl=true
Read Securing Bitbucket behind HAProxy using SSL for more details.
Step 3. Add a new Bitbucket application node to the cluster
Go to a new cluster node, and start Bitbucket Server. See Start and stop Bitbucket.
Once Bitbucket Server has started, go to https://<load-balancer>/admin/clustering. You should see a page similar to this:

Verify that the new node you have started up has successfully joined the cluster. If it does not, please check your network configuration and the ${BITBUCKET_HOME}/log/atlassian-bitbucket.log files on all nodes. If you are unable to find a reason for the node failing to join successfully, please contact Atlassian Support .
Step 4. Connect the new Bitbucket cluster node to the load balancer
If you are using your own hardware or software load balancer, consult your vendor's documentation on how to add the new Bitbucket cluster node to the load balancer.
If you are using HAProxy, uncomment these lines
server bitbucket02 192.168.0.2:7990 check inter 10000 rise 2 fall 5server bitbucket02 192.168.0.2:7999 check port 7999in your haproxy.cfg file and restart haproxy:
sudo service haproxy restartVerify that the new node is in the cluster and receiving requests by checking the logs on each node to ensure both are receiving traffic and also check that updates done on one node are visible on the other.
Congratulations!
That's it! Bitbucket Data Center is accessible from a URL like this: http://<load_balancer_IP_address>:<port>

What's next?
When setting up Bitbucket in a production environment, we recommend that you configure these aspects next:
- Connect Bitbucket Server to a user directory - manage users/groups stored in an external directory.
- Secure the Bitbucket home directory - secure the home directory against unauthorized access.
- Proxy and secure Bitbucket Server - run Bitbucket Server behind a reverse proxy and enable HTTPS access.
- Establish a data recovery plan - backup the home directory and database of your instance.
Read more about setting up Bitbucket Server for an enterprise here: Use Bitbucket in the enterprise.