Disaster recovery guide for Bitbucket Data Center
This page demonstrates how Bitbucket Data Center can be configured to implement and manage a disaster recovery strategy. It doesn't, however, cover the broader business practices, like setting the key objectives (RTO, RPO & RCO 1 ), and standard operating procedures.
A disaster recovery strategy is a key part of a business continuity plan. It defines the processes to follow in the event of a disaster to ensure your business can recover and keep operating from a standby system. This means your Bitbucket instance, and more importantly your Bitbucket managed data (source code), is available in the event that your primary system becomes unavailable.
Overview
Bitbucket Data Center 4.8 or later is required to implement the strategy described in this guide.
Before you begin, read these initial subsections to get familiar with the various components and terminology used in this guide, review the requirements that must be met to follow this guide, and introduce the example scripts used to perform actions described in this guide.
Terminology
Cold standby - This guide describes what is generally referred to as a "cold standby" strategy. That means that the standby Bitbucket instance is not continuously running and that some administrative steps need to be taken to start the standby instance in the event of a disaster scenario.
Recovery Point Objective (RPO) - How up-to-date you require your Bitbucket instance to be after a failure.
Recovery Time Objective (RTO) - How quickly you require your standby system to be available after a failure.
Recovery Cost Objective (RCO) - How much you are willing to spend on your disaster recovery solution.
What is the difference between high availability and disaster recovery?
The terms "high availability", "disaster recovery" and "failover" are often confused. To eliminate confusion we define these terms as:
High availability – A strategy to provide a specific level of availability. In Bitbucket's case, access to the application and an acceptable response time. Automated correction and failover (within the same location) are usually part of high-availability planning.
Disaster recovery – A strategy to resume operations in an alternate data center (usually in another geographic location), in the event of a disaster whereby the main data center becomes unavailable. Failover (to another location) is a fundamental part of disaster recovery.
Failover – is when one machine takes over from another machine, when the aforementioned machines fails. This could be within the same data center or from one data center to another. Failover is usually part of both high availability and disaster recovery planning.
Components
A typical deployment of Bitbucket with a standby for Disaster Recovery is depicted in the following diagram. The standby Bitbucket and Mesh instances are "cold" (i.e., not running) and the shared file server, database and (optionally) search server are "warm" (i.e., running) so that replication can occur.
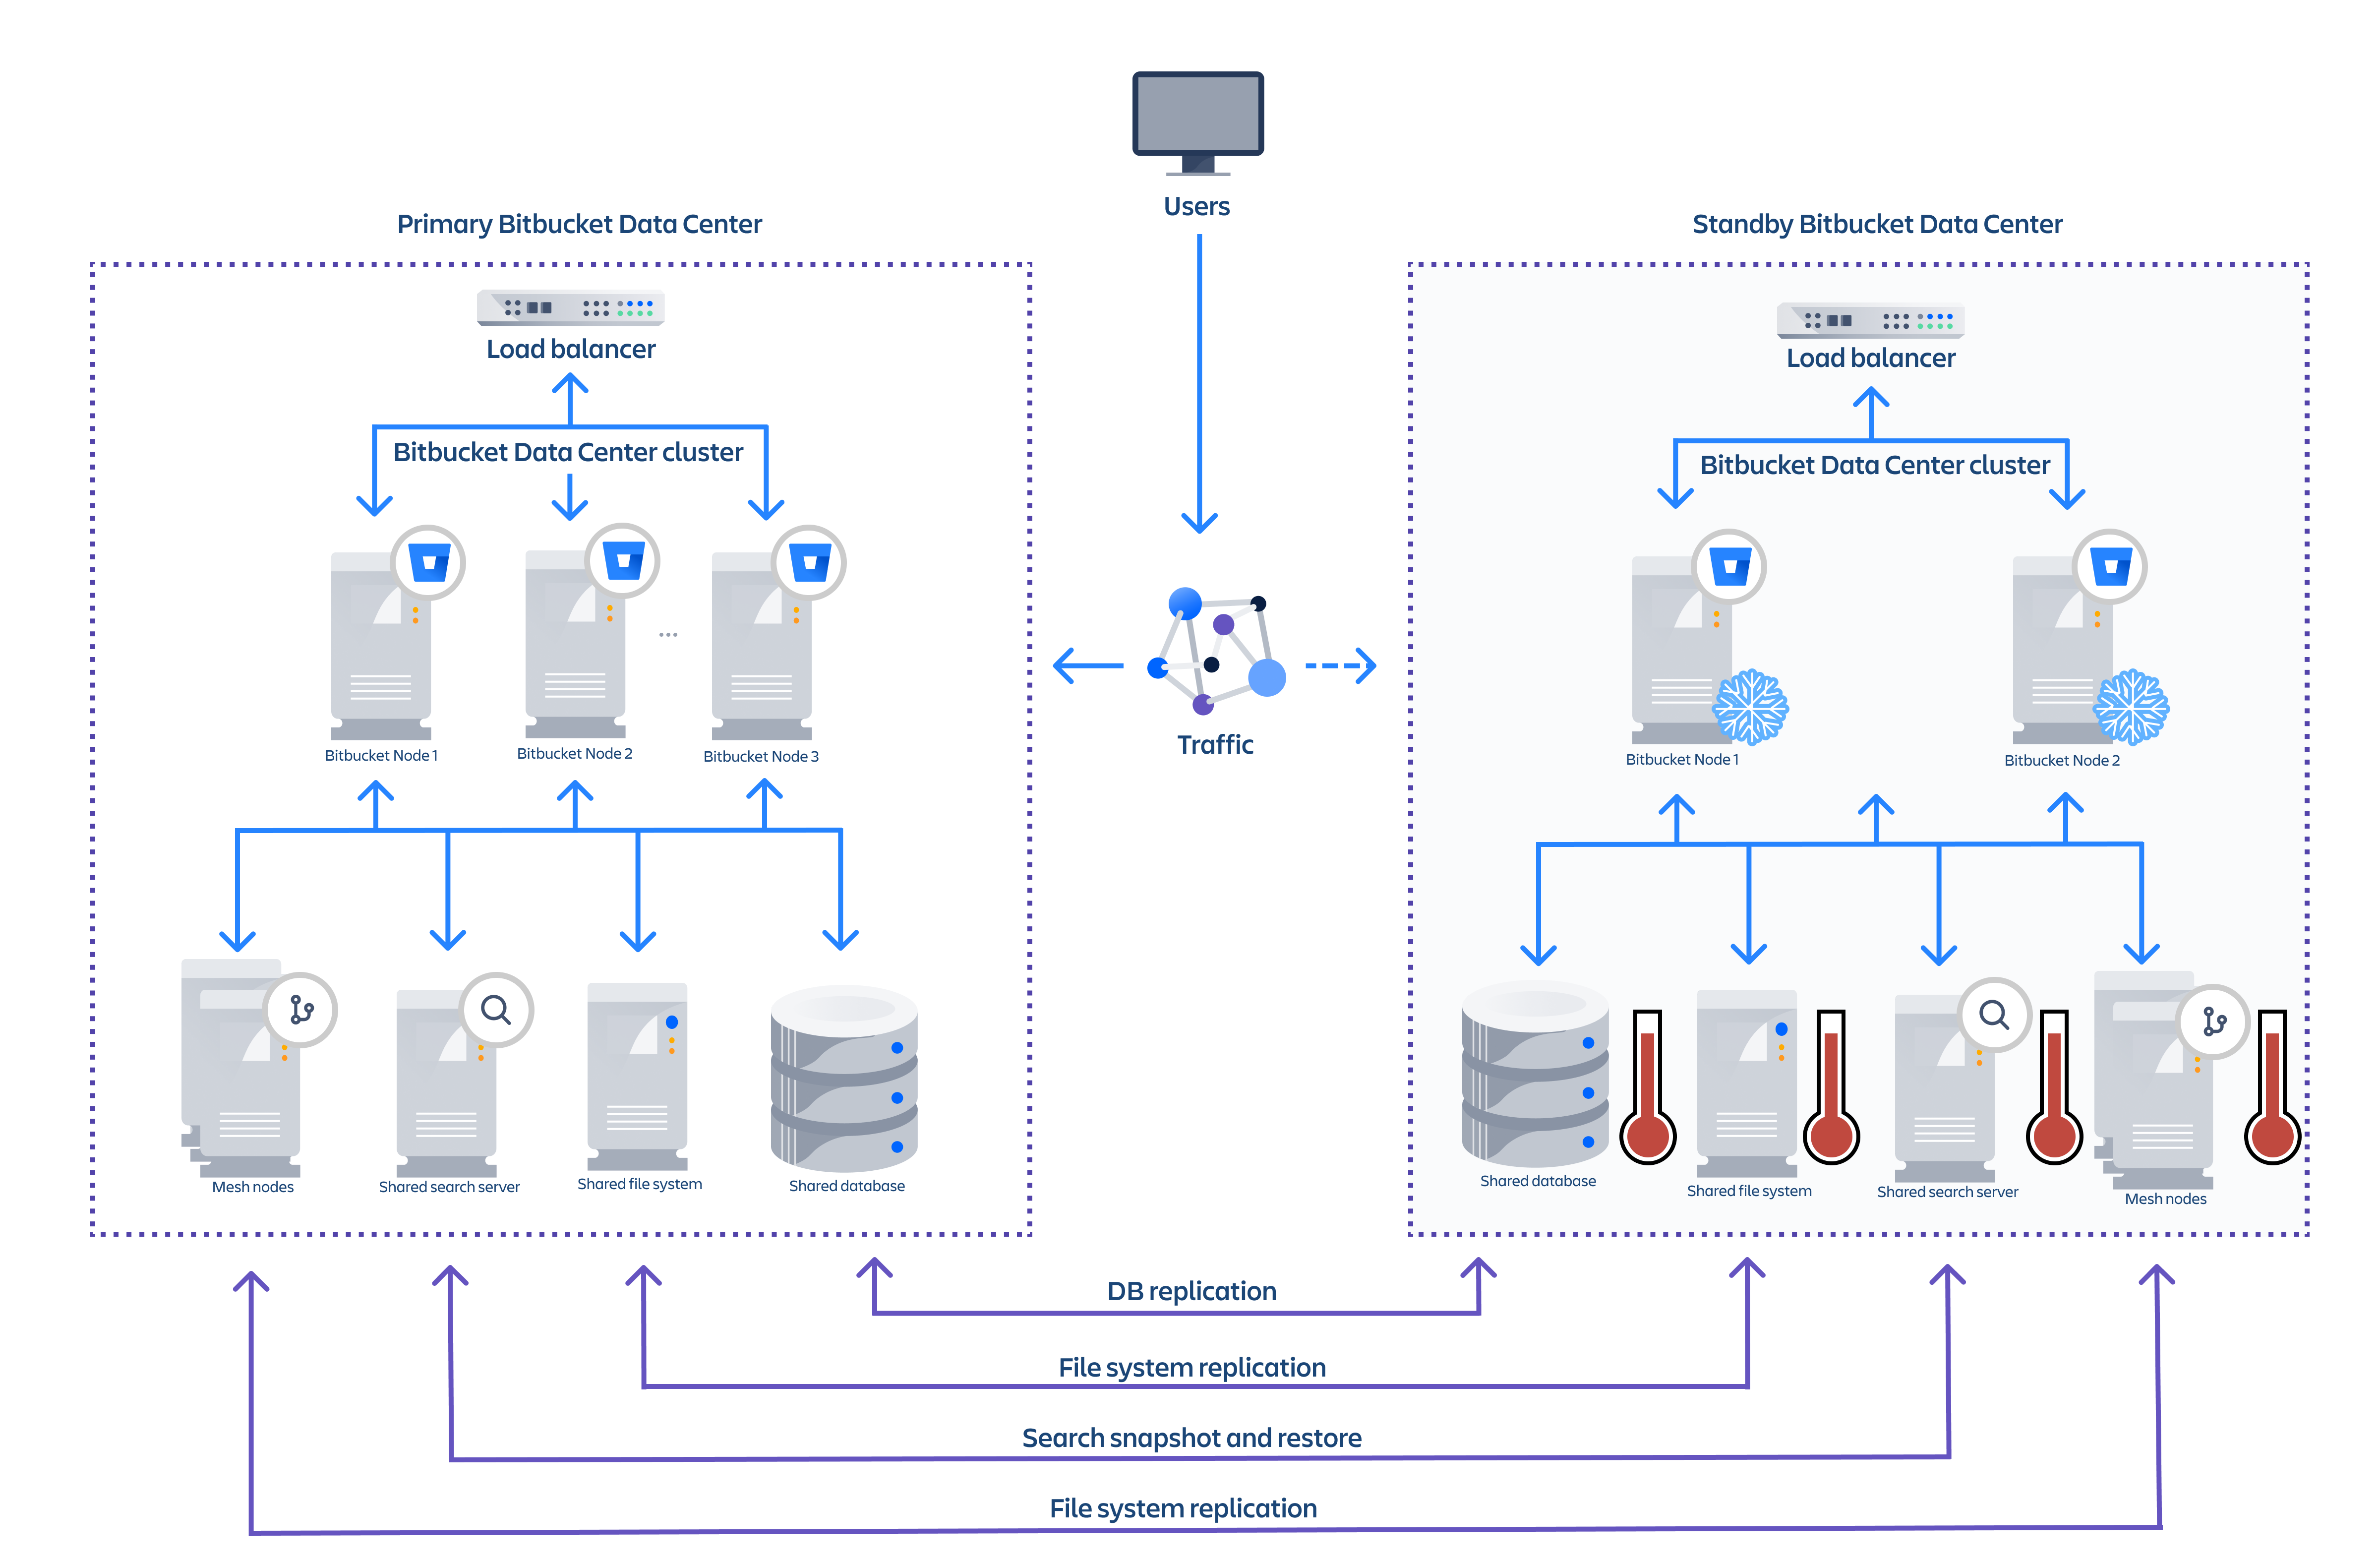
Example component diagram of a typical DR deployment.
Replication of data sources
Replication of your primary Bitbucket system to a standby system requires:
- your shared home directory to be on a file system which supports atomic snapshot-level replication to a remote standby, and
- your database to be capable of replication to a remote standby, and
- your Mesh home directories to be on a file system that supports atomic snapshot-level replication to a remote standby, if you use Mesh for managing your repositories.
File system
The shared home directory contains your repository data, log files, user-installed plugins, and so on (see Set the home directory for more detail). You need to replicate your shared home directory onto your standby file server. This process needs to be quick, reliable, and incremental to ensure the standby is as up to date as possible.
![]() You must choose a file system replication technology that will maintain the data integrity of the Git repositories on disk.
You must choose a file system replication technology that will maintain the data integrity of the Git repositories on disk. ![]()
For example, a replication technology such as RSync would not meet this requirement, as a repository might change during the transfer, causing corruption.
The best way to achieve the desired level of consistency is to use a file system which supports atomic block level snapshots. All files in the snapshot are effectively frozen at the same point in time regardless of how long the replication to the standby takes. The example scripts implement ZFS as the file system for the Bitbucket shared home, as it allows light weight snapshots which can be transferred and restored on a remote system.
Database
The database contains data about pull requests, comments, users, groups, permissions, and so on. You need to replicate your database and continuously keep it up to date to satisfy your RPO.
See the Supported platforms - Databases section for more details about choosing a supported database technology.
Mesh nodes
If you use Mesh to manage your Git repositories, you’ll also need to create cold standby instances for each of your Mesh nodes. We’re exploring support for multi-region deployments of Mesh to ensure each repository is replicated to multiple regions. In such a deployment, Mesh would support hot standby nodes that would be kept in sync by Mesh itself.
For now, you’ll need to replicate each Mesh node’s home directory to its corresponding standby instance. Similar to the replication of the main cluster’s shared home directory, this process needs to be quick, reliable, and incremental to ensure the standby is as up-to-date as possible. In addition, you must use a file system replication technology that supports atomic snapshots to maintain the data integrity of Git repositories on disk.
Search server
This is not technically a key data store as its data derives from a combination of database and repository content. Bitbucket search detects an out of date index and incrementally reconstructs it. However, rebuilding the search index, especially for large installations, can be time consuming, during which search functionality will be impacted.
When the search server is unavailable the core Bitbucket functionality continues to operate normally. Only the search functionality is impacted if the search server is offline or out of date. Bitbucket will serve search queries while its index is being rebuilt, but the search results will not be entirely complete or accurate until the index is completely rebuilt. The search server can be replicated at a lower frequency than the database and file system as Bitbucket only incrementally updates its search index. For example if the search index is a day out of sync, only the changes for the last day need to be indexed. Here are some examples of strategies for search server replication:
- No replication – Bitbucket will rebuild the search index when the standby instance comes online
- Backup and restore (low frequency) – Make regular backups of the search server and restore them on the standby instance. Bitbucket will bring the search index up to date when the standby comes online
- Backup and restore (high frequency) – Snapshot the primary and restore snapshot on the standby at a higher frequency to minimize time to bring the index up to date when the standby comes online
The example scripts implement search server snapshots using either s3 or the shared filesystem as the snapshot repository. These scripts will configure the snapshot repository and take manual snapshots.
These data sources comprise the entire state of your Bitbucket instance. Files added through other means, such as files added by plugins, will require another means of replication. In these cases, contact the plugin vendor for recommendations.
Worked example scripts
Atlassian provides some worked example scripts in the atlassian-bitbucket-diy-backup repository that can optionally be used to automate the Disaster Recovery replication and failover process. Worked examples are currently provided only for the following technologies:
| File system and Mesh home directories | Database |
|---|---|
|
These scripts are meant to serve as a starting point, rather than a fully worked DR solution, and should only be used after first configuring and customizing them for your specific environment.
To get the scripts, clone or pull the latest version of atlassian-bitbucket-diy-backup.
git clone git@bitbucket.org:atlassianlabs/atlassian-bitbucket-diy-backup.gitThe scripts must be configured before use by copying the appropriate bitbucket.diy-backup.vars.sh.example to bitbucket.diy-backup.vars.sh, and editing to match your environment. Valid configurations for Disaster Recovery are:
STANDBY_HOME_TYPE=

                zfs
STANDBY_DATABASE_TYPE=

                  amazon-rds


               or   postgresql
You must configure additional variables for these home and database types, and install the same scripts on both the primary and standby systems to use them for Disaster Recovery. Refer to bitbucket.diy-backup.vars.sh.example in the atlassian-bitbucket-diy-backup repository for more information on configuring the scripts for Disaster Recovery.
Update to the latest version of the backup scripts
When you create an EBS snapshot, the scripts now tag it with the name of the EBS volume. This 'Device' tag allows the snapshot to be automatically cleaned up, and without it you cannot restore your snapshot.
If you took your snapshot with scripts created before 18 September 2018, it won't have a 'Device' tag and you won't be able to restore it. To fix this, use the AWS console to add a tag to the EBS snapshot with with "Device" as the key and "<device_name>" as the value. <device_name> should be the device name of the EBS volume holding the shared home directory (e.g. "Device" : "/dev/xvdf").
Setting up a standby system
Step 1. Install Bitbucket Data Center 4.8 or later
Install Bitbucket Data Center on the standby instance the same way you would set up a primary instance. The standby instance is effectively an exact replica of the primary instance, and therefore requires all the components deployed in the primary to be deployed in the standby. This includes a single node or clustered data center instance, database, search server and a file server to serve the shared home folder. See Installing Bitbucket Data Center for specific, detailed installation procedures.
DO NOT start Bitbucket on the standby
If you start the Bitbucket service before the failover process, the database and file server replication may fail, preventing the standby from serving as a replica. Starting your standby instance to test your setup is discussed later in the document in the section Disaster recovery testing.
If you use Mesh to manage your repository data, provision a standby Mesh node for each node in your primary instance. Install Mesh on the standby instance the same way you would set up the primary instance, but DO NOT start Mesh on the standby and don’t register the node with Bitbucket.
Step 2. Set up replication to the standby instance
This section contains instructions for setting up replication to your standby instance, so that in the event of a disaster you can failover with minimal data loss.
Set up file server replication - Set up your standby file server as a replica of your primary. Only the volume containing Bitbucket's shared home directory and any added data stores need to be replicated. Refer to your file server vendor's documentation for more information.
Set up Mesh home directory replication - For each of your Mesh nodes, set up the standby node as a replica of the primary node. Only the volume containing Mesh's home directory need to be replicated. Refer to your file server vendor's documentation for more information.
Set up database replication - Set up your standby database as a read replica of your primary database. Refer to your database vendor's documentation for more information.
Set up search server replication (optional) - The developers of Elasticsearch, provide detailed instructions on setting up snapshot repositories and how the snapshots contained in these repositories can be transferred to the standby cluster. See their article titled Snapshot And Restore for more information. The example scripts will configure the snapshot repository and take manual snapshots using either an s3 or shared filesystem repository.
Step 3. Initiate replication
Once you setup replication, ensure the primary instance is replicating to the standby instance. The method of replication varies depending on the chosen technology. Once set up correctly, most database replication technologies are automatic and do not require ongoing manual steps. File system replication technologies may require the ongoing transfer of snapshots from the primary system to the standby to be automated (for example, via cron).
Disaster recovery testing
Practice makes perfect, and this applies to verifying your DR failover process, but there is a serious caveat. As Bitbucket's configuration lives in the shared home folder which is replicated from the primary, the settings in the bitbucket.properties file points at production instances, which must be changed before starting the standby instance for testing.
You should exercise extreme care when testing any disaster recovery plan. Simple mistakes could cause your live instance to be corrupted, for example, if testing updates are inserted into a production database. You may detrimentally impact your ability to recover from a real disaster while testing your disaster recovery plan.
It is important to note that your standby instance will be configured as if it was the primary, which can cause issues when testing your disaster recovery plan. When running Bitbucket in disaster recovery mode, the integrity checker may attempt to correct errors it finds when the file server is out of sync with the database. This includes merging, re-opening, and declining pull requests which can cause Jira tickets to update via applinks, and could also send out email notifications.
Before testing your DR deployment
Before testing, isolate your standby instance!
Keep the standby data center as isolated as possible from production systems during testing. You will need to prevent replication from the primary whilst testing your standby instance.
To ensure your standby instance is isolated from your primary instance
Isolate your database - Temporarily pause all replication to the standby database, then promote the standby database.
Isolate your file system - Temporarily pause replication to the standby file system, then promote the standby file system.
Isolate your Mesh nodes - Temporarily pause replication to each of your standby Mesh nodes' home directory, then promote the standby file system.
- Edit the
bitbucket.propertiesfile on the standby - Update thebitbucket.propertiesfile located in the Bitbucket shared home on the standby file server. C hange these properties:- The JDBC connection properties.
- The search server connection properties.
- Set
disaster.recovery=true. - Update any other settings that point at production instances to use their standby counterpart.
Performing the disaster recovery testing
Once you have isolated your standby instance, you can now test your disaster recovery plan.
To test your DR deployment
- Ensure that the standby database has been promoted and is writable.
- Ensure that the new shared home directory is ready.
- For each of your Mesh nodes, ensure that the new home directory is ready and start Mesh.
- Ensure your
bitbucket.propertiesfile is correctly configured. - Start Bitbucket.
- Monitor the Bitbucket log file and check for consistency issues, as described in Running integrity checks in Bitbucket Data Center.
After testing, reset your DR deployment
Resetting your DR deployment involves restoring the standby components into a state whereby replication can occur, and this state differs based on the chosen file server and database replication technology. In many cases it may be easier to setup your standby infrastructure again.
To reset your DR deployment
- Once validation of the standby instance is complete, stop Bitbucket.
- Restore the file server to a state in which replication can begin.
- Restore each of Mesh nodes to a state in which replication can begin.
- Restore the database to a state in which replication can begin.
Handling a failover
In the event your primary instance is unavailable, you need to failover to your standby system. This section describes how to do this, including instructions on how to check the data in your standby system.
To failover to your standby instance
Promote your standby database - Ensure the standby database is ready to accept connections and can no longer receive any further updates from the primary. Refer to your database vendor's documentation for more information.
Promote your standby file server - Ensure the standby file server can not receive any further updates from the primary. Refer to your file server vendor's documentation for more information.
Promote and start your standby Mesh nodes - For each Mesh node:
a. Ensure the the standby Mesh node can not receive any further updates from its corresponding primary. Refer to your file system provider’s documentation for more information.
b. Once the Mesh home directory has been promoted, start Mesh.
c. Connect to the (promoted) standby database and update the Mesh node URL to the (promoted) standby Mesh node instead of the primary.d. If the availability zones of the new nodes differs then update them too. Note that if this change is made, all nodes must consistently remain in their own availability zone. For example ifupdate bb_mesh_node set rpc_url='<standby_url>' where rpc_url='<primary_url>';AZ-1is renamed toAZ-2then all nodes that were inAZ-1also need to be inAZ-2.update bb_mesh_node set availability_zone='<new_az>' where availability_zone='<primary_az>';
Edit the
bitbucket.propertiesfile on the standby - Update thebitbucket.propertiesfile located in the Bitbucket shared home on the standby file server. Setdisaster.recovery=true, and ensure all the properties are appropriate for the standby environment. At a minimum, check that these properties are defined:disaster.recovery=true
jdbc.url=<the URL of your standby database>
plugin.search.config.baseurl=<the URL of your standby search server>
hazelcast.network.tcpip.members=<the IP addresses of your standby cluster nodes>
Note that during normal replication,
bitbucket.propertieson the standby is identical to the primary system. During failover, it is important to ensure the configuration of yourbitbucket.propertiesfile matches the standby system's configuration before you start Bitbucket on the standby, or the standby may not start or attempt to connect to services in the primary's environment.Start Bitbucket on one node in the standby instance.
Monitor the Bitbucket log file and check for consistency issues, as described in Running integrity checks in Bitbucket Data Center.
If required, start the other Bitbucket nodes.
Update your DNS, HTTP Proxy, or other front end devices to route traffic to your standby server.
Update the mail server configuration if the mail server differs from the production mail server.
- If you’re using Mesh, continue to monitor the Bitbucket logs and check for failing pushes; they may be an indication of inconsistent repository replicas. For any such repository, try to push a new branch or tag to the repository to trigger repairs.
Returning to the primary instance
In most cases, you'll want to return to using your primary instance after you've resolved the problems that caused the disaster. There are basically two approaches for this:
- Schedule a reasonably-sized outage window. Take a full backup of the standby system's home directory and database (for example, with the tools described in Data recovery and backups), and restore it on the primary system.
- Take a full backup of each Mesh node’s home directory and restore it on the primary system.
- Run the replication and failover steps in reverse, where the standby system now takes the role of the primary, and the original primary system acts as a standby until you cut over.
Other resources
Troubleshooting
If you encounter problems after failing over to your standby instance, check these FAQs for guidance: