Configuring JMX Monitoring to use SSL

Still need help?

The Atlassian Community is here for you.

Ask the community

Platform notice: Server and Data Center only. This article only applies to Atlassian products on the Server and Data Center platforms.

Support for Server* products ended on February 15th 2024. If you are running a Server product, you can visit the Atlassian Server end of support announcement to review your migration options.

*Except Fisheye and Crucible

Summary

Bitbucket Server and Data Center exposes JMX Managed Beans (MBeans) for monitoring application performance and resource consumption. Please see the Enabling JMX counters for performance monitoring documentation for the procedures on how to enable it and to see the list of metrics that can be monitored.

This article is a supplement and describes how to configure JMX monitoring to use Secure Sockets Layer (SSL).

Solution

Two-way authentication with SSL

The diagram below illustrates what's required to configure JMX monitoring with SSL: jmx ssl

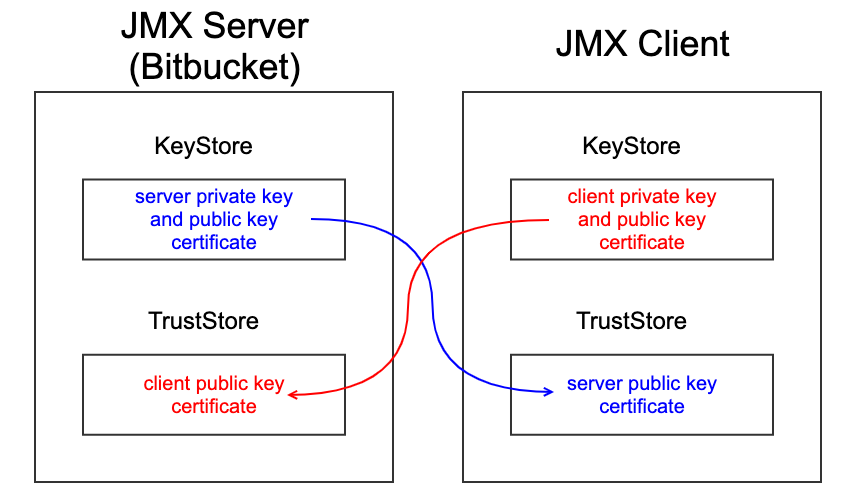
The JMX Server and the JMX client have their respective KeyStores and TrustStores, which contain cryptographic artifacts used for public-key cryptography. The KeyStore contains the key pair, which consists of a private key and a certificate with the public key. The TrustStore contains the trusted public certificates. The JMX Client needs to have the JMX Server's public key certificate in its TrustStore, and vice versa.

Set up

Using self-signed certificates

Here are sample procedures for setting up the required components using self-signed certificates:

JMX Server
JMX Server
  1. Generate the key pair for the JMX Server using the keytool command.

    $JAVA_HOME/bin/keytool -genkey -alias <alias> -keyalg RSA -sigalg SHA256withRSA -keystore </path/to/keystore>
  2. Export the self-signed certificate for the JMX Server

    $JAVA_HOME/bin/keytool -export -rfc -alias <alias> -file file.cer -keystore </path/to/keystore>
  3. Copy the exported certificate to a location on the JMX Client
       
  4. Import the certificate into the TrustStore of the JMX Client

    $JAVA_HOME/bin/keytool -import -alias <alias> -file file.cer -keystore </path/to/truststore>
JMX Client

Repeat the procedures above for the JMX Client. In steps 3 and 4, the destination where the certificate will be imported to would be the JMX Server.


Using certificates from a Certification Authority (CA)

Here are procedures adapted from the Tomcat documentation on installing certificates from a CA. The procedures are the same for both the JMX Server and JMX Client.

JMX Server and JMX Client
  1. Generate the key pair for the JMX Server using the keytool command.

    $JAVA_HOME/bin/keytool -genkey -alias <alias> -keyalg RSA -sigalg SHA256withRSA -keystore </path/to/keystore>
  2. Generate a Certificate Signing Request (CSR)

    $JAVA_HOME/bin/keytool -certreq -keyalg RSA -alias <alias> -file certreq.csr -keystore </path/to/keystore>
  3. Submit the generated file called certreq.csr to your chosen certificate authority. Refer to the documentation on the CA's website to find out how to do this.

  4. Download/receive the files from the CA.

  5. Import the certificate chain into the keystore

    $JAVA_HOME/bin/keytool -import -alias <alias> -keystore </path/to/keystore> -trustcacerts -file <chain certificate file>


  6. Import the certificate into the keystore

    $JAVA_HOME/bin/keytool -import -alias <alias> -keystore </path/to/keystore> -file <certificate file>


Bitbucket JMX Server configuration

JMX settings for Bitbucket can be configured in the <BITBUCKET_INSTALL_DIR>/bin/set-jmx-opts.sh file.

The script already contains variables that can be set to configure JMX to use SSL.

Here are the variables to update:

VariableDescription
JMX_REMOTE_AUTH

Authentication to use for remote JMX access.

Value should be set to "ssl"

RMI_SERVER_HOSTNAMEIP address / host name of this server that is resolvable by JMX clients
JMX_REMOTE_PORTPort for remote JMX support, e.g. 3333
JMX_REMOTE_RMI_PORTrandom port for RMI data transfer, e.g. 3334
JAVA_KEYSTOREFull path to the Java keystore which must contain Bitbucket's key pair used for SSL authentication for JMX
JAVA_KEYSTORE_PASSWORDPassword for JAVA_KEYSTORE
JAVA_TRUSTSTOREFull path to the Java truststore which must contain the client certificates accepted by Bitbucket for SSL authentication of JMX.
JAVA_TRUSTSTORE_PASSWORDPassword for JAVA_TRUSTSTORE

After setting these, restart Bitbucket.

Run JMX Client with SSL

In this sample, jconsole is used as the JMX client.

Run jconsole  and include the following arguments:

ArgumentDescription
javax.net.ssl.keyStoreJMX Client KeyStore

javax.net.ssl.keyStorePassword

KeyStore password

javax.net.ssl.trustStore

JMX Client TrustStore

javax.net.ssl.trustStorePassword

TrustStore password

Sample command:

jconsole -J-Djavax.net.ssl.keyStore=/path/to/keystore \
-J-Djavax.net.ssl.keyStorePassword=changeit \
-J-Djavax.net.ssl.trustStore=/path/to/jre/lib/security/cacerts \
-J-Djavax.net.ssl.trustStorePassword=changeit

In the "New Connection" screen in jconsole , type in the server hostname and port to connect to and click "Connect". Username and password would not be required to connect to the JMX Server. This will initiate a connection to the JMX Server (Bitbucket) using SSL.

Reference: Remote Monitoring with JConsole with SSL Enabled  

Only Server is authenticated with SSL

If for any reason, it is not possible to generate the required key pair for the JMX Client, JMX monitoring can be configured to authenticate the JMX Server with SSL while authenticating the JMX Client with the default password authentication method.

Set up

Using a self-signed certificate
JMX Server
  1. Generate the key pair for the JMX Server using the keytool command.

    $JAVA_HOME/bin/keytool -genkey -alias <alias> -keyalg RSA -sigalg SHA256withRSA -keystore </path/to/keystore>
  2. Export the self-signed certificate for the JMX Server

    $JAVA_HOME/bin/keytool -export -rfc -alias <alias> -file file.cer -keystore </path/to/keystore>
  3. Copy the exported certificate to a location on the JMX Client
       
  4. Import the certificate into the TrustStore of the JMX Client

    $JAVA_HOME/bin/keytool -import -alias <alias> -file file.cer -keystore </path/to/truststore>
Using a certificate from a Certification Authority (CA)
JMX Server
  1. Generate the key pair for the JMX Server using the keytool command.

    $JAVA_HOME/bin/keytool -genkey -alias <alias> -keyalg RSA -sigalg SHA256withRSA -keystore </path/to/keystore>
  2. Generate a Certificate Signing Request (CSR)

    $JAVA_HOME/bin/keytool -certreq -keyalg RSA -alias <alias> -file certreq.csr -keystore </path/to/keystore>
  3. Submit the generated file called certreq.csr to your chosen certificate authority. Refer to the documentation on the CA's website to find out how to do this.

  4. Download/receive the files from the CA.

  5. Import the certificate chain into the keystore

    $JAVA_HOME/bin/keytool -import -alias <alias> -keystore </path/to/keystore> -trustcacerts -file <chain certificate file>


  6. Import the certificate into the keystore

    $JAVA_HOME/bin/keytool -import -alias <alias> -keystore </path/to/keystore> -file <certificate file>


Bitbucket JMX Server configuration

  1. Create a JMX password file for secure access to JMX monitoring. Follow the JMX password file setup procedures

  2. Create a JMX SSL properties file
    It is just a text (.properties) file with two entries:

    javax.net.ssl.keyStore=<path/to/keystore>
    
    javax.net.ssl.keyStorePassword=<keystore password>

    Change the access permissions to this file to restrict access:

    chmod 600 <properties file>


  3. Update the <BITBUCKET_INSTALL_DIR>/bin/set-jmx-opts.sh file and use the modified script below:

    Expand to view the script
    #-----------------------------------------------------------------------------------
    # JMX
    #
    # JMX is enabled by selecting an authentication method value for JMX_REMOTE_AUTH and then configuring
    # related the variables.
    #
    # See http://docs.oracle.com/javase/7/docs/technotes/guides/management/agent.html for more information
    # on JMX configuration in general.
    #-----------------------------------------------------------------------------------
    
    # Set the authentication to use for remote JMX access. Anything other than "password" or "ssl" will
    # cause remote JMX access to be disabled.
    #
    JMX_REMOTE_AUTH=ssl
    
    # The port for remote JMX support if enabled
    #
    if [ -z "${JMX_REMOTE_PORT}" ]; then
        JMX_REMOTE_PORT=3333
    fi
    
    # If `hostname -i` returns a local address then JMX-RMI communication may fail because the address returned
    # by JMX for the RMI-JMX stub will not resolve for non-local clients. To fix this you will need to explicitly
    # specify the IP address / host name of this server that is reachable / resolvable by JMX clients. e.g.
    # RMI_SERVER_HOSTNAME="non.local.name.of.my.bitbucket.server"
    #
    RMI_SERVER_HOSTNAME=<hostname>
    
    # After authentication JMX-RMI will choose a random port for RMI data transfer. If running inside a Docker
    # container or behind a strict firewall communication may fail because the randomly chosen port is not open. 
    # To fix this you can manually specify the RMI data port. The RMI data port can be set to the same value as  
    # JMX_REMOTE_PORT, although this is not necessary, e.g. JMX_REMOTE_RMI_PORT=3333
    #
    JMX_REMOTE_RMI_PORT=3334
    
    #-----------------------------------------------------------------------------------
    # JMX username/password support
    #-----------------------------------------------------------------------------------
    
    # The full path to the JMX username/password file used to authenticate remote JMX clients
    #
    JMX_PASSWORD_FILE=<path to JMX password file>
    
    #-----------------------------------------------------------------------------------
    # JMX SSL support
    #-----------------------------------------------------------------------------------
    
    # The full path to the Java keystore which must contain Bitbucket's key pair used for SSL authentication for JMX
    #
    #JAVA_KEYSTORE=
    
    # The password for JAVA_KEYSTORE
    #
    #JAVA_KEYSTORE_PASSWORD=
    
    # SSL Properties file
    JMX_PROPERTIES_FILE=<path to JMX SSL properties file>
    
    
    # The full path to the Java truststore which must contain the client certificates accepted by Bitbucket for
    # SSL authentication of JMX
    #
    #JAVA_TRUSTSTORE=
    
    # The password for JAVA_TRUSTSTORE
    #
    #JAVA_TRUSTSTORE_PASSWORD=
    
    if [ -n "$RMI_SERVER_HOSTNAME" ]; then
        RMI_SERVER_HOSTNAME="-Djava.rmi.server.hostname=${RMI_SERVER_HOSTNAME/-Djava.rmi.server.hostname=/}"
    fi
    
    if [ -n "$JMX_REMOTE_RMI_PORT" ]; then
        JMX_REMOTE_RMI_PORT="-Dcom.sun.management.jmxremote.rmi.port=${JMX_REMOTE_RMI_PORT/-Dcom.sun.management.jmxremote.rmi.port=/}"
    fi
    
    if [ "$JMX_REMOTE_AUTH" = "password" ]; then
        if [ -z "$JMX_REMOTE_PORT" ]; then
            echo -e "\nRemote JMX is enabled, but no port has been configured."
            echo "Edit set-jmx-opts.sh and define JMX_REMOTE_PORT"
            return 1
        fi
    
        if [ -z "$JMX_PASSWORD_FILE" ] || [ ! -f "$JMX_PASSWORD_FILE" ]; then
            echo -e "\nRemote JMX with username/password authentication is enabled, but a password"
            echo "file has not been configured. Edit set-jmx-opts.sh and define JMX_PASSWORD_FILE"
            return 1
        fi
    
        JMX_OPTS="-Dcom.sun.management.jmxremote.port=${JMX_REMOTE_PORT} ${JMX_REMOTE_RMI_PORT} ${RMI_SERVER_HOSTNAME} -Dcom.sun.management.jmxremote.ssl=false -Dcom.sun.management.jmxremote.password.file=${JMX_PASSWORD_FILE}"
        export JMX_OPTS
    
    elif [ "$JMX_REMOTE_AUTH" = "ssl" ]; then
        if [ -z "$JMX_REMOTE_PORT" ]; then
            echo -e "\nRemote JMX is enabled, but no port has been configured."
            echo "Edit set-jmx-opts.sh and define JMX_REMOTE_PORT"
            return 1
        fi
    
        if [ -z "$JMX_PASSWORD_FILE" ] || [ ! -f "$JMX_PASSWORD_FILE" ]; then
            echo -e "\nRemote JMX with SSL authentication is enabled, but a password"
            echo "file has not been configured. Edit set-jmx-opts.sh and define JMX_PASSWORD_FILE"
            return 1
        fi
    
        if [ -z "$JMX_PROPERTIES_FILE" ] || [ ! -f "$JMX_PROPERTIES_FILE" ]; then
            echo -e "\nRemote JMX with SSL authentication is enabled, but the file"
            echo -e " that contains the keystore properties has not been"
            echo "configured. Edit set-jmx-opts.sh and define JMX_PROPERTIES_FILE"
            return 1
        fi
    
        export JMX_OPTS="-Dcom.sun.management.jmxremote.port=${JMX_REMOTE_PORT} ${RMI_SERVER_HOSTNAME} -Dcom.sun.management.jmxremote.ssl=true -Dcom.sun.management.jmxremote.ssl.config.file=${JMX_PROPERTIES_FILE} -Dcom.sun.management.jmxremote.password.file=${JMX_PASSWORD_FILE}"   
    fi

    Variables to update:

    VariableDescription
    RMI_SERVER_HOSTNAMEIP address / host name of this server that is reachable / resolvable by JMX clients
    JMX_REMOTE_PORTPort for remote JMX support, e.g. 3333
    JMX_REMOTE_RMI_PORTRandom port for RMI data transfer, e.g. 3334
    JMX_PASSWORD_FILEPath to JMX password file in Step #1 above
    JMX_PROPERTIES_FILEPath to JMX SSL properties file in Step #2 above

Run JMX Client

Run jconsole  (no additional arguments required). In the "New Connection" screen in jconsole , type in the server hostname and port to connect to and click "Connect". Enter the username and password configured in the JMX password file to connect to the JMX Server.

Related Link

Bitbucket Data Center sample deployment and monitoring strategy


Last modified on Dec 22, 2022

Was this helpful?

Yes
No
Provide feedback about this article
Powered by Confluence and Scroll Viewport.