1. Clover for Eclipse in 10 minutes
This short guide will learn you how to install and use Clover in 10 minutes.
Installing the plugin
- Select from the menu "Help | Install new software".
- Click "Add" button and enter http://update.atlassian.com/eclipse/clover then click OK.
- Select "Clover 4" and "Clover 4 Ant Support" features. Disable the "Contact all update sites..." checkbox (for faster installation). Click "Next" button twice.
- Accept license agreement, click "Finish", click "OK" for warning about unsigned content, click "Restart now".

Entering license key
Your Clover-for-Eclipse just downloaded should be shipped with a 30-day evaluation key. You can also obtain new license keys on http://my.atlassian.com site.
- Click Window > Preferences > Clover > License.
- Paste the license key (note that the key contains newline characters). Click OK.
Enabling Clover for Java project
Right click on a project in "Package Explorer" view, select "Clover > Enable on this Project". If you wish to enable Clover for multiple projects at once, choose "Enable/Disable on...".

Four Clover views will be opened automatically:
- Coverage Explorer
- Test Run Explorer
- Clover Dashboard
- Test Contributions


You can always open them from "Window > Show View > Other ... > Clover":

Building and running application
Build your project as usual. In order to run it, choose "Run with Clover" button from tool bar:

Reviewing coverage results
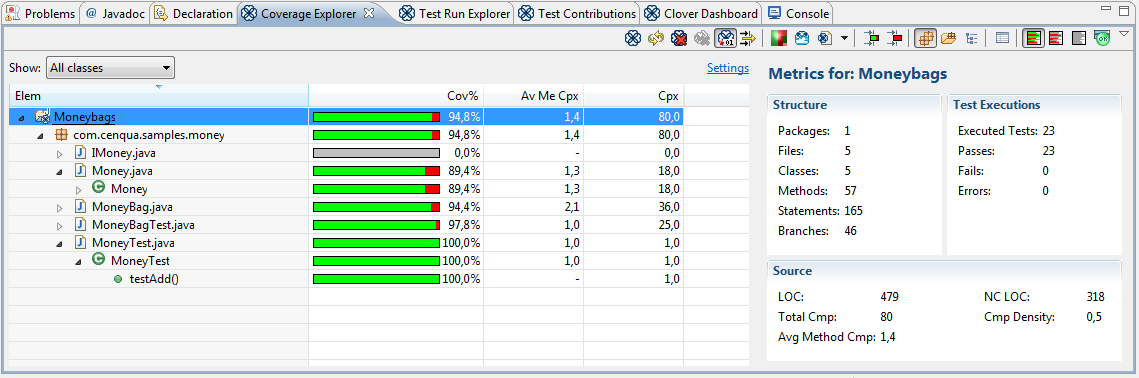
Coverage Explorer
It's the best place to start. You will see coverage and metrics for all instrumented projects.
Clover Dashboard
It's a place where you can have a quick overview of your project and find hints about code areas you should focus on:
- Coverage - shows percentage coverage of the project
- Test Results - shows percentage of passed tests as well as duration
- Most Complex Packages - lists several packages with the highest complexity -> refactor
- Most Complex Classes - as above, but on a class level -> refactor
- Top Project Risks - the most complex and the least tested classes -> refactor and/or write more tests
- Least Tested Methods - methods with the lowest test coverage -> write more tests

Java Editor
To view coverage information on a line-by-line basis, Clover adds colored annotations to your project's Java source code editors.

Colors used for background highlighting are as follows:
Color | Meaning |
|---|---|
Green | Coverage from passing tests or due to execution outside tests (e.g. main() method). |
Squiggly Red Lines | Partial branch coverage (caused when only one part of a branch has been covered). |
Yellow | Failed test coverage (where coverage has only been caused by one or more failing tests and no passing tests). |
Grey | Filtered out code. |
Red | Code with no coverage. |
A left margin ruler shows three color markers:
- left half - green if at least part of line is covered, yellow if at least part of line is covered but test has failed, red for line not covered at all (it's an "optimistic marker")
- right half - red if at least part of line is not covered, yellow if at least part of line is covered but test has failed, green for fully covered line (it's a "pessimistic marker")
- right strip - dark green for coverage related with passed tests, dark yellow for coverage related with failed tests
Test Run Explorer
The Test Run Explorer view, lets you explore your recently run tests - showing whether they passed or failed, their duration and any error messages that they generated. Furthermore, it allows you to explore the code coverage caused by an individual test, a test class, a package or even your entire project.
After running tests in a Clover-enabled project, on the left-hand side of this view you will see a tree of tests that were run. On selecting an element on the left-hand side, the right-hand side displays all the application (i.e. non-test) classes that had coverage caused by the selection.
The right-hand table displays not only the names of the classes that were partially or fully covered by the test methods, but also the percentage of class' total coverage that is attributable to the test method (the test method's coverage contribution) as well as the percentage of the class' coverage that was attributable only to the selected test method (the test method's unique coverage).

Test Contributions
The Test Contributions view shows unit tests and methods that generated coverage for the currently opened and selected Java source file. As you switch between Java source file editors, the top most tree is updated with the test methods that contributed to coverage of this file. The bottom tree tracks the test methods that contributed to coverage of the file at the current cursor position.
The Test Contributions view allows you to better understand the relationship between your test code and your application code.

Coverage Cloud Report
Coverage cloud report are a great way to work out the classes that form major risks (low coverage but high complexity) to your project and its packages, and also to highlight potential quick wins for increasing the overall project or per-package coverage. The coverage cloud report can be generated by right clicking on your Clover-enabled project in the Coverage Explorer view or Test Run Explorer view and selecting Generate Coverage Cloud.


Coverage Treemap Report
The coverage treemap report allows simultaneous comparison of classes and package by complexity and by code coverage. The treemap is divided by package (labeled) and then further divided by class (unlabeled). The size of the package or class indicates its complexity (larger squares indicate great complexity). Colors indicate the level of coverage (bright green - most covered, bright red - uncovered).
The treemap cloud report can be generated by right clicking on your Clover-enabled project in the Coverage Explorer and selecting Generate Coverage Treemap.


Congratulations! You now know basics of Clover for Eclipse plugin - enough to start your daily work with it.
If you like to learn more, read the 2. Exploration of coverage in Eclipse chapter.