Upgrading Jira with a fallback method
You've chosen to upgrade Jira Server or Data Center with a fallback method.
Skip to
About the fallback method
The fallback method allows you safely and quickly roll back to your previous version if the upgrade process takes longer than expected, or if you encounter any issues.
This method is especially useful for:
- Enterprise environments where Jira is mission-critical for the business, and you can't allow prolonged downtime.
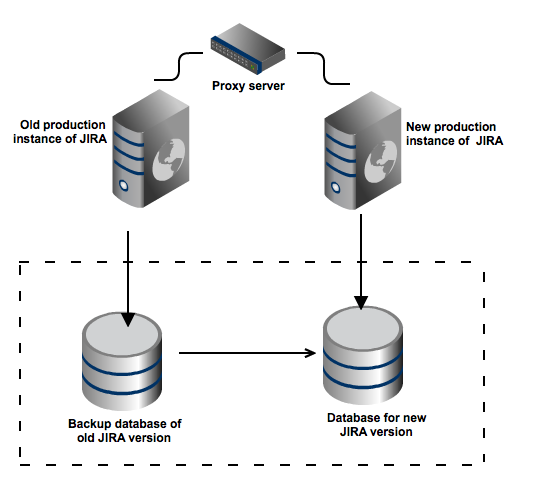
To be able to quickly change the Jira instance your users are being redirected to, you'll need to set up a proxy server. By doing so, you'll have a quick way of redirecting them either to the new instance of Jira (if you're happy with the upgrade), or to the old one (if something went wrong). Your current Jira environment will be left untouched, and you'll be replicating it to a new location.
This graphic illustrates the process described in this document. For simplicity, the illustration shows how you can perform an upgrade using two different pieces of hardware. However, you can just as easily install Jira in different directories on the same server to test and perform an upgrade. In this case, simply ensure that you use separate installation and database directories during the testing.
Set up a proxy server
Set up a reverse proxy, such as a load balancer. The proxy server lets you redirect users to a different Jira server without having to wait for a DNS change. If, at any point during the upgrade process, you encounter issues you can't resolve, you can restart your existing Jira instance and reconfigure the proxy server to point to the old Jira instance.
If you use monitoring, API calls (such as SOAP, REST, or CLI), or scripts associated with your production server, update them with the new proxy information.
Please see the following documentation for further information on configuring Apache:
Shut down Jira and create backups
Shut down your existing Jira, so that users don't create new data. Next, create backups of your database, and the home and installation directories.
- Back up your database and confirm the backup was created properly.
Back up your installation directory and home directory.
Set up a new Jira instance
The easiest way to set up a new environment is to use the procedure described in Creating a test environment for Jira, where you copy the whole Jira into a new directory.
You can also just install the new Jira instance from scratch, and then restore the database, home directory, and all your customizations. However, replicating your old instance might be a better idea, because you'll be able to test the upgrade on it.
Upgrade Jira
Perform a regular upgrade on your new Jira instance. Whether you choose the installer or manual is up to you.
- Upgrading Jira (installer)
- Upgrading Jira (manual)
- CLUSTER Upgrading Jira Data Center (installer)
- CLUSTER Upgrading Jira Data Center (manual)
Verify the upgrade and redirect the proxy
Take a look around your new instance and verify that everything is working properly:
- All good
If you're happy with the outcome, redirect the proxy server to the new Jira instance. - Not really
If something is not right, redirect the proxy server to the old Jira instance. Your users can resume work, while you prepare for the new upgrade.