Upgrade a Bitbucket cluster manually without downtime

Still need help?

The Atlassian Community is here for you.

Ask the community

This document provides step-by-step instructions on how to perform a rolling upgrade on deployments with little or no automation. These instructions are also suitable for deployments based on our Azure templates.

tip/resting Created with Sketch.

For an overview of rolling upgrades (including planning and preparation information), see Upgrade Bitbucket without downtime.

On this page:

Step 1: Download upgrade files

Before you start the upgrade, download the right Bitbucket version first. You'll be installing this on each node. Remember, you can only upgrade to a higher bug fix version (for example, from Bitbucket 7.9.0 to 7.9.4). Download the file directly from here:

https://www.atlassian.com/software/bitbucket/download

Alternatively, you can also use the Pre-upgrade planning tool to help you download a compatible bug fix version. Choose   > Administration > Plan your upgrade to open the tool.

Step 2: Enable upgrade mode

  1. Go to  > Administration > Rolling upgrades.
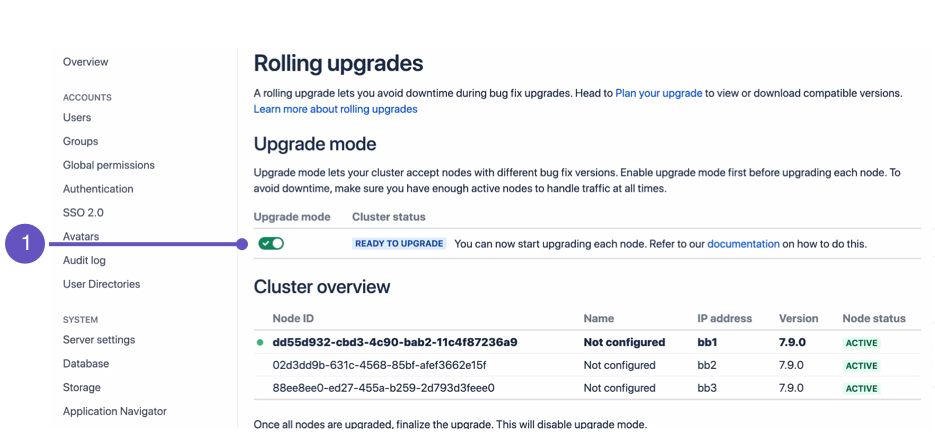
  2. Select the Upgrade mode toggle (1).

Enabling upgrade mode allows your cluster to accept nodes running a later bug fix version. This lets you upgrade one node and let it rejoin the cluster (along with the other non-upgraded nodes). Both upgraded and non-upgraded active nodes work together in keeping Bitbucket available to all users.

You can disable Upgrade mode as long as you haven’t upgraded any nodes yet.

Step 3: Upgrade the first node

For most environments, upgrading a node during a rolling upgrade consists of four phases:

Disconnecting the node from the load balancer
tip/resting Created with Sketch.

Start with the least busy node

We recommend that you start upgrading the node with the least number of running tasks and active users. This will typically be the node with the lowest amount of CPU usage. 

When you disconnect a node from the load balancer, user requests will no longer be routed to the node. The following table provides guidance how to do so for popular load balancers:

NGINX

NGINX defines groups of cluster nodes through the upstream directive . To prevent the load balancer from connecting to a node, delete the node's entry from its corresponding upstream group. Learn more about the upstream directive in the ngx_http_upstream_module module

HAProxy

With HAProxy, you can disable all traffic to the node by putting it in a maint state:

set server <node IP or hostname> state maint

Learn more about forcing a server's administrative state

Apache

You can disable a node (or "worker") by setting its activation member attribute to disabled. Learn more about advanced load balancer worker properties in Apache

Azure Application Gateway

We provide a deployment template for Bitbucket Data Center on Azure; this template uses the Azure Application Gateway as its load balancer. The Azure Application Gateway defines each node as a target within a backend pool. Use the Edit backend pool interface to remove your node's corresponding entry. Learn more about adding (and removing) targets from a backend pool

Shutting down Bitbucket gracefully on the node

With upgrade mode enabled, you can now upgrade your first node. Start by shutting down Bitbucket gracefully on the node:

  1. Access the node through a command line or SSH.

  2. Shut down Bitbucket gracefully on the node. This will provide Bitbucket with some time to finish all of its tasks first before going offline. If you installed Bitbucket manually, run the bin/stop-bitbucket.sh script to gracefully shut down Bitbucket. Learn more about gracefully shutting down Bitbucket

  3. Wait for the node to go offline. You can monitor its status on the Node status column of the Rolling upgrade page’s Cluster overview section.

Extracting the downloaded files into a new directory

Once the node’s status is offline, you can start upgrading the node. Copy the Bitbucket files you downloaded (from Step 1: Download upgrade files section) to the node’s local file system:

To upgrade the first node:
  1. Extract the files to a directory. This will be your new installation directory and it must be different from your existing installation directory.
  2. Update the value of BITBUCKET_HOME in the <Installation-directory>/bin/set-bitbucket-home.sh file so the new Bitbucket installation points to your existing Bitbucket home directory.

    If you’re using a BITBUCKET_HOME environment variable to specify the home directory location, no change is required.

  3. Copy any other immediately required customizations from the old version to the new one. For example, if you aren’t running Bitbucket on the default ports or if you’re managing users externally, you'll need to update or copy the relevant files.

    If you’ve configured Bitbucket to run as a Linux service, don't forget to update its service configuration as well. Learn more about running Bitbucket as a Linux service

  4. Start Bitbucket on the node. Learn more about starting Bitbucket

Why doesn’t Bitbucket search work after the upgrade?

When you’re starting up your Bitbucket Data Center instance after the upgrade, the bundled search server won’t run. Instead, the remote search will be started.

This happens because Data Center instances use the remote search, not the bundled search.

During the upgrade, the --no-search flag is inserted in the /etc/init.d/atlbitbucket file. This flag allows running the remote search but blocks the bundled search.

Reconnecting the node to the load balancer

After Bitbucket starts successfully on the node, reconnect it to the load balancer. This will allow the node to rejoin the cluster. Wait for it to show up in the Cluster overview with an Active status. As soon as the first upgraded node joins the cluster, your cluster status will transition to Mixed. This means that you won’t be able to disable Upgrade mode until all nodes are running the same version.

Step 4: Upgrade all other nodes individually

After starting the upgraded node, wait for it to show up on the Cluster overview with an Active status. When it does, you can start upgrading another node using the instructions from the previous step. Do this for each remaining node – as always, we recommend that you upgrade the node with the lowest level of CPU activity.

Step 5: Finalize the upgrade

Once all nodes are Active and running the same upgraded version, the Finalize upgrade button will become enabled. Click this to complete the rolling upgrade.

After completing the rolling upgrade, you should:


Troubleshooting

Node errors during rolling upgrade

If a node’s status transitions to Error, it means something went wrong during the upgrade. You can’t finish the rolling upgrade if any node has an Error status. However, you can still disable Upgrade mode as long as the cluster status is still Ready to upgrade.

There are several ways to address this:

  • Shut down Bitbucket gracefully on the node. This should disconnect the node from the cluster, allowing the node to transition to an Offline status.

  • If you can’t shut down Bitbucket gracefully, shut down the node altogether.

Once all active nodes are upgraded with no nodes in Error, you can finalize the rolling upgrade. You can investigate any problems with the problematic node afterwards and re-connect it to the cluster once you address the error.

Disabling upgrade mode

You can disable Upgrade mode as long as all nodes in the cluster:
  • haven't been upgraded yet
  • aren't in an Error state

The cluster's status will transition to Mixed if an upgraded node joins the cluster or a node enters an error state. 

Mixed status with Upgrade mode disabled

If a node is in an Error state with Upgrade mode disabled, you can't enable Upgrade mode. Fix the problem or remove the node from the cluster to enable Upgrade mode. 

Rolling back to the original version

To roll back upgraded nodes to their original version:

  1. Access the node through a command line or SSH.

  2. Shut down Bitbucket gracefully on the node. 

  3. Wait for the node to go offline. You can monitor its status on the Node status column of the Rolling upgrade page’s Cluster overview section.

  4. Start Bitbucket on the node from your old installation directory. You should not see the setup wizard.
  5. If you configured Bitbucket to run as a Linux service, don't forget to update its service configuration as well. Learn more about running Bitbucket as a Linux service.

Once all nodes are running the same version, the cluster’s status will revert back to Ready to upgrade. This will also allow you to disable Upgrade mode.

Traffic is disproportionately distributed during or after upgrade

Some load balancers might use strategies that send a disproportionate amount of active users to a newly-upgraded node. When this happens, the node might become overloaded, slowing down Bitbucket for all users logged in to the node.

To address this, you can also temporarily disconnect the node from the cluster. This will force the load balancer to re-distribute active users between all other available nodes. Afterwards, you can add the node again to the cluster.

Last modified on Nov 8, 2022

Was this helpful?

Yes
No
Provide feedback about this article
Powered by Confluence and Scroll Viewport.