Upgrade a Confluence cluster on AWS without downtime
This document provides step-by-step instructions on performing a rolling upgrade on an AWS deployment orchestrated through CloudFormation. In particular, these instructions are suitable for Confluence Data Center deployments based on our AWS Quick Starts.
For an overview of rolling upgrades (including planning and preparation information), see Upgrade Confluence without downtime.
Step 1: Enable upgrade mode
To enable upgrade mode:
- Go to Administration
 > General Configuration > Rolling upgrades.
 - Select the Upgrade mode toggle (1).
Screenshot: The Rolling upgrades screen.
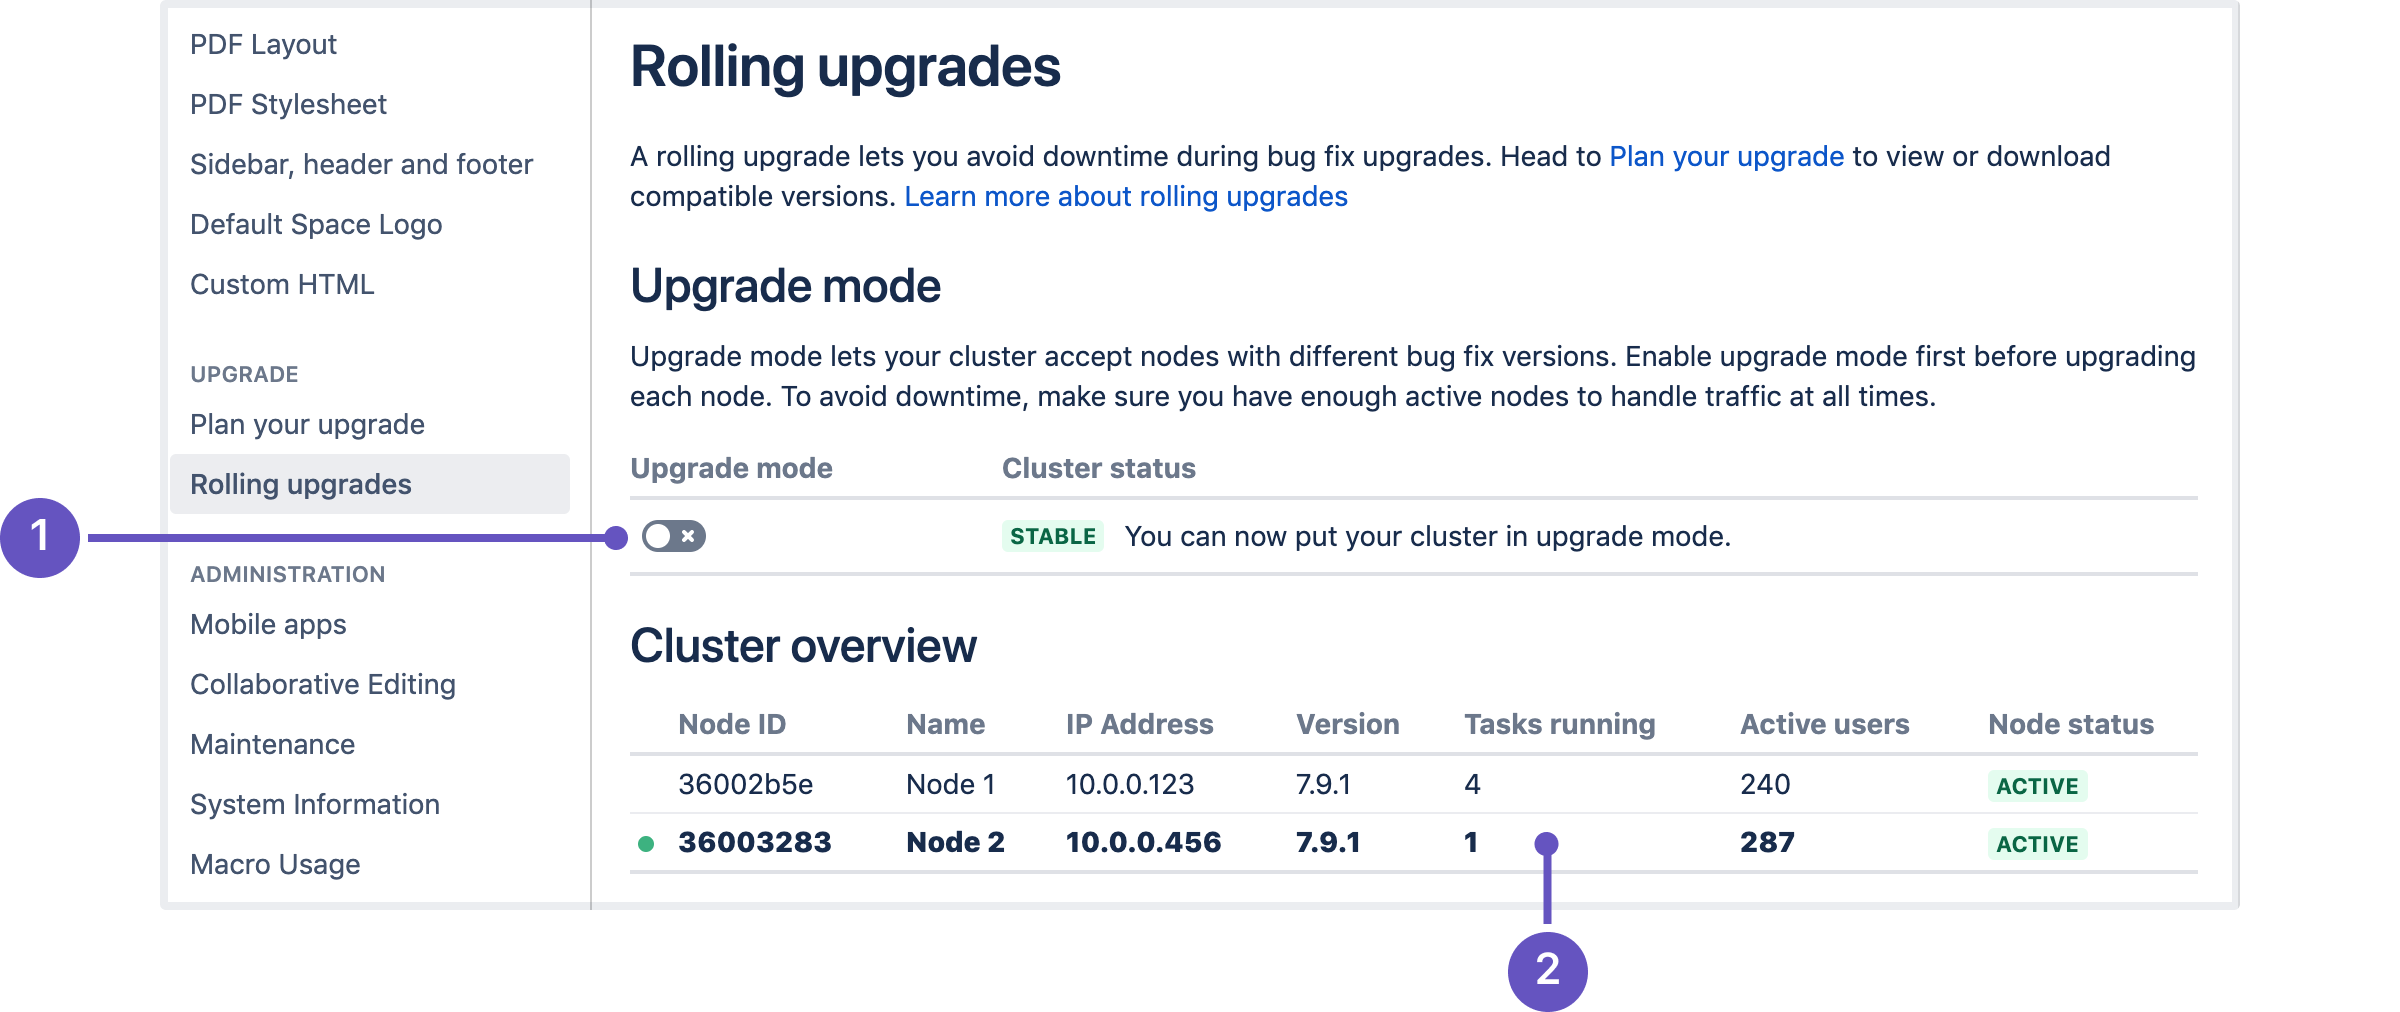
The cluster overview can help you choose which node to upgrade first. The Tasks running (2) column shows how many long-running tasks are running on that node, and the Active users shows how many users are logged in. When choosing which node to upgrade first, start with the ones with the least number of tasks running and active users.
Upgrade mode allows your cluster to temporarily accept nodes running different Confluence versions. This lets you upgrade a node and let it rejoin the cluster (along with the other non-upgraded nodes). Both upgraded and non-upgraded active nodes work together to keep Confluence available to all users. You can disable upgrade mode as long as you haven’t upgraded any nodes yet.
Step 2: Find all the current application nodes in your stack
In AWS, note the Instance IDs of all running application nodes in your stack. These are all the application nodes running your current version. You'll need these IDs for a later step.
In the AWS console, go to Services > CloudFormation. Select your deployment’s stack to view its Stack Details.
- Expand the Resources drop-down. Look for the ClusterNodeGroup and click its Physical ID. This will take you to a page showing the Auto Scaling Group details of your application nodes.
- In the Auto Scaling Group details, click on the Instances tab. Note all of the Instance IDs listed there; you'll be terminating them at a later step.
Step 3: Update your CloudFormation template
Your deployment uses a CloudFormation template that defines each component of your environment. In this case, upgrading Confluence means updating the version of Confluence used in the template. During the upgrade, we highly recommend that you add a node temporarily to your cluster as well.
- In the AWS console, go to Services > CloudFormation. Select your deployment’s stack to view its Stack Details.
- In the Stack Details screen, click Update Stack.
- From the Select Template screen, select Use current template and click Next.
- Set the Version parameter to the version you’re updating to. Since this is a rolling upgrade, you can only set this to a later bug fix version.
- Add an extra node to your cluster. This will help ensure that your cluster won't have a shortage of nodes for user traffic. To do this, increase the value of the following parameters by 1:
- Maximum number of cluster nodes
- Minimum number of cluster nodes
- Select Next. Click through the next pages, and then to apply the change using the Update button.
After updating the stack, you will have one extra node already running the new Confluence version. With Upgrade mode enabled, that node will be allowed to join the cluster and start work. Your other nodes won't be upgraded yet.
As soon as the first upgraded node joins the cluster, your cluster status will transition to Mixed. This means that you won’t be able to disable Upgrade mode until all nodes are running the same version.
Once the new upgraded node is running an in an Active state, you should check the application logs for that node, and log in to Confluence on that node to make sure everything is working. It's still possible to roll back the upgrade at this point, so taking some time to test is recommended.
Once you've tested the first node, you can start upgrading another node. To do that, shut down and terminate the node – AWS will then replace the node with a new one running the updated Confluence version.
Step 4: Upgrade another node
Start with the least busy node
We recommend that you start upgrading the node with the least number of running tasks and active users. On the Rolling upgrades page, you’ll find both in the Cluster overview section.
In Step 2, you noted the instance ID of each node in your cluster. Terminate the node where you gracefully shut down Confluence. To do this:
- In the AWS console, go to Services > EC2. From there, click Running Instances.
- Check the instance of matching the node where you gracefully shut down Confluence.
- From the Actions drop-down, select Instance State > Terminate.
- Click through to terminate the instance.
Each time you terminate a node, AWS will automatically replace it. The replacement will be running the new version of Confluence. Once the new node's status is Active, you can move on to upgrading another node.
Step 5: Upgrade all other nodes individually
At this point, your cluster should have two nodes running the new version of Confluence. You can now upgrade other nodes. To do so, simply repeat the previous step on another node. As always, we recommend that you upgrade the node with the least number of running tasks each time.
If your deployment uses standalone Synchrony, you may need to update the version used by each Synchrony node as well. To do this, terminate each Synchrony node one after the other after you upgrade all nodes to the new version.
Step 6: Finalize the upgrade
Finalize upgrade to a bugfix version
To finalize the upgrade:
- Wait for the cluster status to change to Ready to finalize. This won't happen until all nodes are active, and running the same upgraded version.
- Select the Finalize upgrade button.
- Wait for confirmation that the upgrade is complete. The cluster status will change to Stable.
Your upgrade is now complete.
Finalize upgrade to a feature version
To finalize the upgrade:
- Wait for the cluster status to change to Ready to run upgrade tasks. This won't happen until all nodes are active, and running the same upgraded version.
- Select the Run upgrade tasks and finalize upgrade button.
- One node will start running upgrade tasks. Tail the logs on this node if you want to monitor the process.
- Wait for confirmation that the upgrade is complete. The cluster status will change to Stable.
Your upgrade is now complete.
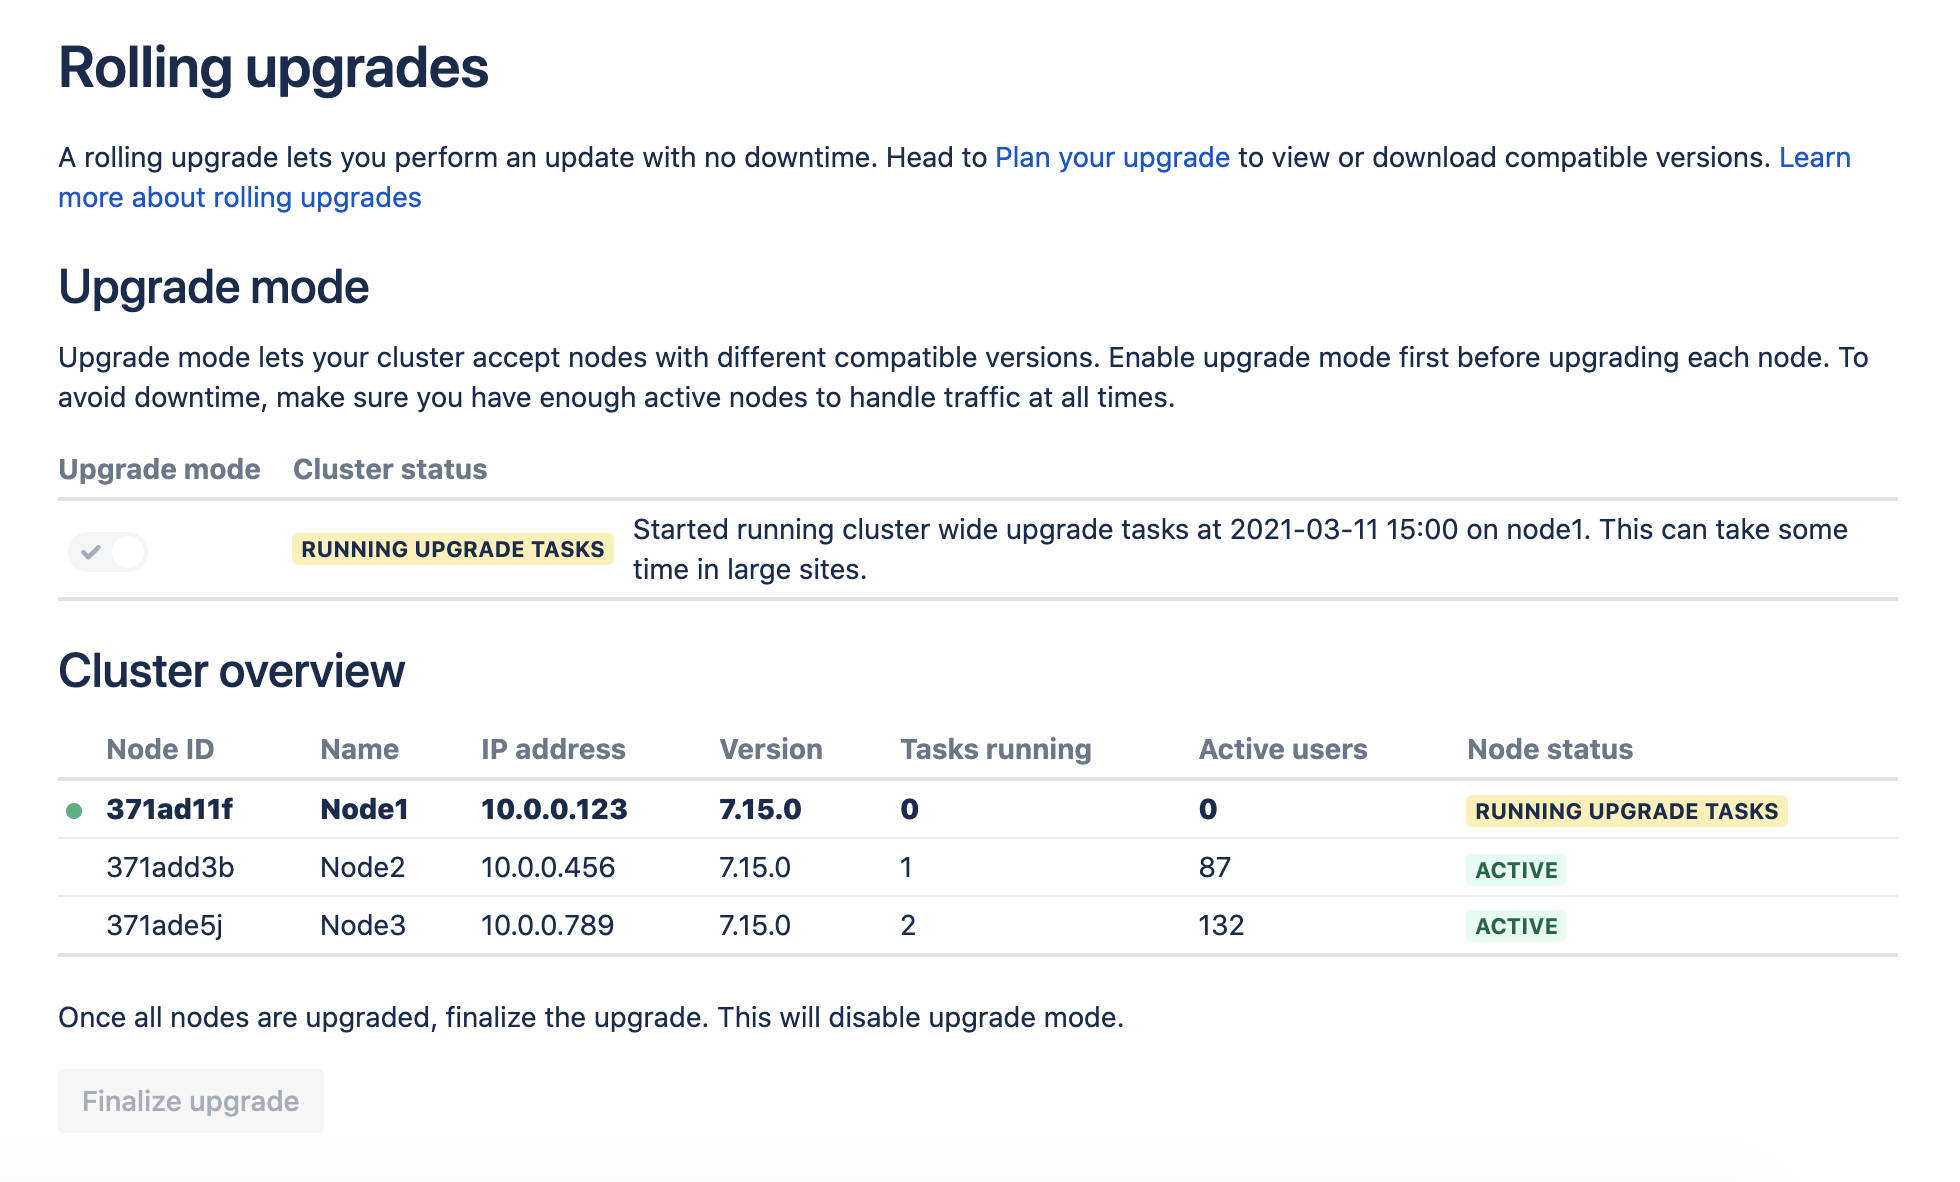
Screenshot: One cluster node running upgrade tasks for the whole cluster.
Step 7: Scale down your cluster
In Step 3, we added a node temporarily to the cluster as a replacement for each one we terminated. This was to help ensure we'd have enough nodes to handle normal user traffic. After finalizing the upgrade, you can remove that node:
- In the AWS console, go to Services > CloudFormation. Select your deployment’s stack to view its Stack Details.
- In the Stack Details screen, click Update Stack.
- From the Select Template screen, select Use current template and select Next.
- Decrease the value of the following parameters by 1:
- Maximum number of cluster nodes
- Minimum number of cluster nodes
- Select Next. Click through the next pages, and then to apply the change using the Update button.
You can now remove one node from your cluster without AWS replacing it. To do this:
- Choose the node with the least number of running tasks.
- Shut down Confluence gracefully on the node.
- Terminate the node.
Refer to Step 4 for detailed instructions.
Troubleshooting
Disconnect a node from the cluster through the load balancer
If an error prevents you from terminating a node, try disconnecting the node from the cluster through the load balancer. In the AWS Application Load Balancer, each node is registered as a target – so to disconnect a node, you'll have to de-register it. For more information on how to do this, see Target groups for your Application Load Balancers and Registered targets.
Traffic is disproportionately distributed during or after upgrade
To address this, you can also temporarily disconnect the node from the cluster. This will force the load balancer to re-distribute active users between all other available nodes. Afterwards, you can add the node again to the cluster.
Node errors during rolling upgrade
There are several ways to address this:
Shut down Confluence gracefully on the node. This should disconnect the node from the cluster, allowing the node to transition to an Offline status.
If you can’t shut down Confluence gracefully, shut down the node altogether.
Once all active nodes are upgraded with no nodes in Error, you can finalize the rolling upgrade. You can investigate any problems with the problematic node afterwards and re-connect it to the cluster once you address the error.
Roll back to the original version
Mixed status with Upgrade mode disabled
If a node is in an Error state with Upgrade mode disabled, you can't enable Upgrade mode. Fix the problem or remove the node from the cluster to enable Upgrade mode.