How to setup Jira Align Self-Hosted with non-default SQL instance and custom SQL Port
Summary
There could be multiple instances of SQL other than the default instance <MSSQLSERVER> using custom port. This article provides guidance on verifying non-default instances, custom port configure and setting up self-hosted Jira Align with a non-default instance.
Environment
Jira Align Self-Hosted
Solution
Step 1: Verify if the SQL server is using a default instance or a non-default named instance. If using a non-default instance, note its name.
- The default instance of the SQL server has the name "MSSQLSERVER". This can be seen next to the service name of SQL under services.msc. The non-Default instance has the instance name next to SQL Server service. Example: SQL Server(INSTANCE_NAME)

- When connecting to the SQL server via SQL Server Management Studio, it is not required to enter the instance name for the default instance. However, to connect to a non-default instance, it is required to enter server name as <Server_name>\<Instance_name>

- In the above screenshot example, the name of the non-default instance is "EXTRA_INSTANCE"
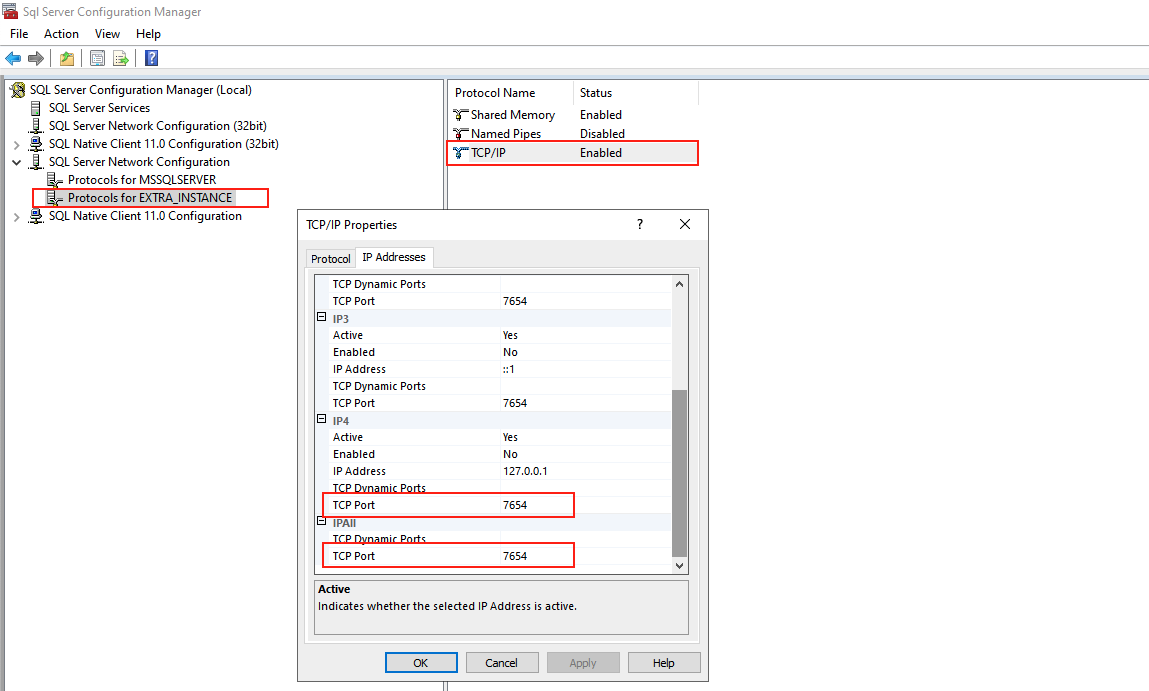
Step 2: Verify and determine if SQL is using the default port or custom port.
- Open SQL Server Configuration Manager > SQL Server Network configuration > Protocols for $INSTANCE_NAME$ > TCP/IP > right click > Properties > IP Addresses > IPv4/IPAll > TCP Port
- If the port defined is 1433, SQL server is using default port and no port related configuration is required
- If the port defined is not 1433, SQL server is using a non-default port
- Note the port number defined
- Example screenshot:
- Refer to https://learn.microsoft.com/en-us/sql/database-engine/configure-windows/configure-a-server-to-listen-on-a-specific-tcp-port on how to configure custom port for SQL
Step 3: Confirm that connection can be established using the custom SQL port via SQL Server Management Studio to Jira Align Database using the Server Name as <SQL_Server_Name>\<Instance_Name>,<custom_port>
- Example Screenshot:

Step 4: Config file editing:
- SQL Server name is defined under three files during the installation process:
- For Web Application - <Install_Drive>:\<JA_customer_name>\_Cust\web.config
- For each connector, <Install_Drive>:\<JA_customer_name>\<Jira_x>\AgileCraft_Jira.exe.config
- For Backoffice Service prior to 10.130: <Install_Drive>:\<JA_customer_name>\BackofficeService\AgileCraft.Backbone.exe.config
- For BackOffice Service for 10.130 and above: <Install_Drive>:\<JA_customer_name>\BackofficeService\AgileCraft.Backbone.dll.config
- In the above files, define the SQL server name in the SQL connection String as Data Source=<SQL_Server>\<Instance_Name>,<custom_port>
Example Syntax
<add name="Main"connectionString="Data Source=<SERVERNAME>\<Instance_Name>,<custom_port>;Initial Catalog=<JA_DB>;Integrated Security=False;User Id=<SQL_admin>;Password=<SQL_pwd>;MultipleActiveResultSets=True;Encrypt=yes;TrustServerCertificate=True;"/>Example based on the above screenshot:
<add name="Main"connectionString="Data Source=EC2AMAZ-32CB98R\EXTRA_INSTANCE,7654;Initial Catalog=ABCCORP;Integrated Security=False;User Id=sa;Password=12345678;MultipleActiveResultSets=True;Encrypt=yes;TrustServerCertificate=True;"/>