How to Change Text Box Length on a Screen UI in JIRA
Platform Notice: Data Center - This article applies to Atlassian products on the Data Center platform.
Note that this knowledge base article was created for the Data Center version of the product. Data Center knowledge base articles for non-Data Center-specific features may also work for Server versions of the product, however they have not been tested. Support for Server* products ended on February 15th 2024. If you are running a Server product, you can visit the Atlassian Server end of support announcement to review your migration options.
*Except Fisheye and Crucible
The information in this page relates to customisations in JIRA. Consequently, Atlassian Support cannot guarantee to provide any support for the steps described on this page as customisations are not covered under Atlassian Support Offerings . Please be aware that this material is provided for your information only and that you use it at your own risk.
Purpose
The purpose of this article is to show how to change the length of a text box area of a field in a screen without changing the JIRA UI source code. This can be done by simple CSS rules in Announcement Banner in JIRA. Configuring an Announcement Banner will give you an introduction on Announcement Banner in JIRA.
Solution
- For this example, the length of
SummaryandPrioritytext box in Issue Creation screen will changed to be the same (100px). - Click on "Create' to see Issue Creation Screen.

- Right-click on the text box of the field that you want to change the length. Click on
Inspect Element.

Take note of the
idof the field.
- Choose Administration > System. Select User Interface > Announcement Banner in the System panel below.
Keyboard shortcut: g + g + start typing announcement banner Place following CSS code in Announcement Banner and click on
Set Banner.<style> #summary /* The "id" of the "Summary" text box */ { max-width: 100px; /* This line will set the length of the text box to 100px */ } #priority-single-select /* The "id" of the "Priority" text box */ { max-width: 100px; /* This line will set the length of the text box to 100px */ } </style>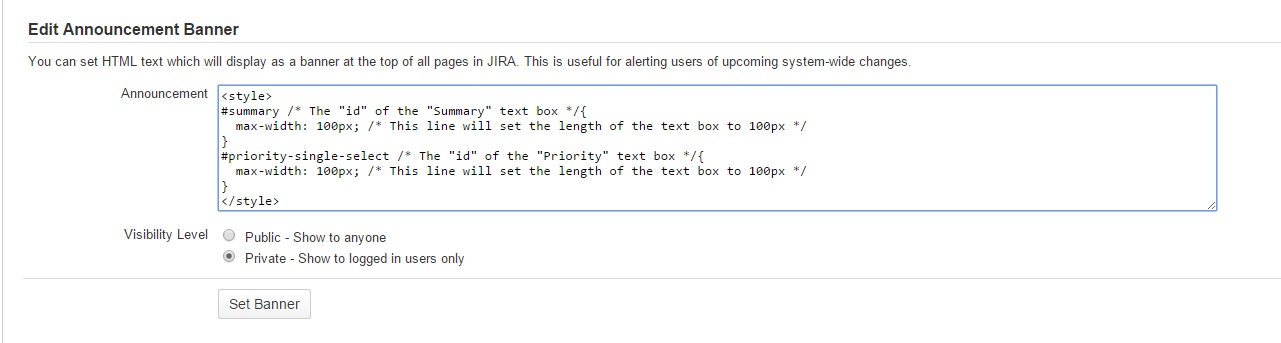
The result will be as following:
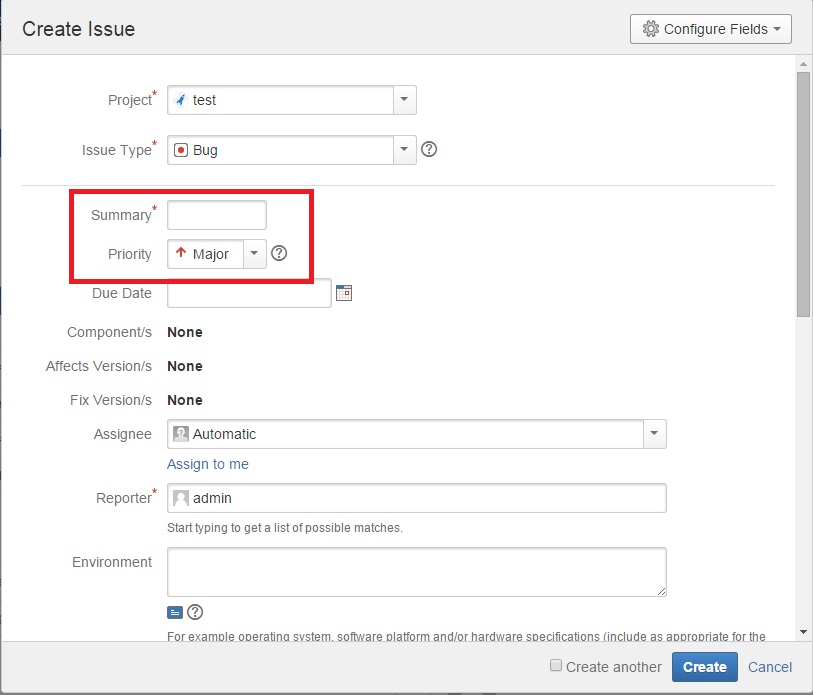
Note: The length of text box for
SummaryandPriorityfields are the same.