How to create issues using direct HTML links in Jira
Platform Notice: Data Center and Cloud By Request - This article was written for the Atlassian data center platform but may also be useful for Atlassian Cloud customers. If completing instructions in this article would help you, please contact Atlassian Support and mention it.
Support for Server* products ended on February 15th 2024. If you are running a Server product, you can visit the Atlassian Server end of support announcement to review your migration options.
*Except Fisheye and Crucible
The Jira functionality described on this page is not maintained as a supported component of Jira applications. Consequently, Atlassian can't guarantee to provide any assistance in configuring or implementing it.
This Jira functionality was disabled in Jira 9+.
We recommend using the Jira REST API instead of following the steps on this page, as the content is now quite outdated. Please see our Jira REST API Tutorials for further information.
![]() Additionally, all recent versions of Jira allow administrators to create Issue Collectors, which replaces the need to construct URLs as instructed in this knowledge base article.
Additionally, all recent versions of Jira allow administrators to create Issue Collectors, which replaces the need to construct URLs as instructed in this knowledge base article.
Summary
The purpose of this KB article is to explain how to create issues using direct HTML links in Jira
![]() If you would like for your users to create issues from another site, you can do so by putting links to your Jira application's create issue page. You can also populate the fields on the page with values to select the project, the issue type, or even the summary of the issue. This document will detail how to construct these links and how to populate the fields.
If you would like for your users to create issues from another site, you can do so by putting links to your Jira application's create issue page. You can also populate the fields on the page with values to select the project, the issue type, or even the summary of the issue. This document will detail how to construct these links and how to populate the fields.
![]() Note that this only pre-populates the Create Screen with desired values. You will still need to click on the 'Create' button manually to actually create the issue. It's not possible to automatically click/submit using this method.
Note that this only pre-populates the Create Screen with desired values. You will still need to click on the 'Create' button manually to actually create the issue. It's not possible to automatically click/submit using this method.
Environment
- Jira Data Center on any version below 9.0.0
- This Jira functionality was disabled in version 9.0.0 and above
Solution
The most basic HTML link to create issues has the following structure:
| Type of issue | Link |
|---|---|
| Regular Issue | |
| Sub-tasks | |
where
Component | Description | Example |
|---|---|---|
[Jira BASE URL] | The Base URL of the Jira application you wish to create issues in | http://Jira.atlassian.com |
[ARGUMENTS] | List of key-value pairs separated by '&' which represent the field and its value to be set in the create issue screen | pid=10420&issuetype=4 |
[DESCRIPTION] | The link description visible to users | create an issue in Test Project |
| [PARENTID] | The ID of the parent issue you want to create a sub-task for. Note that you cannot fill in other fields (eg. summary, description) when creating sub-tasks | 10000 |
Jira Base URL
This Base URL is the same as the Jira Base URL you wish to create issues in. This can be found in Jira Admin > System > General Configuration > Settings. For example, http://Jira.atlassian.com is the base URL of the Jira application running at Atlassian.
The Arguments
If you need help finding the Project ID or the Issue Key ID, check the following knowledge base articles:
The list of key-value pairs included will define which fields will have what values set. The argument list has the following properties:
- Each key-value pair is separated by an '&'
- For Example: '[keyValuePair]&[keyValuePair]&[keyValuePair]'...
- For Example: '[keyValuePair]&[keyValuePair]&[keyValuePair]'...
- Each key-value pair has the form 'key=value' where the key is a field name and the value is the desired value to be set for its corresponding field
- For Example: 'pid=10420&issuetype=1&summary=helloWorld&description=greetings'...
- For Example: 'pid=10420&issuetype=1&summary=helloWorld&description=greetings'...
- The list must comply with HTML link syntax, meaning that all characters must be properly escaped.
- Characters like space cannot be used directly, they must be encoded (escaped). To use a space, we would replace the space with a '+' or '%20' which is the space equivalent.
An excellent HTML URL-encoding reference listing all the characters and their corresponding encoded symbol can be found here. - For Example: 'summary=This+is+a+summary%20with%20escaped+spaces'
- Characters like space cannot be used directly, they must be encoded (escaped). To use a space, we would replace the space with a '+' or '%20' which is the space equivalent.
As you can see, constructing the argument list is relatively simple. All we need is the name of the fields we want to set values for, and just structure it as above.
Fields that are not set will simply be assigned their normal default values. The issue is not created until the user submits the form, which includes a validation check to confirm the field values are correct.
Finding out the field names and their values
Now that we know how to construct the URL structure for direct issue creation, we need to know how to identify the IDs to be added to it.
The easiest way to achieve this is by creating a "base issue", that is set with all of the values you want to use on the HTML link, and then view the values stored on the JSON representation of the issue by accessing the following REST endpoint:
https://<yourinstanceurl>/rest/api/2/issue/<issuekey>?expand=names A few helpful notes:
- Be sure to replace '<yourinstanceurl>' and '<issuekey>' with your instance base URL and the "base issue" respectively.
- If your URL contains a context path, be sure to also add it to the URL.
- To facilitate the visualization of the data, you can download an extension to beautify your JSON results. We use JSONView extension for Chrome.
Example of how the REST results look like:
Here, the 'issuetype' ID would be '10002', and the project 'pid' would be '10100'.
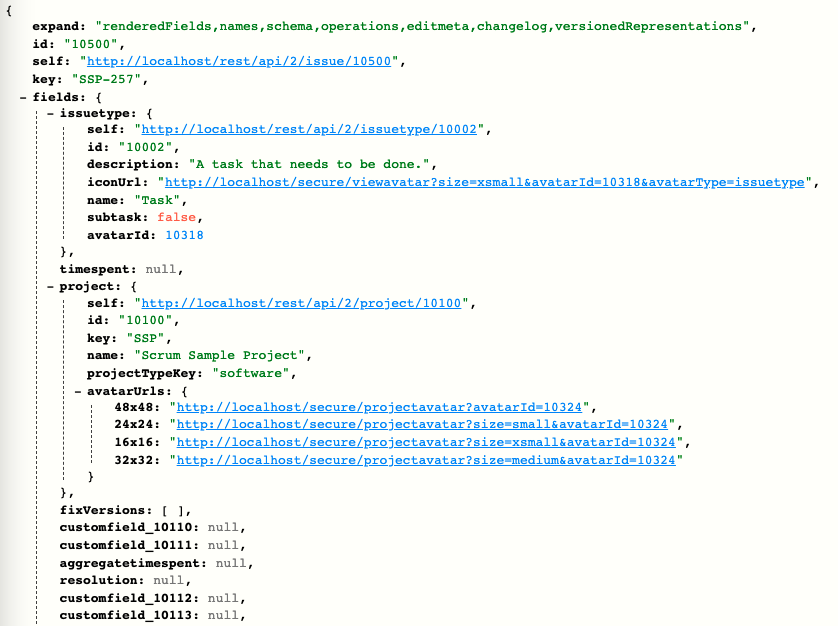
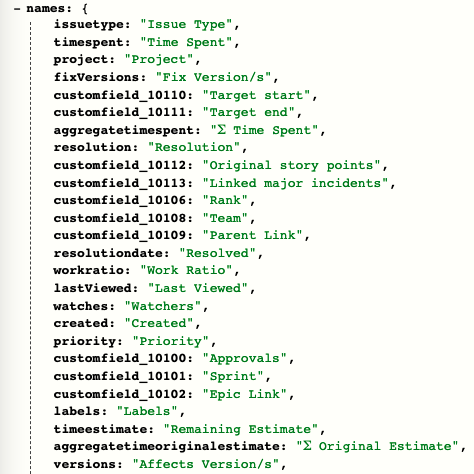
![]() Since we've added the '?expand=names' parameter to the URL, we get a helpful translation between the system name for the field and the name that is displayed on the UI at the bottom of the page.
Since we've added the '?expand=names' parameter to the URL, we get a helpful translation between the system name for the field and the name that is displayed on the UI at the bottom of the page.
The following table shows a sample list of the standard Jira fields with their name (key), the type of value expected, and an example of the value:
Display Name | Key | Value Type | Value Examples |
|---|---|---|---|
Project | pid | Project Id | ' 10420' |
Issue Type | issuetype | Issue Type Id | standard Jira issue type values range from '1' to '4' |
Summary | summary | Plain Text | 'issue+created%20via+link' |
Priority | priority | Priority Id | standard Jira priority values range from '1' to '5' |
Due Date | duedate | Date | '15-Dec-2005' - may have a different format depending on your Jira date settings |
Components | components | Component Id | '10014' |
Affects Version/s | versions | Version Id | '10015' |
Fix Version/s: | fixVersions | Version Id | '10015' |
Assign To | assignee | Username | 'admin' or 'sam@atlassian.com' |
Reporter | reporter | Username | 'admin' or 'sam@atlassian.com' |
Environment | environment | Plain Text | 'this+is+the+environment' |
Description | description | Plain Text | 'this+is+the+description' |
| Labels | labels | Plain Text | Note that, since the Labels field can contain a list of labels, it is possible to add multiple labels using the Create Issue URL. Examples:
|
Custom Fields
The key and value for custom fields can be found in the same way as above. The name/key to be used on the HTML link is prefixed by 'customfield_' followed by their custom field id. For example: 'customfield_10000'
![]() Please note that when setting values for Custom Fields with defined values (Select List CF) you'll need to apply the option ID to the URL. You can get this ID through the same methods described above, or alternatively pass an 'invalid' value to the URL, and Jira will list you the available options for that custom field.
Please note that when setting values for Custom Fields with defined values (Select List CF) you'll need to apply the option ID to the URL. You can get this ID through the same methods described above, or alternatively pass an 'invalid' value to the URL, and Jira will list you the available options for that custom field.
For example, by setting '&customfield_10300=xyz' to the URL, Jira will list the proper values when loading the page. After that, you may simply replace it with the correct one, such as '&customfield_10300=10302' if you want to select "Option 3".

Examples
Here are some simple examples that provide links to create issues in a Jira project.
To create an improvement issue in the Test project, click here |
|
|
|
Here is an example to create a sub-task. No other fields can be populated. |